ASUS Error: Invalid Signature Detected. Check Secure Boot Policy in Setup
ASUS laptops users quite often facing a problem when the computer is loading and the following error message appears: Secure Boot Violation. Invalid signature detected. Check Secure Boot Policy in Setup.
According to the text of the message, the operating system can’t be loaded because of the detection of an invalid signature by the security policy. This laptop error can be fixed without contacting the service center, and in this article, we will consider how to do this.

Error Invalid signature detected, as a rule, can occur in the following cases:
- When you upgrade your old Windows to Windows 10 or install a new Windows 10 build;
- In case you installed a second operating system on your laptop (dual boot configuration);
- When you connect a new or additional HDD or SSD drive;
- After BIOS/UEFI factory reset or when it is flashed;
- If you enable the Digital Signature Driver Verification.
In this post, we’ll show you some simple ways to fix the problem and restore the system boot to a normal state.
Change “OS Type”
If the error occurs after connecting a second disk or a USB flash drive (which you are not going to use for the OS boot), make sure that you are booting from the correct drive (from the hard disk or Windows Boot Manager) or disconnect the attached drive—perhaps this will fix the problem.
The next step is to check the Secure Boot settings in BIOS or UEFI (you can access this screen with the system settings is either immediately after clicking OK in the error message or by standard BIOS input methods, by pressing F1, F2, Fn + F2 or Delete).
In most cases, you just need to disable Secure Boot (or Security Boot Control) by changing its state to Disabled. In most ASUS laptops, this option is located in the Security, Authentication or Boot tab. If there is an OS type selection entry in UEFI, then try to choose Other OS (even if you have Windows). If Enable CSM (or Launch CSM) option is available, change it to Enabled.

After the changes made to the BIOS, they need to be saved. Usually, the settings are saved with the F10 key, but again, it depends on the BIOS version.
Disable Integrity Checks
Rarely the error can occur because of unsigned drivers, that conflicting with the system protection module. As a solution, first of all try to disable driver signature verification on Windows. To do this, boot from the Windows 10 install media and on the first installation screen press Shift + F10. At the Command prompt run the following commands:
After that, the system should boot. The next step is when the user will need to find and remove the problem driver, then enable driver signature verification (security of the computer will be under serious threat without this).
In some cases, an Invalid signature detected error appears after the UEFI/BIOS update performed. In this case, the bootloader can detect a mismatch between saved keys and the operating system. To reset the keys, in the Key management menu delete all protection keys and create them again (or leave “not installed”).
Recovery Drive
If none of the above helps, you should resort to reinstalling Windows via the recovery drive system. To do this, you need to record Windows 10 to the USB flash drive and start from it via UEFI. After that, go to the “Troubleshoot” → “Recover from a drive” section.
Next, select the action for your files ― save them or delete them. Then click “Recover” to begin the reinstallation process. At the end of the process, the computer will restart. After that, follow the initial Windows setup instructions.
System Restore
An alternative to reinstalling is to use the system restore point on the local drive. Of course, for this, it must be created at a time when Windows was fully operational. If there is such a recovery point:
- Enter the “Troubleshoot” section on USB Flash with Windows 10 (described above).
- Select “Advanced options”.
- Press “System Restore”.
- Choose a restore point, then press “Next”.
- To start the operation, press “Finish” and wait for it to finish.
After that, the system will be restored to the specified operating state.
Ошибка invalid signature detected check secure boot policy in setup (как исправить)
Causes of Windows 10 problem: Invalid signature detected, Check secure Boot Policy in Setup?
Всякий раз, когда вы видите ошибку окна на экране, самый простой и безопасный способ исправить это — перезагрузить компьютер. Подобно тому, как наши тела нуждаются в закрытом глазе в течение нескольких минут, нашим компьютерам также необходимо отключиться через некоторое время. Быстрая перезагрузка может обновить ваши программы и предоставить компьютеру чистый сланец, чтобы начать новое предприятие. Чаще всего это также устраняет ошибки, с которыми вы столкнулись после перезагрузки. Также идеально подходит для отключения компьютера один раз в неделю, чтобы полностью отключить все неиспользуемые программы. Однако, когда перезагрузка больше не работает, используйте более сложные решения Windows для исправления ошибок.
Увидеть, что Windows не загружается, может быть стрессовым, но есть несколько способов устранения ошибок при загрузке. Большинство случаев ошибок при загрузке заставят Windows автоматически запустить настройку восстановления. Он будет сканировать проблемы и попытаться их исправить. Другой способ — загрузить из раздела восстановления или установочного носителя Windows. На вашем компьютере имеется специальный раздел восстановления, который позволяет загружаться в среде восстановления Windows. Физическому диску нет необходимости.
Однако на некоторых компьютерах нет раздела восстановления, поэтому необходимо использовать физический диск, содержащий установщик Windows. Если эти два параметра не работают, вы можете перейти к командной строке на странице «Дополнительные параметры», чтобы устранить проблему.
Как исправить ошибку Secure Boot Violation
Поскольку рассматриваемая ошибка характерна для ноутбуков от компании Asus, ниже будут приведены рекомендации и советы по ее устранения именно на компьютерах тайваньской компании. Однако если у вас она возникла на другом ноутбуке, действия по устранению ошибки Secure Boot Violation практически не будут отличаться.
Первое, что нужно сделать при появлении сообщения «Invalid signature detected. Check Secure Boot Policy in Setup», это перейти в BIOS или UEFI, в зависимости от того, что используется на ноутбуке. В большинстве случаев, чтобы перейти в BIOS, достаточно нажать на «ОК» в сообщении об ошибке, но если этот способ не сработал – зайдите в него стандартным образом, нажав Del, F2 или другую функциональную кнопку при пуске компьютера.
Оказавшись в BIOS/UEFI, нужно выключить Secure Boot – часто этого бывает достаточно, чтобы исправить ошибку «Invalid signature detected. Check Secure Boot Policy in Setup». В UEFI компьютеров ASUS, чтобы отключить Secure Boot нужно перейти в раздел Boot и установить в «OS Type» вариант «Other OS».
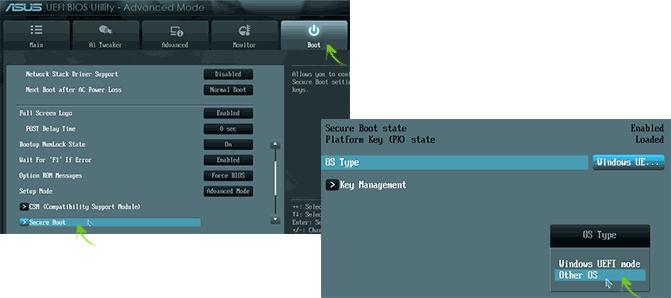
Обратите внимание: В некоторых версиях BIOS/UEFI на Asus опция Secure Boot отключается стандартным образом – необходимо найти данную настройку в списке (чаще всего в разделе Authentication) и установить вариант Disable для нее. Если после отключения Secure Boot ошибка Secure Boot Violation не была устранена, вероятнее всего она связана с проблемами считывания неподписанных драйверов устройств
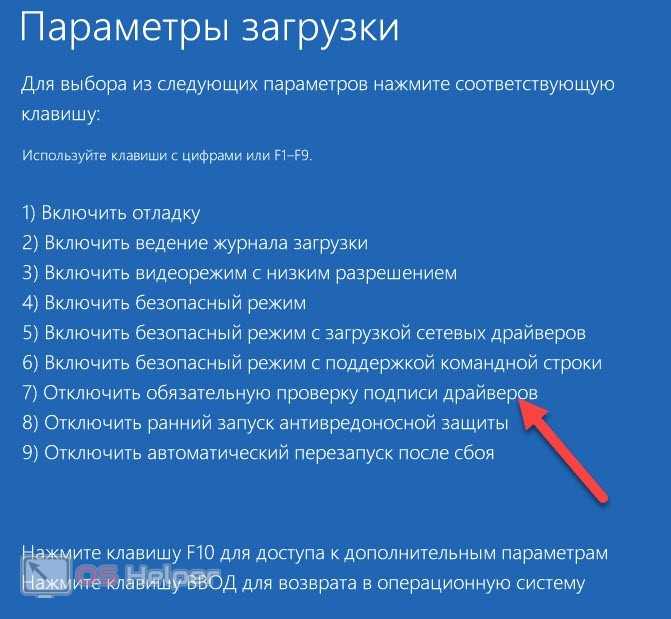
Поскольку в Windows зайти не удается, отключить проверку цифровой подписи драйверов можно только через среду восстановления. Для этого нужно запустить систему с загрузочного диска (флешки) и добраться до параметров загрузки по пути:
Если после отключения Secure Boot ошибка Secure Boot Violation не была устранена, вероятнее всего она связана с проблемами считывания неподписанных драйверов устройств. Поскольку в Windows зайти не удается, отключить проверку цифровой подписи драйверов можно только через среду восстановления. Для этого нужно запустить систему с загрузочного диска (флешки) и добраться до параметров загрузки по пути:
Далее среди доступных вариантов выберите седьмой – «Отключить обязательную проверку подписи драйверов» и перезагрузите компьютер.
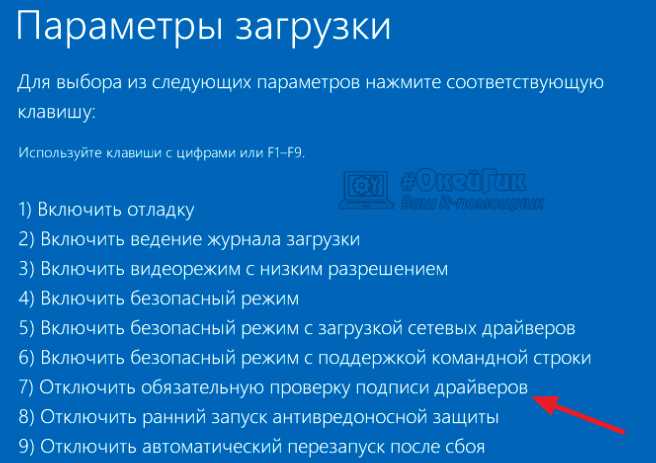
После этого система должна загрузиться. Далее пользователю потребуется найти и удалить проблемный драйвер, чтобы после этого вновь включить проверку подписи, без которой безопасность компьютера окажется под серьезной угрозой. Чтобы не удалить лишние драйвера, можно воспользоваться точкой восстановления, если она имеется.
Что означает ошибка «Ваше подключение не защищено»?
Сообщение с ошибкой «Ваше подключение не защищено» обозначает, что соединение не является безопасным. Это означает, что если вы не используете антивирус или шифрование, ваше устройство может стать «золотой жилой» для хакеров.
Чтобы получить доступ к веб-сайту, ваш браузер должен выполнить проверку цифровых сертификатов, установленных на сервере, чтобы убедиться, что сайт соответствует стандартам конфиденциальности и безопасен для дальнейшего использования. Если Ваш браузер обнаружит что-то неладное с сертификатом, он попытается предотвратить ваш доступ к этому сайту. Именно в этот момент вы увидите сообщение “Ваше подключение не защищено».
Эти сертификаты также называются сертификатами инфраструктуры открытых ключей или удостоверениями личности. Они предоставляют доказательства того, что открываемый сайт действительно является тем сайтом, за который он себя выдает. Цифровые сертификаты помогают защитить вашу личную информацию, пароли и платежную информацию.
Когда ваше соединение не защищено, то обычно это происходит из-за ошибки в сертификате SSL.
Отключение параметра безопасной загрузки
Проблему можно решить путем отключения в настройках BIOS опции Secure Boot.
Включите компьютер и при появлении начального экрана (POST-процедур) нажмите на кнопку для входа в настройки BIOS, которая отображена в нижней строке «Press ___ to enter Setup». Обычно используются клавиши – Del, F2, F10 и прочие. Если экран закрывает заставка, сделайте запрос в интернете по модели материнской платы, чтобы узнать точную клавишу.
После входа в настройки перейдите в раздел Безопасности. Найдите Secure Boot и переключите его значение на «Disable».
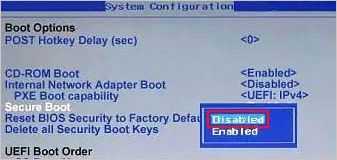
После сохраните изменения нажатием на F10 и выйдите из BIOS.
Рекомендуемые ссылки для решения:
(1)
Download (Windows 10 problem: Invalid signature detected, Check secure Boot Policy in Setup) repair utility.
(2)
Проблема с Windows 10: обнаружена недопустимая подпись, проверьте безопасную политику загрузки в программе установки
(3) invalid signature detected . check secure boot policy in set…
(4) После автоматического обновления системы Windows Red Message «Неверная подпись обнаружена. Проверьте политику в программе установки».
(5) БЕЗОПАСНОЕ НАПРЯЖЕНИЕ БЕЗОПАСНОСТИ НЕПРАВИЛЬНОЙ ПОДПИСИ
Внимание
Исправление вручную Проблема с Windows 10: обнаружена недопустимая подпись, проверьте безопасную политику загрузки в программе установки error only Рекомендуется только для опытных пользователей компьютеров.Загрузите инструмент автоматического ремонта вместо.
Change “OS Type”
If the error occurs after connecting a second disk or a USB flash drive (which you are not going to use for the OS boot), make sure that you are booting from the correct drive (from the hard disk or Windows Boot Manager) or disconnect the attached drive—perhaps this will fix the problem.
The next step is to check the Secure Boot settings in BIOS or UEFI (you can access this screen with the system settings is either immediately after clicking OK in the error message or by standard BIOS input methods, by pressing F1, F2, Fn + F2 or Delete).
In most cases, you just need to disable Secure Boot (or Security Boot Control) by changing its state to Disabled. In most ASUS laptops, this option is located in the Security, Authentication or Boot tab. If there is an OS type selection entry in UEFI, then try to choose Other OS (even if you have Windows). If Enable CSM (or Launch CSM) option is available, change it to Enabled.
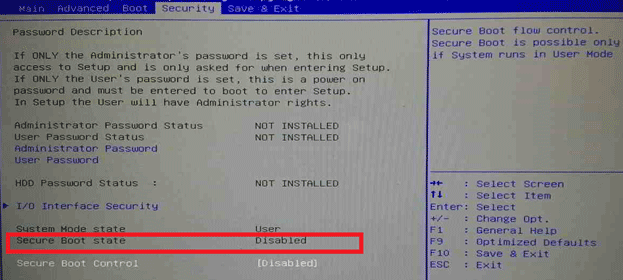
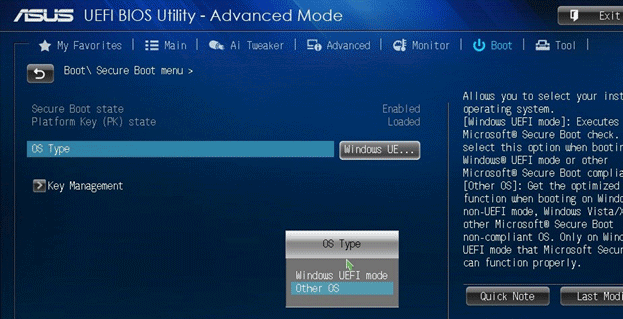
After the changes made to the BIOS, they need to be saved. Usually, the settings are saved with the F10 key, but again, it depends on the BIOS version.
Disable Integrity Checks
Rarely the error can occur because of unsigned drivers, that conflicting with the system protection module. As a solution, first of all try to disable driver signature verification on Windows. To do this, boot from the Windows 10 install media and on the first installation screen press Shift + F10. At the Command prompt run the following commands:
After that, the system should boot. The next step is when the user will need to find and remove the problem driver, then enable driver signature verification (security of the computer will be under serious threat without this).
In some cases, an Invalid signature detected error appears after the UEFI/BIOS update performed. In this case, the bootloader can detect a mismatch between saved keys and the operating system. To reset the keys, in the Key management menu delete all protection keys and create them again (or leave “not installed”).
Настройки BIOS
Сначала нужно отключить опцию Secure Boot и проверить работоспособность компьютера. Для этого вам необходимо зайти в меню BIOS
При включении компьютера обратите внимание на начальный экран. На нем будет указана клавиша, которая запускает системные настройки
Необходимо нажать на нее до того, как начнется загрузка Windows.
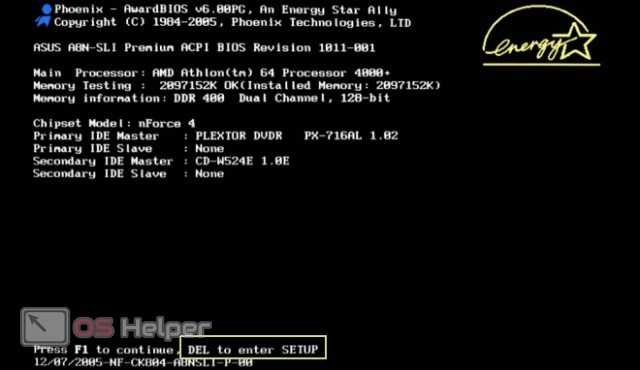
В результате вы окажетесь в меню BIOS. Поскольку речь идет о классическом меню, управление осуществляется стрелочками и прочими клавишами. Вы должны переместиться по меню и найти строку Secure Boot. Она может располагаться в разделе Authentication или System Configuration. Выделите параметр и нажмите Enter. Переставьте настройку в положение Disabled. Для сохранения изменений воспользуйтесь клавишей F10. ПК автоматически перезагрузится.

Meaning of Windows 10 problem: Invalid signature detected, Check secure Boot Policy in Setup?
Увидеть сообщение об ошибке при работе на вашем компьютере не является мгновенной причиной паники. Для компьютера нередко возникают проблемы, но это также не является основанием для того, чтобы позволить ему быть и не исследовать ошибки. Ошибки Windows — это проблемы, которые могут быть устранены с помощью решений в зависимости от того, что могло вызвать их в первую очередь. Некоторым может потребоваться только быстрое исправление переустановки системы, в то время как другим может потребоваться углубленная техническая помощь
Крайне важно реагировать на сигналы на экране и исследовать проблему, прежде чем пытаться ее исправить
Если вы включили свой компьютер и заметили, что Windows не запустится, вы испытываете ошибку загрузки. Некоторые причины, по которым ваши Windows не запускаются, когда поврежден системный раздел, отсутствуют файлы или повреждены. Как только вы столкнулись с ошибкой загрузки, вы увидите такие сообщения, как:
- Перезапустите систему и выберите подходящее устройство загрузки
- Bootmgr отсутствует
- Отсутствует операционная система
- FATAL: Не найден загрузочный носитель! Система остановлена
- Ошибка загрузки операционной системы
- Недопустимая таблица разделов
Некоторые версии Windows могут восстановить эти проблемы путем автоматического запуска восстановления при запуске. В противном случае вы можете вручную использовать среду восстановления Windows для устранения этой проблемы.
Отключение проверки цифровой подписи
Вторая распространенная причина появления ошибки – это неподписанные драйверы компонентов ПК. Способов решения проблемы несколько. Во-первых, найти конфликтное ПО, удалить его, скачать правильную версию с официального сайта и установить заново. Однако данный вариант займет у вас много времени. Проще всего выключить проверку цифровых подписей.
Если Windows не загружается, вы можете выполнить данную процедуру из безопасного режима или средства устранения неполадок. При загрузке ПК нажмите F8, чтобы попасть в отдельное меню. Здесь выберите пункт «Устранение неполадок компьютера». Перейдите в раздел «Диагностика» и откройте дополнительные параметры. Здесь нажмите «Параметры загрузки» и выберите вариант перезапуска компьютера. После этого появится меню с операциями, которые можно выполнить автоматически. Активируйте отключение проверки подписей с помощью клавиши F7.
Если операционная система загружается в безопасном режиме, то вы можете отключить проверку через редактор групповой политики. Запустите данную утилиту командой gpedit.msc в окне «Выполнить». Откройте ветку «Установка драйвера», которая расположена по пути, указанном на скриншоте ниже. Зайдите в свойства параметра цифровой подписи и переключите состояние в положение «Отключено».
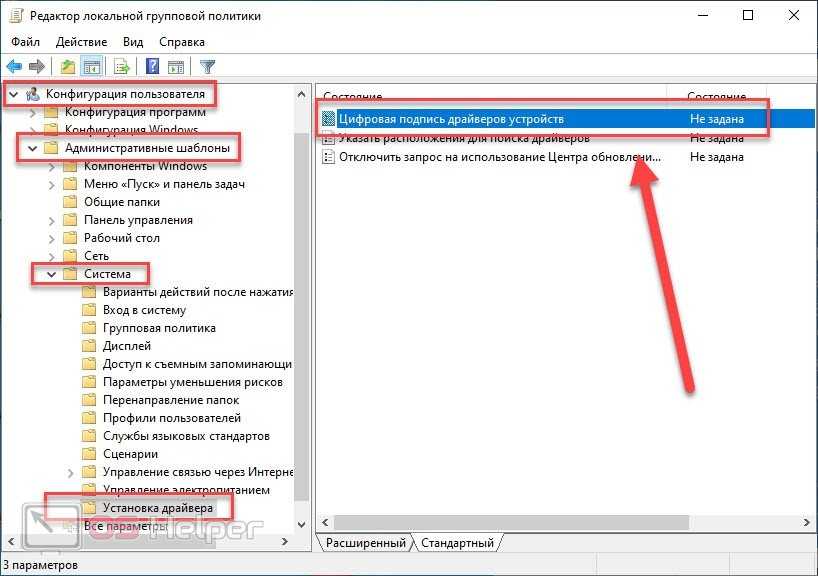
Теперь перезагрузите компьютер в нормальный режим и проверьте, загружается ли Windows.
Отключение утилиты
Если на вашем компьютере требуется отключить безопасный режим и обеспечить загрузку новой ОС, следует выполнить следующие действия:
- Войти в настройки интерфейса UEFI;
- Изменить настройки БИОС одним из возможных способов, в зависимости от производителя материнской платы.
На компьютерах с Виндовс 8 и выше существует 2 основных способа входа в БИОС:
- Перейти в правой панели в меню «Параметры», выбрать изменение параметров, затем «Обновление и восстановление» и просто «Восстановление»;
- После этого выбирается пункт «Перезагрузить», затем настройки ПО UEFI. Осталось подождать перезагрузки, после чего вход в интерфейс БИОС будет выполнен автоматически;
- Нажать при включении компьютера функциональную клавишу (Delete, F2 или другие).
После того как удалось войти в интерфейс, следует найти в его настройках пункт, отвечающий за отключение.
Он зависит от конкретной модели компьютера и марки материнской платы.
Например, для ноутбуков HP в БИОС следует найти вкладку System Configuration, перейти к пункту Boot Options и изменить значение показателя Secure Boot на Disabled.
После сохранения изменений и перезагрузки компьютера никаких ограничений на установку ОС остаться не должно.
Устройства Lenovo и Toshiba имеют вкладку Security, а Dell – меню UEFI Boot, где тоже следует отключить Secure Boot.
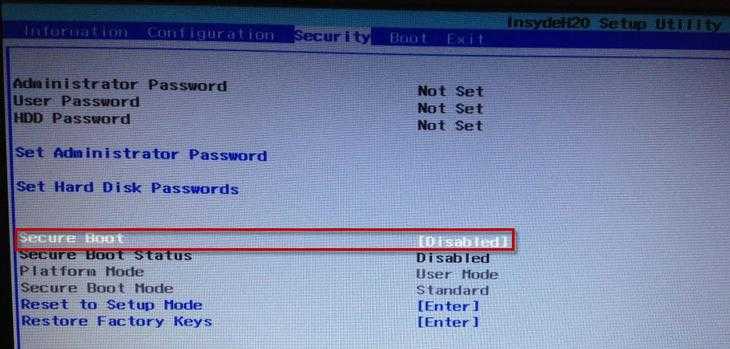
Рис.4. Отключение безопасной загрузки для модели ноутбука Lenovo.
Для устройств Asus, кроме отключения, требуется дополнительно выбрать возможность установки новой ОС, установив параметр Other OS в пункте OS Type.
На стационарных компьютерах Asus функцию отключают, перейдя в раздел Authentication. А для плат марки Gigabyte требуется переход в меню BIOS Features.
How to Fix the ‘Secure Boot Violation – Invalid Signature Detected’ Problem on Windows?
The “Secure boot violation – invalid signature detected” is an error which appears during the initial boot of the system. You can tab the Enter key in order to proceed with the boot but the error will still appear during every startup.
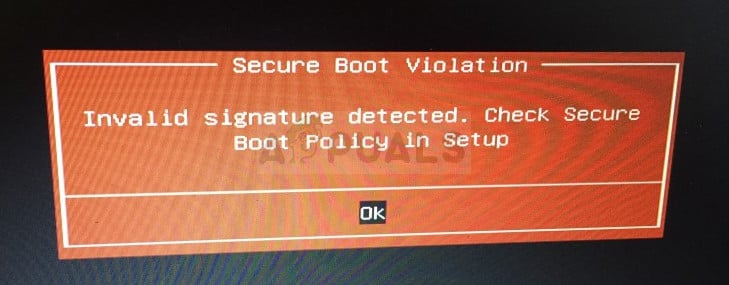 Secure Boot Violation – Invalid Signature Detected
The error is quite annoying and many users are desperate for a solution. Luckily, other people have found their own methods which can be used to resolve the problem. Make sure you check them out below and follow the instructions carefully.
What Causes the “Secure Boot Violation – Invalid Signature Detected” Problem on Windows?
This problem is generally very difficult to find a cause for, considering how obscure it is and how it’s quite generic to ASUS and DELL. However, Secure Boot stands out as one of the most important causes. Secure Boot needs to be disabled in your computer’s BIOS settings if you want to get rid of this problem.
Another important cause is the Digital Driver Signature Enforcement which performs checks which may prevent your computer from booting properly. Make sure you disable this and see whether the problem still appears!
Solution 1: Disable Secure Boot
Disabling secure boot on your computer can easily resolve the problem. Even though many users are reluctant to enter BIOS on their own and change various settings, we urge you to start your troubleshooting process with this method. You can resolve the “Secure boot violation – invalid signature detected” error easily if you follow the steps below!
- Turn your PC on again and try to enter BIOS settings by pressing the BIOS key as the system is about to start. The BIOS key is typically displayed on the boot screen, saying “Press ___ to enter Setup.” or something similar to that. There are other keys as well. The usual BIOS keys are F1, F2, Del, etc.
- Use the right arrow key to choose the Security menu when the BIOS settings window opens, use the down arrow key to select the Secure Boot Configuration option, and press Enter.
- Before you can use this menu, a warning will appear. Press F10 to continue to the Secure Boot Configuration menu. The Secure Boot Configuration menu should open so use the down arrow key to select Secure Boot and use the right arrow key to modify the setting to Disable.
- Navigate to the Exit section and choose to Exit Saving Changes. This will proceed with the computer’s boot. Check to see if the problem persists.
Solution 2: Uninstall the KB3084905 Windows Update
When the KB3084905 update was released for Windows Server 2012 and Windows 8.1, Microsoft has announced that the update may cause problems regarding secure boot on computers connected to the same domain controller. The easiest way to resolve this is to simply uninstall this update from your computer by following the steps below:
- Click the Start menu button and open Control Panel by typing its name and clicking the first option at the top or by locating its entry in the Start menu initial screen.
- Switch to View as: Category at the top right corner and click on Uninstall a Program under the Programs area. At the right side of the screen, you should see the View installed updates button in blue so click on it.
- You should now be able to see the list of all installed Windows updates for your computer. Check the Microsoft Windows section at the bottom for the KB3084905 update.
- Scroll to the left in order to check the Installed on a column which should display the date when the update was installed so make sure you locate the update whose KB number is KB3084905.
- Click on the update once and choose the Uninstall option at the top and follow the instructions which will appear on screen in order to get rid of the update.
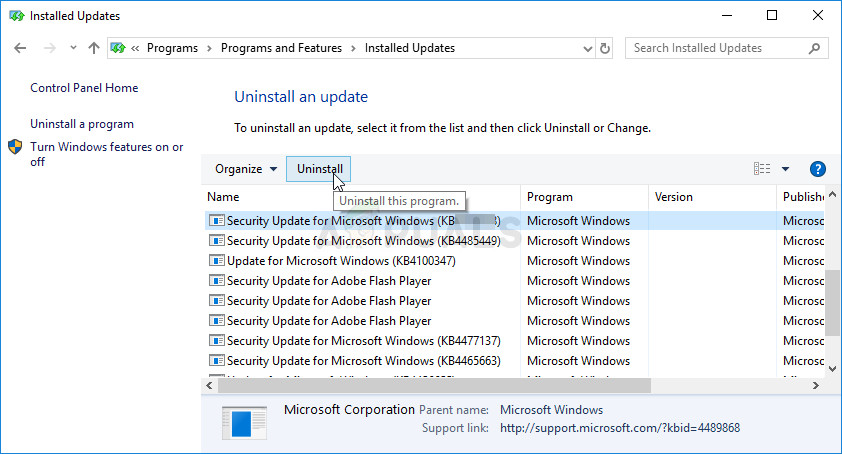 Uninstall Windows Update
 - Wait for Microsoft to release a new update that should be installed automatically if you have configured automatic Windows updates. Check to see if the “Secure boot violation – invalid signature detected” problem still appears during boot!
Solution 3: Disable Digital Driver Signature Enforcement
This option disables the driver signature enforcement which may be one of the reasons why your computer fails to boot properly as it’s stuck checking a single driver. This solution has helped plenty of folks so make sure you try it out.
- Click on the Start button and click the cog icon in order to open Settings. You can also search for “Settings” in the search bar or use the Windows Key + I key combination.
- Scroll down to the bottom of the Settings app and click on Update & security.
- Click on Recovery from the tabs located on the left side of the Update & security screen.
- The advanced startup section should be located in this option so locate it at the bottom of the Recovery tab. Click on Restart now. Advanced Startup Options should appear.
After you have successfully accessed the Advanced Startup Options, you can now freely navigate to the Startup Settings option by following the instructions below.
- Click on the Troubleshoot entry located just under the Continue button in the Choose an option screen.
- You will be able to see three different options: Refresh your PC, Reset your PC, and Advanced options. Click on the Advanced options button.
- Under the Advanced options screen, click on Startup Settings which will open a list of available startup options for you.
- Option number 7 should be named Disable driver signature enforcement. Click on the number 7 on your keyboard or use the F7 function key.
- Press Enter in order to return to your operating system and check to see if the “Secure boot violation – invalid signature detected” problem still appears during boot!
Solution 4: Use the Following Useful Command
This method is quite popular for its simplicity and plenty of people use it in order to fix most things related to the issue at hand. The funny thing is that it works and users have commented saying that this is the only step it took to resolve the problem. Try it out now!