How to install PHP 8 on Windows 10
PHP 8 is on the way. In this tutorial, I will show you how to install PHP 8 on your Windows 10 machine using Apache as a webserver.
Download the necessary files
You can download PHP binaries from the URL: https://windows.php.net/download/.
Currently, the final version of PHP 8 has not been released, therefore, it cannot be found on the main page. Select the «QA Releases» from the top menu or navigate directly to https://windows.php.net/qa/.
Download the thread-safe, 32, or 64-bit version depending on your Windows type. As all versions have been compiled with VisualStudio 16 (2019), so later, you need a suitable Apache binary and a «Microsoft Visual C++ 2019 Redistributable» package installed on your PC.
Prepare PHP location
I like the programs to be in the Program Files folder. Besides this, over time, you will install several different versions of PHP. Therefore, I create the following directory structure:

For the sake of ease of use, I make some sacrifices in the security of my development machine. I give local users full permission to the PHP directory on my machine.

Once you have created the directory, copy the contents of the downloaded zip file.
Check if PHP works
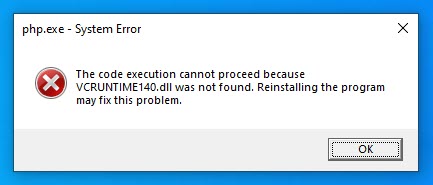
As I mentioned earlier, PHP 8 was compiled with Visual Studio 2019. Thus, if the appropriate Redistributable is not installed on your machine, you will get the following error:
. VCRUNTIME140.dll was not found. ..
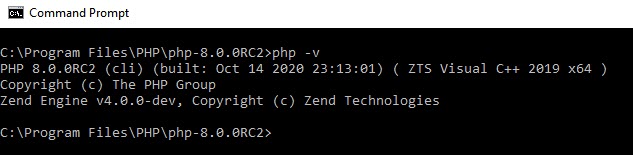
If all went well, you can use PHP from the command line. You can check the installation with the command: php -v and the result should be something similar:
To make working with PHP more convenient, you can put the PHP directory on the path. Click on start and just type env . From the list click on «Edit the system environment variables» and the System Properties dialog will appear. Click the «Environment Variables. « and select «Path» from the System variables block. Add the new PHP folder to the list.

Configure PHP
Now PHP is running but not yet configured properly. Configuring PHP 8 at the base level is no different from older versions.
The PHP folder contains 2 example configuration files:
- php.ini-production
- php.ini-development
Copy the development version to the same directory as php.ini and open this for editing. What you need to set is the location of the extensions and session data.
You have to set the extension_dir parameter to the valid location: extension_dir = «c:\Program Files\PHP\php-8.0.0RC2\ext»
You also have to uncomment the required extensions from the list. Usually, the curl, gd, mbstring, mysqli, pdo_mysql extensions are required for complex php apps.
Finally, you need to set the location where to save the session data: session.save_path = «w:/tmp»
Installing Apache
Even if PHP has a built-in web server, production systems use Apache, Ngnix, Lightspeed, and so on. For a Windows development environment, Apache is the easiest choice.
You can download the latest Apache webserver from the ApacheLounge website. Download the 32 or 64-bit version depending on your OS type.
As I mentioned before, I don’t like everything in the C: root, so I also create a directory for Apache in the Program Files folder. Don’t forget to allow permissions for the users.
Now you can copy the content of the Apache24 folder of the zip file to the new location. Pay attention to the exact directory structure.
As with PHP, you can add Apache to the path, but in this case, you need to add the bin folder.
Basic Apache configuration
Apache configuration files are located in the conf directory. The main config file is the httpd.conf . To start the webserver you need to set the server root ( SRVROOT ) parameter in the config file to the correct location as follows:
It is a good idea to set the ServerName explicitly to prevent problems during startup. As we will use virtual hosts later, you can simply set it to localhost:80
An optional step — but usually required by most PHP applications — to enable Apache modules. For example, the mod_rewrite module is disabled by default but almost always required. Just uncomment the line and you are done.
Install Apache as a service
To install Apache as a windows service, you have to open a command prompt as an administrator. Navigate to the Apache bin directory and execute the command: httpd -k install
Then you can start the webserver using httpd -k start

If everything is correct, then you get the prompt back without any message.

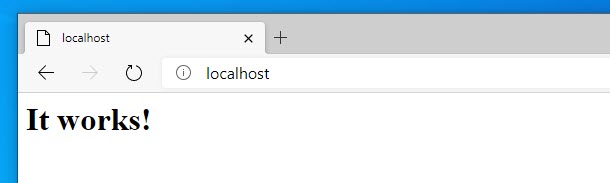
Open a browser and type http://localhost as the URL. You should get a welcome page similar to this:
Setup virtual hosts
The default document location is the htdocs folder in the installation directory. However, this is not optimal. If you are a developer, you probably work on multiple web projects. So it would be nice to have a dedicated folder and URL for each project. For example, if site1.com and site2.com are the production sites, then you probably want a site1.local and site2.local URLs with a dedicated target folder for your development.
Virtual hosts are the solution to this problem.
Again, it is a good idea to store your code separated from drive C.
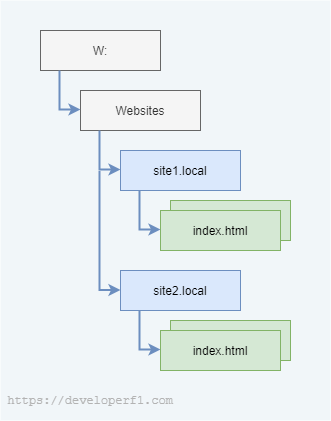
For example, you can create a directory structure like this:
Now you have to configure virtual hosts and enable it. First, open the httpd.conf file and uncomment the line that includes the httpd-vhosts.conf file.
Then, open the httpd-vhosts.conf file that is in the extra folder. Add one entry for each project you want. The ServerName , DocumentRoot , and ErrorLog are the important parameters, you can skip the others.
Besides this, you have to allow access to these folders so add a common Directory block with the following content before the VirtualHosts entries.
Your final virtual host config file should look like this:
You also need to extend the Windows hosts file that is located in c:\Windows\System32\drivers\etc\hosts . Open the file for editing with administration privileges and add the server names used before to the file pointing to the local 127.0.0.1 IP address.
Put a simple index.html file in the site roots with different content for testing purposes.
Now you can restart Apache using httpd -k restart . If everything is correct, then no error message is displayed. Navigate to site1.local and site2.local, and your browser should display the corresponding Html content.
Setup Apache to use PHP 8
The setup is almost done, but we haven’t configured PHP and Apache to work together.
First, we have to add the php extension to the known mime types. To do this, add the following line at the end of the mime.types config file: application/x-httpd-php php
To execute the index.php automatically if a directory is requested, extend the DirectoryIndex property with index.php in httpd.conf .
After that, the most important step is to load the php module. To do this, specify the PHP install directory and the appropriate module in the httpd.conf file. Just insert the lines at the end of the httpd.conf :
Now you can restart apache and check for any error. If everything is fine then create a small inf.php file in the server document root with a simple phpinfo like this:
Visiting site1.local/info.php should result in a PHP information page in your browser.

Troubleshooting
The «Can’t locate API module structure ‘php8_module’ in file . « error message is a common problem. Verify that exactly php_module is in the LoadModule line. Neither the old php7_module nor the expected php8_module is good.
Установка в системах Windows
Установка PHP в современных операционных системах Microsoft Windows и рекомендуемая конфигурация под распространённые веб-серверы.
Официальные релизы PHP для Windows рекомендованы для использования в промышленной эксплуатации. Однако, вы также можете собрать PHP из исходных кодов. Вам потребуется окружение Visual Studio. Обратитесь к разделу » Пошаговое руководство по сборке для получения более полной информации.
Установка PHP на Azure App Services (он же Microsoft Azure, Windows Azure, или (Windows) Azure Web Apps).
User Contributed Notes 12 notes
If you make changes to your PHP.ini file, consider the following.
(I’m running IIS5 on W2K server. I don’t know about 2K3)
PHP will not «take» the changes until the webserver is restarted, and that doesn’t mean through the MMC. Usually folks just reboot. But you can also use the following commands, for a much faster «turnaround». At a command line prompt, type:
and that will stop the webserver service. Then type:
net start w3svc
and that will start the webserver service again. MUCH faster than a reboot, and you can check your changes faster as a result with the old:
in your page somewhere.
I wish I could remember where I read this tip; it isn’t anything I came up with.
You can have multiple versions of PHP running on the same Apache server. I have seen many different solutions pointing at achieving this, but most of them required installing additional instances of Apache, redirecting ports/hosts, etc., which was not satisfying for me.
Finally, I have come up with the simplest solution I’ve seen so far, limited to reconfiguring Apache’s httpd.conf.
My goal is to have PHP5 as the default scripting language for .php files in my DocumentRoot (which is in my case d:/htdocs), and PHP4 for specified DocumentRoot subdirectories.
Here it is (Apache’s httpd.conf contents):
—————————
# replace with your PHP4 directory
ScriptAlias /php4/ «c:/usr/php4/»
# replace with your PHP5 directory
ScriptAlias /php5/ «c:/usr/php5/»
AddType application/x-httpd-php .php
Action application/x-httpd-php «/php5/php-cgi.exe»
# populate this for every directory with PHP4 code
<Directory «d:/htdocs/some_subdir»>
Action application/x-httpd-php «/php4/php.exe»
# directory where your PHP4 php.ini file is located at
SetEnv PHPRC «c:/usr/php4»
</Directory>
# remember to put this section below the above
<Directory «d:/htdocs»>
# directory where your PHP5 php.ini file is located at
SetEnv PHPRC «c:/usr/php5»
</Directory>
—————————
This solution is not limited to having only two parallel versions of PHP. You can play with httpd.conf contents to have as many PHP versions configured as you want.
You can also use multiple php.ini configuration files for the same PHP version (but for different DocumentRoot subfolders), which might be useful in some cases.
Remember to put your php.ini files in directories specified in lines «SetEnv PHPRC. «, and make sure that there’s no php.ini files in other directories (such as c:\windows in Windows).
And finally, as you can see, I run PHP in CGI mode. This has its advantages and limitations. If you have to run PHP as Apache module, then. sorry — you have to use other solution (the best advice as always is: Google it!).
Hope this helps someone.
If you get 404 page not found on Windows/IIS5, have a look at C:\SYSTEM32\INETSRV\URLSCAN
There is a .ini file there that prevents some files from being served by IIS, even if they exist, instead IIS will give a 404. The urlscan logfile (same place) should give you some insight into what parameter is preventing a page from loading, if any.
I made the mistake of setting a ‘wildcard application map’ for PHP on a Windows 2003 / IIS 6.0 / PHP ISAPI installation.
This resulted in «No input file specified» errors whenever I tried to load the default page in my site’s directories. I don’t know why this broke things, but it did.
If anyone has the same problem, this may be the cause.
If you are installing PHP on Vista just go to David Wang’s blog. http://blogs.msdn.com/david.wang/
archive/2006/06/21/HOWTO-Install-and-Run-PHP-on-IIS7-Part-2.aspx
Still Can’t Run PHP Code?
After installing php-5.2.5-win32-installer.msi on my Windows XP2. with IIS5.1 it still didn’t run PHP files.
I eventually found the fix*:
1. Goto Control Panel>System>Advanced>Environmental Variables
2. Add a New System Variable «PHRC» and set its path as «C:\Program Files\PHP»
3. Restart
IIS setup: 403 forbidden error.
We had installed two separate different PHP versions — PHP 5.1.4 followed by 5.2.5.
We configured 5.2.5 php5isapi.dll to be loaded as the .php file type extension.
Despite this, php version 5.1.4 was being loaded. We renamed 5.1.4’s folder and then PHP was not loading at all.
There were no visible references to 5.1.4 in the IIS configuration, but in the file \webConfig.xml, there was a reference to 5.1.4’s isapi under IISFilters.
To fix this problem, we added version 5.2.5’s php5isapi.dll to the ISAPI Filter category for the web site, in the IIS control panel.
I installed by Microsoft Installer, manually, whatever I always received de same error from IIS7.
HTTP Error 404.3 — Not Found
The page you are requesting cannot be served because of the extension configuration. If the page is a script, add a handler. If the file should be downloaded, add a MIME map.
The IIS7 interface is quite diferent and are not all together like IIS6
The 5.3 version have not any of those files: php5stdll, php5isapi.dll. etc.
The installer puts others files in handlers and I decided to use them as substitutes. Nothing done!
After that, I discovered that installer do not install these files within the sites, but in the root default site configuration of IIS7.
So, I copied the root configuration to my site and them it worked (all others procedures were done e.g. copy php.ini to windows folder)
PHP 5.2.9.2 Install on XP Pro IIS 5.1 — phpinfo( ) results incorrect
Testing Date: 05.15.09
Background:
For several days now I, as a newbie, have been unsure if I had installed PHP correctly, or not. No matter what I did phpinfo( ) reported «Configuratin File Path» as: “C:\WINDOWS”. I was left to wonder what was wrong.
To help resolve the phpinfo() “issue”, I conducted a series of tests using two scripts:
The first is “test-php-ini-loaded.php”; it is stored in c:\inetpub\wwwroot, and has the following code:
<?php
$inipath = php_ini_loaded_file ();
if ( $inipath ) <
echo ‘Loaded php.ini: ‘ . $inipath ;
> else <
echo ‘A php.ini file is not loaded’ ;
>
?>
The second script is simply calls phpinfo( ). It is named test.php, is stored in “c:\inetpub\wwroot”, and has the following code:
<?php phpinfo ( ); ?>
My Dev Environment:
1. Windows XP Pro SP3
2. IIS 5.1 / MMC 3.0
3. PHP 5.2.9.2 – phpMyAdmin not yet installed
4. (plus MySQL 5.1, etc.)
5. Install location is on my local E: drive
Как установить php 8 на windows 10
Найти дистрибутив PHP можно по адресу https://windows.php.net/download#php-8.1 Выберите версию Thread Safe .
В папке c:\WebServer\WAMP\ создайте новую папку PHP и скопируйте туда содержимое архива php-8.1.5 — VS16 x64 Thread Safe (2022-Apr-12 18:12:52) .
Настройка конфигурационного файла php.ini
С помощью Notepad++ открываем php.ini-development в папке c:\WebServer\WAMP\PHP\ и сохраняем его как php.ini , и вносим в него следующие изменения .
Для этого находим строку – 768 :
И заменяем ее на :
Теперь найдите строки: Начинается со строки 920 .
И заменим их на :
Заменим строки: – начинаются со строки 950.
Указываем кодировку по умолчанию . Для этого находим строку – 720 :
Находим строку – 746:
Предварительно создадим папку includes в C:\WebServer\home\
Здесь будут хранится подключаемые файлы PHP .
Заменим строку – 970:
Сохраняем и закрываем файл php.ini .
Теперь необходимо вписать поддержку PHP в файл конфигурации сервера Apache . Открываем файл httpd.conf и в конец файла добавим строки :
Сохраняем и закрываем файл httpd.conf .
Настройка переменной среды
Далее необходимо добавить каталог с установленным интерпретатором PHP в переменную PATH операционной системы Windows 10 . Для этого нажмите кнопку Пуск на Windows 10 , начните набирать «Изменение системных переменных среды» и откройте соответствующее окно настроек.
 Изменение системных переменных среды
В открывшемся окне выбираем в самом низу пункт переменные среды .
В следующем открывшемся окне :

Выберем пункт path и нажимаем изменить .
В следующем открывшемся окне :

Выбираем пункт создать и в открывшейся строке напишите C:\WebServer\WAMP\PHP\ и выбираем пункт вверх и подымаем нашу строку к вверху , и нажимаем кнопку Ok , как на рисунке ниже .

Во всех открытых окнах нажимаем Ok , все окна переменной среды path закрываем . После данных изменений следует перезагрузить компьютер .
После перезагрузки компьютера , открываем Notepad++ и набираем следующий код :
Сохраняем файл в каталоге c:\WEbServer\home\www\ с названием i.php
В адресной строке Web – браузера набираем : http://localhost/i.php , если вы увидите данные о интерпретаторе PHP , как на рисунке , то значит все настройки сделали правильно и PHP работает .
 Версия PHP
Установка PHP завершена , если при выполнении примеров появляются ошибки ошибки , то проверяйте все в конфигурационные файлы , перезагружаем сервер и снова пробуем достичь желаемого результата.
И помните после каждого изменения конфигурационных файлов и исправлении ошибок , нужно чистить историю Web – браузера , может так получится вы нашли исправили ошибку , перезагрузили сервер , а Web – браузер выдает вам файлы из истории , и вы видите при загрузке опять ошибку .