Easily moving the Three.JS camera with OrbitControls and MapControls
In a 3D application, implementing the camera control is an indispensable step for offering interactive and intuitive content.
It’s a step that can be natively complicated, but luckily the official Three.JS add-ons provides up with specialized classes in this subject !
Today, we will study two of these classes : OrbitControls and its alternative, MapControls .
OrbitControls and MapControls classes
As explained earlier, these two classes are available in the official Three.JS add-ons, so you can easily import them into your code :
As you may have noticed, these two classes are declared in the same module. MapControls is a bypass of OrbitControls ; these two classes are therefore very close !
Functions and Differences between the Classes
The latters propose two principal functions :
- A movement of the camera on the X and Z axes.
- A camera rotation around a fixed point – placing the camera into orbit around the target.

Camera Controls – Displacement and Rotation
These two functionalities are usable with a mouse or a tactile screen !
In the case of OrbitControls , the rotational action will be controlled by the principal button (left) of the mouse – or by a finger on the tactile screen. The secondary button of the mouse (right) controls the camera’s displacement actions – This is also possible with two fingers on the tactile screen.
The order of these actions is inverted on MapControls ; this is the principal difference between these two classes !
In these two cases, it is possible to zoom with the scroll wheel of the mouse or by using the tactile screen!
Basic application of these classes
The examples of this part are centered around OrbitControls , but the practical application is totally identical for MapControls !
In our JavaScript code, let’s import OrbitControls :
Next, in our Three.JS application, let’s create a controls global variable :
To finish, during the initial setup of the Three.JS environment, let’s initialize our controls variable with an OrbitControls instance :
From now on, with these three steps, you should be able to control the camera in your scene with the help of the mouse or the tactile screen!
Advanced application of these classes
Many personalization options are available to us; in this second part, we will study these principles together!
Here, the examples are targeted on MapControls , but these options are also valid for OrbitControls .
Deactivating a feature
As explained earlier, OrbitControls and MapControls propose two camera control functions. It is possible to deactivate them, or to forbid certain actions for the user.
If we wish to activate or deactivate the movement of the camera, we will use the property enablePan :
If we wish to activate or deactivate the camera rotation, we will use the property enableRotate :
Rotational Constraints
In certain cases, it is also interesting to limit user actions without completely deactivating a function.
For example, in the case of rotation, it is possible to define a maximum camera orientation angle. In this example, we use the property maxPolarAngle to define a maximum incline for the camera:
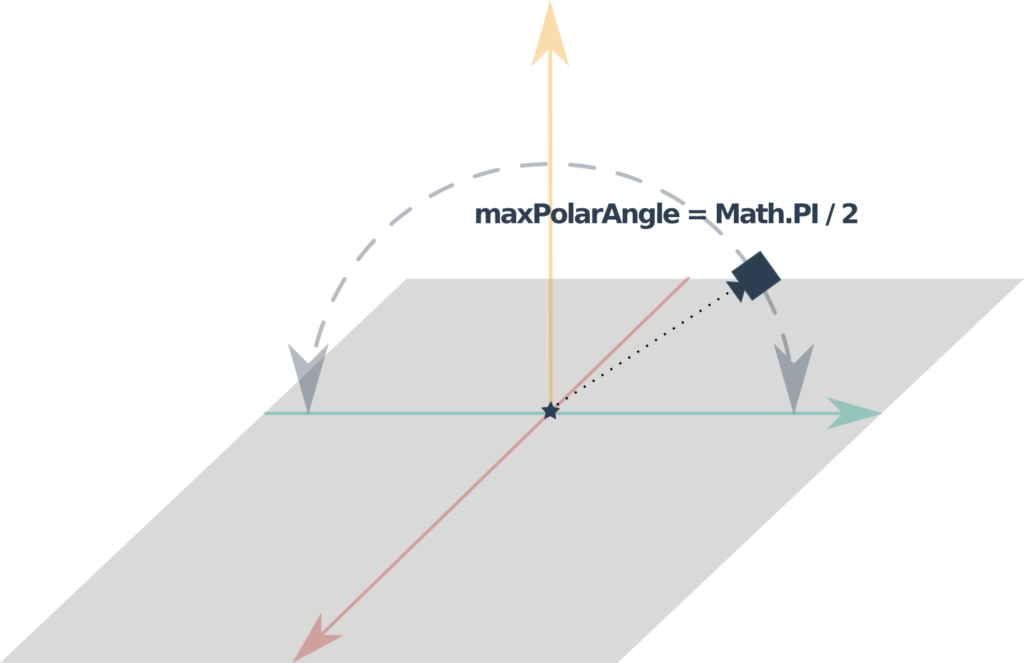
Maximum Orientation Angle
Thus, observing the scene from a low-angle shot is now impossible.
Zoom Constraints
Just like the inclination in the precedent paragraph, it is also possible to constrain the zoom of our camera.
For this, we use two properties :
- minDistance – Minimum distance between the camera and its target
- maxDistanc e – Maximum distance between the camera and its target
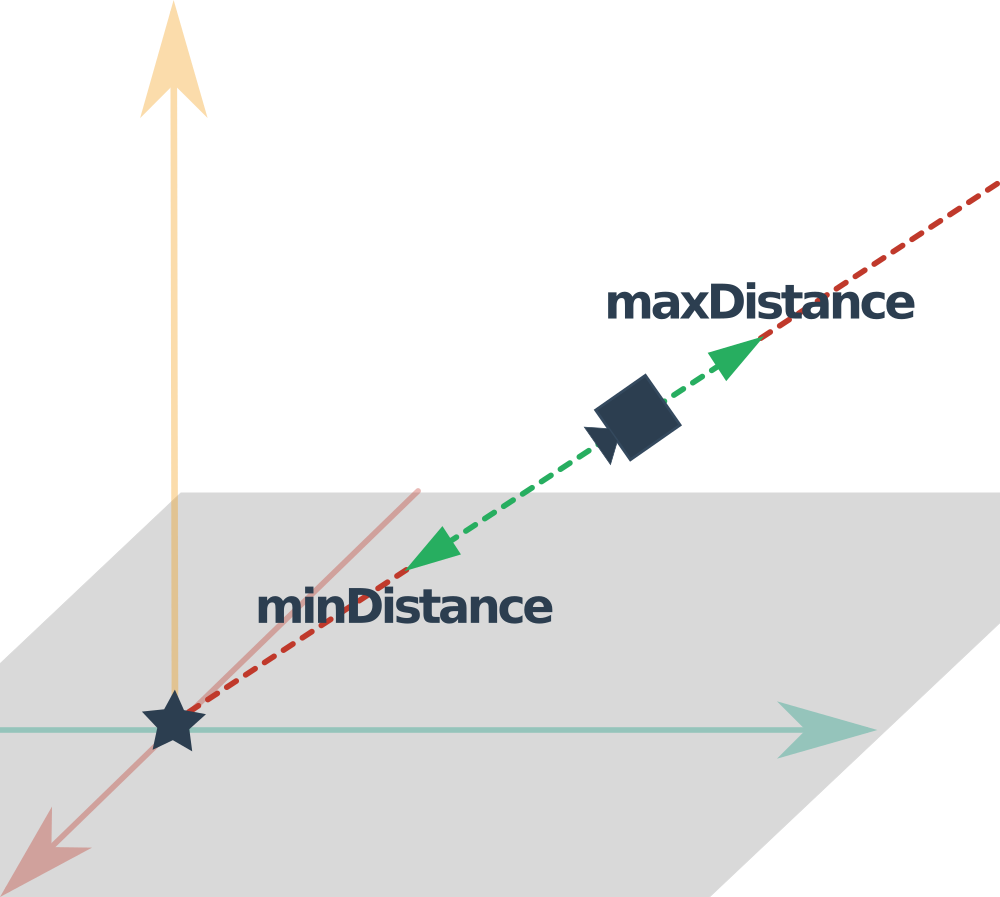
minDistance and maxDistance
Inertia and progressive deceleration of the camera
The user experience is primordial ! It is possible to make the movement of our camera more fluid and gentle by making it lose speed progressively.
For this, we use the properties enableDamping and dampingFactor :
You can adjust the dampingFactor value to render the deceleration more or less rapid.
To finish the activation for this option, it is necessary to call the update method in our principal animation loop :
Conclusion
A more intuitive camera control is primordial for proposing a quality user experience.
Создание компонента сцены:

Для начала импортируем three.js — это можно сделать в компоненте, в котором вы будете создавать сцену:
Или, если вы планируете расширять и декомпозировать three-структуру проекта, то это можно сделать в nuxt.config с помощью webpack глобально (также, здесь дополнительно можно добавить алиасы для GLTF-лоадера и OrbitControls которые нам еще понадобятся).
Если у вас возникнут проблемы с eslint, то, возможно, вам понадобиться добавить THREE: true в “globals” вашего .eslintrc.json.
Инициализация Three.js-сцены с помощью класса:
Для удобства, вынесем создание основных составляющих, необходимых для инициализации Three-сцены в отдельный класс, создав в корневой директории /components папку /Scene/js и добавив туда файл Scene.init.js.
Вообще, стоит вынести такой глобальный класс куда-нибудь повыше, но в данной реализации, я думаю, это необязательно.
Также полагаю, что здесь целесообразнее всего было бы использовать composition-api —возможно, позднее я так и сделаю и вынесу создание сцены в композиционную функцию.
Подробнее почитать об основных аспектах создания Three.js сцены, вы можете здесь: https://threejs.org/docs/#manual/en/introduction/Creating-a-scene
Гениальная вырезка из официальной документации, переведенная с помощью yandex.translate и ставшая еще более гениальной:
Чтобы на самом деле иметь возможность отображать все, что угодно с тремя.js, нам нужны три вещи: сцена, камера и визуализатор, чтобы мы могли визуализировать сцену с помощью камеры.
В общем-то в данном классе мы все это и реализовали:
Мы по порядку инициализируем scene, camera, renderer, вызвав соответствующие методы в методе init() .
Дополнительно мы добавим light, controls (OrbitControls , отвечает за взаимодействие с камерой) и loader (GLTFLoader , отвечает за загрузку модели в формате .gltf или .glb)
После всех этих шагов, в rootEl , вызывающего нас компонента, мы вставляем html созданного рендер-элемента (канваса).
Кто-то может подумать, что здесь мы закончили, но нет — на самом деле, если мы сейчас создадим новый инстанс класса, то мы ничего не увидим, потому что после инициализации основных компонентов сцены, нам теперь нужно ее отрисовать на нашем экране — для этого мы вызываем метод update() . Он будет перерисовывать сцену каждый раз, когда обновляется экран (для стандартного экрана это где-то 60 раз в секунду).
Создание компонента Scene.options.vue
Содержит в себе управляющие элементы для компонента Scene.vue, такие как — кнопки навигации по областям модели, переключение вида модели(с каркасами, либо без).
Компонент содержит лишь разметку используемых нами кнопок, которые на событии @click эмитят соответствующий родительский метод.
Orbitcontrols three js как подключить
ThreeJS OrbitControls as an npm module. See test for an example.

This module exports a function which accepts an instance of THREE, and returns an OrbitControls class. This allows you to use the module with CommonJS, globals, etc.
The returned function has the following constructor pattern:
This uses an unusual versioning system to better support ThreeJS’s (lack of) versioning. The major version of this repo will line up with ThreeJS breaking releases ( 69.0.0 => r69 ). Often the module will continue to work (i.e. 69.0.0 should work with r70).
The minor will be reserved for any new features, and patch for bug fixes and documentation/readme updates. In some rare cases, a minor feature may introduce a breaking change; so it’s generally safest to use tilde or —save-exact for this module.