Как создать внутриигровое меню в Unity
1. Создаем две сцены: Menu и Game
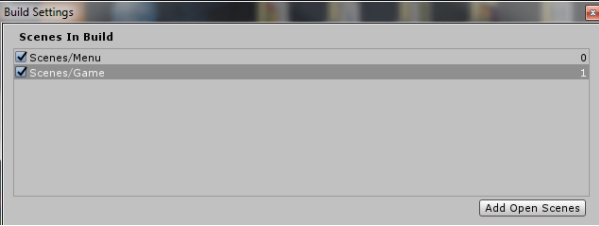
2. Открываем File->BuildSettings и перетаскиваем созданные сцены в Scenes in build.
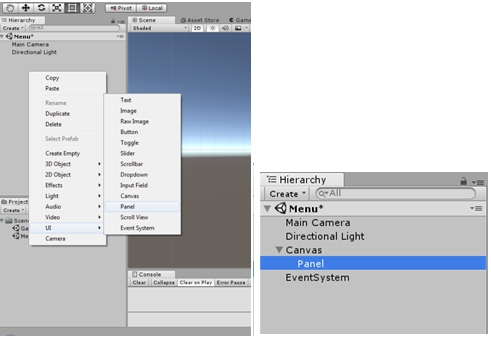
Теперь можем приступать к созданию пользовательского интерфейса. Откройте сцену Menu и добавьте Panel. Сразу добавляется Canvas(Холст) и дочерним объектом к нему добавляется Panel (Панель).
Обратим внимание на инспектор для Canvas. А именно на компонент Canvas.
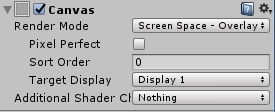
Render Mode автоматически выставлен на Screen Space – Overlay.
Screen Space – Overlay:
Способ рендеринга, при котором Canvas напрямую привязан к экрану. Если изменить разрешение экрана или размер, то Canvas с такой настройкой тоже изменит свой масштаб на подходящий. UI в таком случае будет отрисовываться поверх других объектов.
Важен порядок размещения объектов в иерархии. Холст Screen Space – Overlay должен находиться в самом верху иерархии, иначе он может пропасть из виду.
Screen Space – Camera:
В таком случае, Холст прикрепляется в камере. Для такой настройки обязательно нужно указать камеру которой соответствует Холст. Как и в предыдущем пункте, Холст будет менять свой масштаб в зависимости от разрешения и размера экрана, а также от области видимости камеры.
Так же для Холста с такими настройками важно размещение относительно других объектов. На переднем плане будут объекты, которые находятся ближе к камере, не зависимо от того, это UI или другие GameObjects.
World Space:
Холст размещается, как любой другой объект без привязки к камере или экрану, он может быть ориентирован как вам угодно, размер Холста задается с помощью RectTransform, но то, как его будет видно во время игры, будет зависеть от положения камеры.
В данном задании мы будем использовать Screen Space – Overlay.
Давайте настроим цвет панели. Можно также добавить картинку на фон. Для этого нужно обратить внимание на компонент Image в Инспекторе панели.
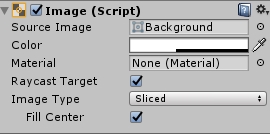
Как видите, картинка добавляется в поле Source Image. Картинку можно просто перетащить из файлов проекта, либо кликнуть на кружочек справа от поля.
Цвет выбирается в поле Color, либо с помощью инструмента пипетки.
Важно знать, что пипетка позволяет выбрать цвет за пределами Unity.
После того, как выбрали цвет или картинку, нам нужно разместить кнопки, которые всем будут управлять, а так же текст. Чтобы упростить себе задачу, для Panel мы добавим еще один компонент, который называется Vertical Layout Group. И сразу настроим его.
Нам необходимо разместить все кнопки и текст по центру экрана. Для этого находим в компоненте Vertical Layout Group пункт Child Alignment и выбираем Middle Center. Теперь все наши элементы, будь то кнопки или текст, будут выравниваться по центру, независимо от разрешения экрана.
Так же убираем галочки с ChildForceExpand. Должно получиться так:
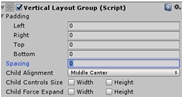
Данный компонент можно настраивать в зависимости от того, какой вид вы хотите получить.
В нашем меню должны быть следующие кнопки:
1. Start Game
2. Settings
3. Exit
Сейчас, добавляем Text дочерним элементом нашей Панели. Можете заметить, как он прикрепляется по центру. Иногда для этого требуется созданный элемент в окне Scene просто передвинуть на Panel и тогда он выровняется. Настраиваем текст так, как хочется с помощью компонента Text(Script) в инспекторе.
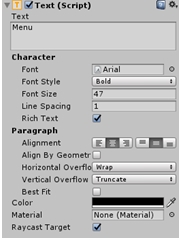
После добавляем Button. Кнопка добавится под текст.
Разберем компонент Button нашей кнопки. Нас интересует Transition – то, как кнопка будет реагировать на действия мышки. В Unity реализовано несколько способов. Пока рассмотрим довольно простой Color Tint. Это значит, что кнопка будет менять свой цвет при определенных состояниях. Интерфейс для настройки довольно удобный. Настраиваем так, как нравится.
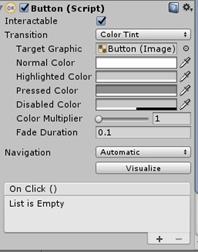
Так же у объекта Button есть дочерний объект Text – это текст который будет отображаться на кнопке. В тексте прописываем Play.
Кажется, Текст и Кнопки находятся слишком близко друг к другу.
Что бы это исправить для нашего Текста Menu добавляем еще один компонент, который называется Layout Element. И ставим галочку напротив Ignore Layout.
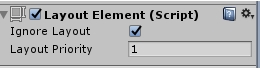
После этого выставляем Anchor на Middle-Center.
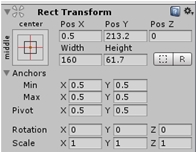
Потом добавляем еще три кнопки и называем их Settings, Credits, Exit.
Можно поменять размеры кнопок. На этом этапе меню выглядит так:
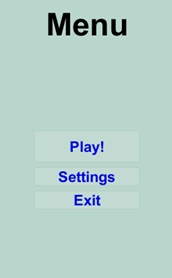
Переходы между main menu и settings
Что бы переходить на меню опций не обязательно делать новую сцену.
Для начала создаем пустой GameObject (Create Empty) как Child нашего Холста. Назовем его Main menu. Потом нашу панель, со всеми инструментами сделаем дочерними элементами этого объекта. Должно получиться так:
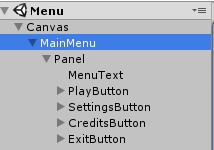
Выбираем наш MainMenu объект и сделаем его дубликат. С выбранным элементом нажимаем комбинацию клавиш Ctrl+D. У нас появится новый объект.
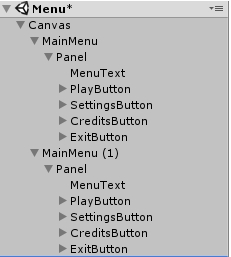
Переименовываем новый объект в Settings. Для удобства управления инактивируем MainMenu.
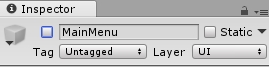
Дальше в панели Settings переписываем текст на Settings, а так же удаляем все кнопки.
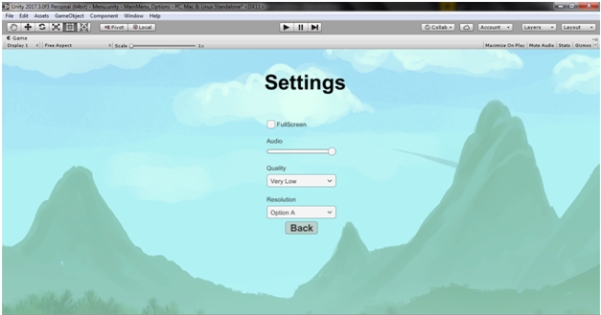
В настройках мы сделаем следующее – Fullscreeen, настройки громкости, качество изображения, разрешение экрана.
За контроль Fullscreen будет отвечать элемент Toggle.
За громкость – Slider.
За качество изображения и разрешение – Dropdown.
Между каждыми элементами следует разместить текст, который будет обозначать название каждой настройки. Следует также добавить кнопку, которая будет возвращать нас обратно в главное меню.
Можно настроить Spacing в Vertical layout group, чтобы между элементами было немного пространства. Добавим на панель картинку и в итоге получим такой результат:
Программирование кнопок
Перейдем к написанию скрипта меню.
Нам нужно, чтобы по нажатию кнопки Play у нас запускалась другая сцена с нашей игрой, а по нажатию кнопки Exit игра закрывалась.
Это мы и пропишем в нашем скрипте.
Для MainMenu добавляем новый компонент MenuControls.cs и отрываем его.
Первое что надо сделать – удалить существующие методы Start() и Update() – тут они нам не нужны.
Дальше нам надо подключить следующее:
После этого напишем свой метод для нажатия кнопки Play. Метод должен быть public — нам нужно иметь возможность видеть его за пределами нашего скрипта.
За загрузку сцены отвечает SceneManager и у него есть метод LoadScene. Существует несколько перегрузок метода. Можно передавать имя сцены, которую вы хотите загрузить. В нашем случае это сцена «Game».
В итоге функция будет выглядеть следующим образом.
Так же создаем метод для выхода из игры:
Однако в Unity мы не увидим результата работы этого метода, так как подобное работает только в билде. Для того что бы проверить, что все работает правильно, добавляем в метод строчку
Теперь необходимо прикрепить события кнопок к этим методам. Выбираем кнопку Play и находим в инспекторе следующее:
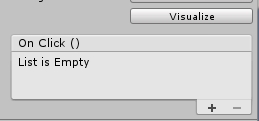
Это событие кнопки, которое по нажатию будет вызывать подписанные на событие методы. Добавляем метод нажимая на +.
В появившееся окно нужно перетащить объект, в котором содержится нужный скрипт. В нашем случае это Main Menu.
После этого нужно выбрать скрипт MenuControls и найти метод PlayPressed().
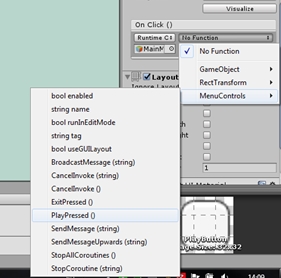
Точно также делаем для кнопки Exit. Только теперь выбираем метод ExitPressed().
Для кнопки Settings нам не нужно писать никакой код, так как некоторый функционал уже встроен.
Суть в том, что мы будем активировать GameObject. На этом этапе у вас должен быть активным MainMenu, а Settings не должно быть видно. Так же видим, что когда мы активируем Settings, он полностью перекрывает Menu. Суть в том, что играет роль порядок расположения дочерних объектов Холста – в каком порядке они расположены в иерархии в том порядке они и будут прорисовываться. Поскольку Settings у нас находятся над Main Menu, то они перекрывают меню.
Это мы и будем использовать.
Выбираем кнопку Settings и в OnClick() перетаскиваем наш объект Settings. В функциях выбираем GameObject ->SetActive(); и ставим галочку. Вот так:

Ну а для кнопки Back, которая находится в меню опций, можно таким же образом подключить событие SetActive для объекта Settings, но на этот раз нам нужно инактивировать наш объект, поэтому мы просто не ставим галочку.
Вот и все, мы закончили создание меню, а в следующей части продолжим и сделаем так, чтобы игра реагировала на изменения настроек.
Настройки
Настройки полного экрана
Первое что мы пропишем это переключение полноэкранного и оконного режимов.
Нужно убрать галочку с пункта Is On нашего Toggle элемента.
Создаем скрипт для объекта Settings. Назовем его Settings.cs.
Для начала нам надо хранить переменную типа bool которая будет отображать текущее состояние – полноэкранный режим или нет. А потом, по изменению toggle эта переменная будет переключаться на противоположное значение.
У экрана есть свойство Screen.fullScreen типа bool. Можно просто будем присваивать значение нашей переменной isFullScreen этому свойству.
Код выглядит так:
Увидеть результат можно только в билде. Давайте сейчас это сделаем. Учтите, что для того что бы билд был правильным нужно оставить активным только объект MainMenu, а Settings отключить. Если это сделано, то запускаем билд через File->BuildSettings и нажимаем кнопку Build.
После этого можно проверить работу программы. Если все правильно, то по нажатию галочки сразу будет изменяться режим.
Изменения громкости звука в игре
Для работы с настройками звука нам для начала понадобится AudioMixer, а также какой-нибудь трек, на котором мы будем проверять работу наших настроек.
Добавим эти два элемента. Сначала добавляем AudioMixer. Правой кнопкой мыши в окне Project ->Create->AudioMixer.
Называем его GameSettings. После этого открываем окно AudioMixer: Window->Audio Mixer (Ctrl + 8).
Что бы контролировать параметры миксера через скрипт, их нужно сделать видимыми для этого скрипта. Эта процедура называется ExposeParameters. Для этого кликаем на Mixer и в инспекторе находим volume и кликаем правой кнопкой мыши. Выбираем Expose to script:
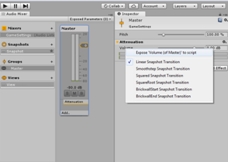
Теперь в окне Audio Mixer обратите внимание на пункт Exposed Parameters в верхней левой части.

Теперь там есть параметр. Кликаем на него и называем наш параметр masterVolume. Следует запомнить имя, которое ему присваиваем – его нужно будет указать в коде.
Переходим в Settings.cs и создаем поле AudioMixer, чтобы получить ссылку на него в коде.
потом создаем метод
Метод SetFloat будет принимать значения нашего слайдера и присваивать это значение параметру “masterVolume”.
Осталось прикрепить наш метод к событиям слайдера. Находим в инспекторе слайдера поле On Value Changed и точно так же прикрепляем объект. Вот только теперь нам надо не просто выбирать метод из списка, а использовать поле Dynamic float. Как видите, там уже есть наш метод, и он будет получать переменную от самого слайдера. Также нужно не забыть перетащить AudioMixer в соответствующее поле в компоненте Settings.cs.

Обратите внимание, что мы напрямую привязываем значение слайдера к значениям аудио-миксера. В аудио миксере громкость изменяется от -80 до 20. Нам же достаточно менять от -80(нет звука) до 0(нормальный звук). В настройках слайдера минимальное значение выставляем на -80, максимальное на 0.

Теперь добавим звуки в нашу игру, чтобы проверить работу скрипта.
На canvas добавим компонент Audio Source.
Настроим его следующим образом:
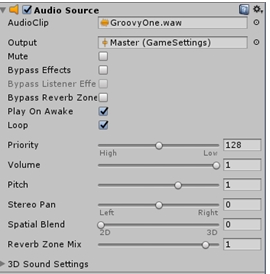
Audio Clip – саундтрек
Output – Мастер нашего миксера (дочерний объект)
Loop – поставить галочку – зациклить композицию, чтобы она играла постоянно.
Качество изображения
В Unity уже встроены настройки качества изображения. Edit->Project Settings->Quality. В инспекторе видим Quality settings. Их можно добавлять и настраивать.
Особенностью работы с настройками качества является следующее:
Каждой настройке соответствует индекс, который мы можем получить из Dropdown. Все что нужно сделать – переписать соответствующие пункты в нужные индексы в нашем UI элементе. Открываем его и в инспекторе находим Dropdown(Script) и в нем пункт Options. Дальше вписываем настройки в нужном порядке. У меня получилось так:
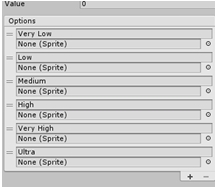
Дальше нужно прописать код. Мы продолжаем дополнять методами наш скрипт Settings.cs
Создаем метод, который будет принимать int – индекс выбранного пункта.
Сохраняем скрипт и подключаем метод к событию на нашем меню. На этот раз это событие Dropdown – On Value Changed.
Поскольку наш метод будет получать значение от самого UI элемента, то мы выбираем название метода из группы Dymanic int. по аналогии с предыдущим пунктом.
Разрешение экрана
Экраны у всех разные и наперед угадать какие разрешения на них будут поддерживаться невозможно. Поэтому для настроек разрешения экрана нужно сначала получить все возможные разрешения, а потом заполнить список разрешений этими значениями.
Первое что нам понадобится – массив типа Resolution[] где мы будем хранить значения разрешений экрана.
Однако для пунктов выпадающего списка тип – string. Поэтому создаем список List<> в который мы будем сохранять значения возможных разрешений. Для работы со списками необходимо подключить:
Также нам понадобится ссылка на соответствующий Dropdown. Для работы с UI элементами следует также прописать:
В скрипте получим следующие поля:
Инициализацию и заполнение проводим в методе Awake. Этот метод вызывается при запуске объекта, соответственно выполняется раньше, чем все остальные методы.
Получаем значения и каждое из них добавляем в List в формате ширина*высота. После этого очищаем список Dropdown и заполняем его новыми опциями.
Теперь нужно создать метод, который будет менять разрешение экрана. Как и в предыдущих пунктах – принимать значение будем от UI элемента. Создаем функцию, которая принимает int
В SetResolution необходимо передать параметры – ширина, высота и булевскую переменную, отвечающую за полный экран. У нас такая уже есть – это isFullScreen. Передаем ее в функцию.
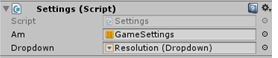
Дальше не забываем подключить к соответствующему событию наш метод Resolution из группы Dynamic Int, а так же добавить ссылку на нужный Dropdown.
Готово. Теперь можно использовать это меню вместо скучного дефолтного лаунчера. Однако, чтобы был толк нужно отключить его запуск.
Application.Quit
Shut down the running application. The Application.Quit call is ignored in the Editor.
If you want to use Application.Quit when running Unity inside another application, see the UnityasaLibrary-Android Unity as a Library Manual page for more information.
Note: In most cases termination of application under iOS should be left at the user’s discretion. Calling this method in iOS player might appear to the user that the application has crashed Consult Apple Technical Page qa1561 for further details.
How to quit the game in Unity
Quitting the game in Unity can be a very simple task.
Which is great, because just about any game or application you make is probably going to need a way to exit at some point.
However, while the basic method of quitting a game in Unity is very simple, there are a few extra things to consider.
Such as quitting in the editor compared to quitting from a built version of the game, how to automatically run code when the game exits and how different platforms handle the closing of an application.
But don’t worry, because in this article you’ll learn everything you need to know about quitting a game in Unity, step by step.
So, how do you quit a game in Unity?
You can quit a game in Unity by calling the Application.Quit function, which will close a running application. However, while this works to end a built application, Application Quit is ignored when running the game in Play Mode in the editor.
In this article, I’ll show you how to properly use the Quit function, how to exit play mode from a script when working in the editor, and how you can run specific code when the application tries to close.
Let’s start with the basic method of quitting a game in Unity.
How to quit the game in Unity (using Application Quit)
You can quit a game in Unity using the Application.Quit function, which will close the running application.
Like this:
This works in built versions of the game, and can be used to give the player manual control over exiting the application.
Such as when a key is pressed for example.
How to quit when the Escape key is pressed
To trigger the quit function when a key is pressed, for example, the Escape key, simply check for the Key Down condition in Update and trigger the quit function when it’s pressed.
Like this:
Which will quit the game as soon as the Escape key is pressed.
However, while exiting when a key is pressed can be useful, chances are that you’ll be triggering the Quit function from a menu button instead.
So how can you connect the quit function to a button?
How to quit the game using a button
To trigger the quit function from a menu button, you’ll need to place it inside a public function.
Like this:
Making the function public will allow the button to access the quit game method when it’s clicked.
Next, on the Button component that you want to use to trigger the quit function, add a new On Click Event:
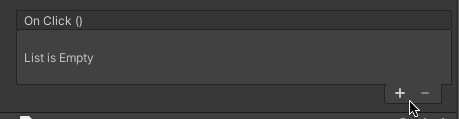
And then drag the script containing the quit function to the empty On Click object field:
Then, to trigger the quit function when the button is pressed, select the quit script and then the quit function from the drop-down menu:
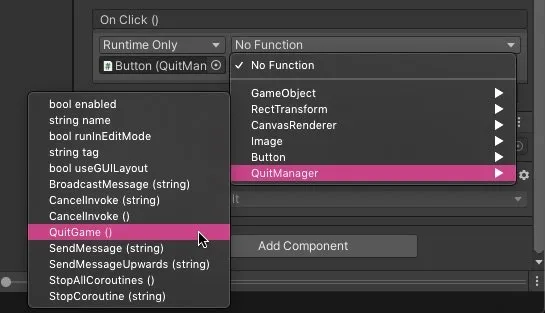
If you don’t see the quit game function in the list, make sure it’s a public method.
If you can’t find the function in this list, go back to the script to make sure that it’s definitely public.
Then, when you click the button, the game will close.
However… keep in mind, that this will only work from a built application.
In the Unity editor, the Application Quit function is ignored so pressing this button in Play Mode won’t do anything.
So, how can you add a quit function to your game that also works in the editor?
How to exit Play Mode from a script in Unity
While the Application Quit function works in a built game to close the application, it doesn’t do anything in the Unity editor.
The function is ignored, so trying to use the quit function to exit Play Mode, doesn’t work.
However, it is still possible to exit out of Play Mode from a script in Unity, you just need to use a different function to do it.
This works by setting the Is Playing property of the Editor Application class to false.
Like this:
This has the same effect as quitting the game using Application Quit, except that it works in the editor.
This can be useful for testing the game quitting process without building the game first, as well as a shortcut for leaving Play Mode quickly.
For example, when a key is pressed.
Like this:
Exiting Play Mode can be set up to work in the same way as the standard quit function, by placing it inside a method that’s called when a key or a button is pressed
There’s just one problem.
While setting Is Playing to false works to exit Play Mode in the editor, it won’t work in the built game.
In fact, because the Unity Editor class can’t be included in the built application, you won’t even be able to build the game when using this code.
And if you try, you’ll get an error.

Trying to include the Unity Editor class in a build will cause an error.
So how can you exit Play Mode from a script, without running into errors when you try to build your game?
How to run different code in the Unity Editor (using Preprocessor Directives)
Preprocessor Directives are used to conditionally compile code in your game.
In Unity, you can use preprocessor directives to run different code depending on certain conditions.
For example you could run different code depending on the platform the game is running on.
Or, if you’ve switched to the new Input System in Unity, you could ignore blocks of code that relate to the old Input Manager.
In this case, preprocessor directives are useful for checking if the game is being run in the editor or not.
This means that you can use a different quit method for when you’re working in the editor, and it will be automatically excluded when the time comes to build your game.
Like this:
How to quit when Unity gets stuck in Play Mode
It can be easy to make a mistake in Unity, such as accidentally creating an infinite loop, which can cause the Unity editor to freeze in Play Mode.
This means that, if you haven’t saved the scene you’re working on, trying to exit Play Mode to recover your work may be impossible.
While there isn’t currently a way to force-quit Play Mode in Unity, you may still be able to recover the work you lost if you have to force Unity to close.
Before entering Play Mode, Unity automatically saves a backup of the scene to the Temp folder. This means that, as long as you haven’t restarted the Unity editor, you can recover the scene you were working on before the crash, restoring your work.
Inside the Temp folder, you’ll find a directory, “__Backupscenes”, which will contain a file called “0.backup”.
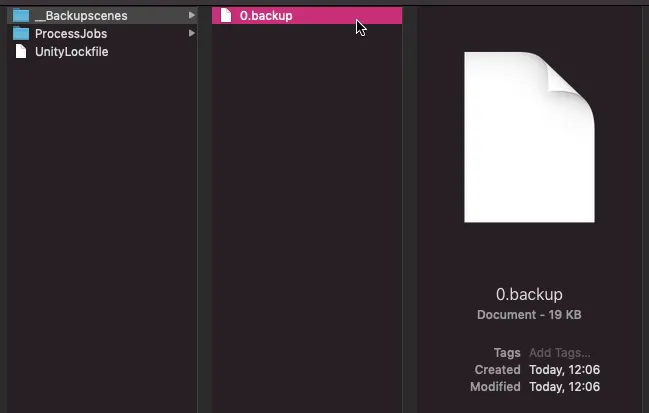
So long as you haven’t restarted Unity, you’ll find a backup of the scene you were working on in the Temp folder.
Changing the extension of this file to .unity will allow you to import it back into your project and open it as a scene.
Change the backup’s extension to .unity to use it in your project.
Keep in mind however that the Temp folder will be cleared when Unity restarts.
This means that, if you open the editor before saving the backup file, or if you don’t move the backup out of the Temp folder, your work will be lost.
How to check if the application is quitting (using On Application Quit)
In the same way that you can run specific code at specific times, such as when an object is enabled or disabled, it’s also possible for a script to run specific code when the game quits.
This works in Unity by using the On Application Quit message, which is called on all game objects when the game is closed.
This can be useful for autosaving on exit, so that the player has the option of loading their game if they forgot to save it, or it could be used to keep track of how long it’s been since the application was last closed.
Like this:
In this example, a string that reads the current time is stored to a Player Pref value when the game quits.
If that same Player Pref is read when the application starts again, it’ll return the time that the application was closed.

On Application Quit is called when the game closes, and can be used to run functions before quitting.
The On Application Quit message is called even if the script component that the function is on is disabled, but only if its game object is enabled.
While it will work when quitting manually from the game, or when quitting from the operating system, On Application Quit won’t be called if the application is forced to close or crashes.
Generally speaking, anything you add into the On Application Quit method should run before the game closes. However, if you try to start a Coroutine, you’ll find that it will be able to start but won’t complete.
For this reason, if you plan to use a coroutine as part of your quit process, for example, to fade out the screen, you may wish to place it before the Application.Quit function as part of the manual quitting process, so that you can run the coroutine in full before the game closes.
Keep in mind, however, that quitting the game outside of this process, such as by quitting from outside the application, won’t run the coroutine so, to avoid inconsistent results, make sure to place any important code, such as creating an exit save, inside the On Application Quit function.
How to prevent the game from quitting when Application Quit is called
While it’s possible to trigger a function when the game quits using the On Application Quit message, it’s also possible to prevent the game from quitting at all, using the Wants to Quit event.
Wants to Quit is an event that’s called when the quit process has been started, but can still be cancelled. It works by adding an event handler, that returns a true or false boolean value, to the Wants to Quit event. It’s then possible to prevent or allow the game to quit depending on the value that’s returned.
Like this:
The Wants to Quit event can be used to prevent an application from closing.
Using Wants to Quit to prevent an application from closing can be useful for avoiding data loss.
However, while this method can be used to cancel a manual attempt to exit, it won’t prevent the game from quitting in the event of a forced close, a crash or on iOS, where closing an app can’t be prevented.
Quitting the game on mobile devices
Depending on the platform your game is running on, the process of quitting a game can be very different.
For example, on mobile devices, which manage their applications in a different way to desktop computers, you may need to change how the game is exited.
Such as on iOS, for example, where games are not actually meant to be closed at all.
How to quit the game on iOS in Unity
When running a game on iOS, you’re generally not expected to offer a method of closing the application.
This is because the method of closing an app on an iOS device is for the user to swipe up on its preview in the multi-tasking view, closing the application manually.
Whereas an iOS application that closes itself using the Application Quit function may, instead, appear to have crashed.
How to quit the game on Android in Unity
Using the Application Quit function on Android devices usually works as you expect it to.
However, when quitting an application you may still notice the game in the phone’s background apps list, as if it’s still running. This can sometimes be down to how the operating system manages recently used apps, keeping them in memory to make them easier to relaunch.
While your experience may vary, depending on the specific version of Android being used, it doesn’t necessarily mean that the game hasn’t closed as expected.
When offering methods for the player to trigger the Quit function on an Android device, you might want to assign the quit command to the phone’s Back Button.
This works by setting Back Button Leaves App to true…
Like this:
Alternatively, if you want to make use of the Back button for quitting the game, but don’t want the application to immediately close as a result, you’ll need to manually implement the Back Button into your script.
On Android, the Back Button can be detected as the Escape key, so assigning a command to the Back Button can be done by simply checking to see if the Escape key has been pressed.
Like this:
Now it’s your turn
How are you quitting your game in Unity?
Are you running any code when the game closes?
And what tips do you have about exiting an application in Unity that you know others will find useful?
Whatever it is, let me know by leaving a comment.

by John Leonard French
Game audio professional and a keen amateur developer.
Get Game Development Tips, Straight to Your inbox
Get helpful tips & tricks and master game development basics the easy way, with deep-dive tutorials and guides.
My favourite time-saving Unity assets
Rewired (the best input management system)
Rewired is an input management asset that extends Unity’s default input system, the Input Manager, adding much needed improvements and support for modern devices. Put simply, it’s much more advanced than the default Input Manager and more reliable than Unity’s new Input System. When I tested both systems, I found Rewired to be surprisingly easy to use and fully featured, so I can understand why everyone loves it.
DOTween Pro (should be built into Unity)
An asset so useful, it should already be built into Unity. Except it’s not. DOTween Pro is an animation and timing tool that allows you to animate anything in Unity. You can move, fade, scale, rotate without writing Coroutines or Lerp functions.
Easy Save (there’s no reason not to use it)
Easy Save makes managing game saves and file serialization extremely easy in Unity. So much so that, for the time it would take to build a save system, vs the cost of buying Easy Save, I don’t recommend making your own save system since Easy Save already exists.