Обновление Windows Server 2012 R2 до Windows Server 2019
Если вы хотите сохранить существующее оборудование и все роли сервера, которые вы настроили, без сжатия сервера, необходимо выполнить обновление на месте. При обновлении на месте вы переходите с более старой версии операционной системы на более новую, сохраняя свои параметры, роли сервера и данные. Эта статья поможет вам перейти с Windows Server 2012 R2 на Windows Server 2019.
Подготовка к обновлению на месте
Перед началом обновления Windows Server рекомендуется выполнить сбор данных с устройств для диагностики и устранения неполадок. Так как эти сведения предназначены для использования только в случае сбоя обновления, необходимо убедиться в том, что вы храните информацию в расположении, доступ к которому можно получить с вашего устройства.
Сбор данных
Откройте командную строку, перейдите в c:\Windows\system32 , а затем введите systeminfo.exe.
Скопируйте, вставьте и сохраните полученные сведения о системе в любом расположении на устройстве.
Введите ipconfig /all в командной строке, а затем скопируйте и вставьте полученные сведения о конфигурации в то же расположение, что и ранее.
Откройте редактор реестра, перейдите в куст HKEY_LOCAL_MACHINE\SOFTWARE\Microsoft\WindowsNT\CurrentVersion, а затем скопируйте и вставьте значения BuildLabEx (версия) и EditionID (выпуск) для Windows Server в то же расположение, что и выше.
После получения всех данных, относящихся к Windows Server, мы настоятельно рекомендуем создать резервную копию операционной системы, приложений и виртуальных машин. Кроме того, необходимо завершить работу, выполнить быструю миграцию или динамическую миграцию всех виртуальных машин, выполняющихся в данный момент на сервере. Во время обновления на месте виртуальные машины не могут работать.
Выполнение обновления
Убедитесь, что значение ProductName соответствует версии Windows Server 2012 R2.
Найдите установочный носитель Windows Server 2019 и выберите setup.exe.

Выберите Да, чтобы начать процесс установки.

Для устройств, подключенных к Интернету, выберите вариант Скачать обновления, драйверы и дополнительные компоненты (рекомендуется) , а затем щелкните Далее.

Программа установки проверяет конфигурацию устройства. Дождитесь ее завершения и щелкните Далее.
В зависимости от канала распространения, из которого был получен носитель Windows Server (розничная, корпоративная, OEM, ODM и т. д.) и лицензия на сервер, может появиться запрос на ввод лицензионного ключа для продолжения.
Выберите выпуск Windows Server 2019, который вы хотите установить, а затем щелкните Далее.

Выберите Принимаю, чтобы подтвердить условия лицензионного соглашения, исходя из вашего канала распространения (например, розничная, корпоративная, OEM, ODM версия и т. д.).

Программа установки предложит вам удалить модуль Microsoft Endpoint Protection через оснастку Установка и удаление программ.
Эта функция несовместима с Windows Server 2019.
Выберите Сохранить личные файлы и приложения, чтобы выполнить обновление на месте, а затем щелкните Далее.

Когда программа установки завершит анализ устройства, она предложит перейти к обновлению, выбрав действие Установить.

Начнется обновление на месте, в котором отображается окно Обновление Windows с информацией о ходе выполнения. После завершения обновления сервер перезапустится.

Действия по завершении обновления
После завершения обновления необходимо убедиться, что обновление до Windows Server 2019 прошло успешно.
Проверка успешности обновления
Откройте редактор реестра, перейдите в куст HKEY_LOCAL_MACHINE\SOFTWARE\Microsoft\WindowsNT\CurrentVersion и просмотрите запись ProductName. Вы должны увидеть здесь выпуск Windows Server 2019, например Windows Server 2019 Datacenter.
Убедитесь, что все приложения работают, и что подключения клиентов к приложениям выполняются успешно.
Если вы считаете, что во время обновления возникли проблемы, скопируйте и создайте архив каталога %SystemRoot%\Panther (обычно C:\Windows\Panther ) и обратитесь в службу поддержки Майкрософт.
7 Steps to Migrate Windows 2012 R2 Domain Controllers to Windows Server 2019

One of the best ways to secure your systems is to make sure that Active Directory (AD) domain controllers (DCs) are running an up-to-date version of Windows Server. DCs are critical infrastructure because they manage the security and access to all your IT resources. If a DC is compromised, then you should consider your entire network compromised. DCs are high-value targets for hackers and you should take all reasonable steps to protect them.
Many organizations are still running DCs on Windows Server 2012 R2. And while the OS is supported under Microsoft’s extended support until 10/10/2023, later versions of Windows Server are significantly more secure, offering features like built-in antimalware in the form of Windows Defender, Credential Guard to protect local and remote domain credentials on compromised servers, and many under-the-hood security enhancements that make newer versions of Windows more robust.
It is often the case that organizations are licensed to upgrade to the latest version of Windows Server but don’t because they don’t want to touch their working infrastructure. But because of the nature of AD, it’s relatively easy to swap out an old domain controller for a new one. And without interrupting critical IT services.
In this article, I’m going to take you through the high-level steps for migrating a Windows Server 2012 R2 DC to Windows Server 2016 or Windows Server 2019. The procedure is the same, regardless of whether you choose Server 2016 or 2019. But I recommend migrating straight to Windows Server 2019. There simply isn’t a reason not to.
1. Set up a new server using Windows Server 2019
The first step is to install Windows Server 2019 on a new physical device or virtual machine. If you are more technically experienced with Windows Server, you could choose to install Server Core and then perform the necessary steps using PowerShell or by remotely connecting to the new server using Server Manager or Windows Admin Center. Otherwise, install Windows Server with the Desktop Experience role enabled.
If you are installing Windows Server 2016, you can check out Aidan Finn’s article on Petri here.
2. Join the new server to your existing Active Directory domain
Once the new server is up and running, join it to your existing AD domain. You can start the process from the Local Server tab in Server Manager by clicking WORKGROUP under the Properties. The procedure is then the same as joining Windows 10 to an AD domain. You will need to reboot the server to complete the process.
3. Install the Active Directory Domain Services role
Wait for the server to reboot and then sign in with a domain admin account. You can then install the Active Directory Domain Services (AD DS) server role using Server Manager and the Add Roles and Features wizard in the Manage menu. You can also use the following PowerShell command:
4. Promote the new server to a domain controller
When the AD DS server role has been installed, you’ll get a notification in Server Manager prompting you to promote the server to a domain controller. Clicking the yellow exclamation mark icon will launch the AD DS configuration wizard. You should choose to ‘Add a domain controller to an existing domain’ and follow through the on-screen instructions. And providing that you are signed in with a domain admin account, adprep will automatically prepare your existing domain.
5. Move Flexible Single Master Operation (FSMO) roles to new server
The next step is to log on to the old domain controller and move the domain and forest FSMO roles, there are five in total, to the new DC. The easiest way to do this is using PowerShell. In the command below, you should replace DC1 with the name of your new DC.
This article assumes you have a domain with only one DC. In practice it’s likely that you will have more than one DC, so make sure you understand how FSMO roles work and on which DCs they are located in your domain and forest.
On the new domain controller, confirm that the FSMO roles have been moved. Start by checking the domain FSMO roles. Using Get-ADDomain, check the name of the server next to the following entries: InfrastructureMaster, PDCEmulator, and RIDMaster. The server name should match that of your new domain controller. Similarly, using Get-ADForest, check the name of the server next to the following entries: SchemaMaster and DomainNamingMaster. Again, the server name should match that of your new domain controller.
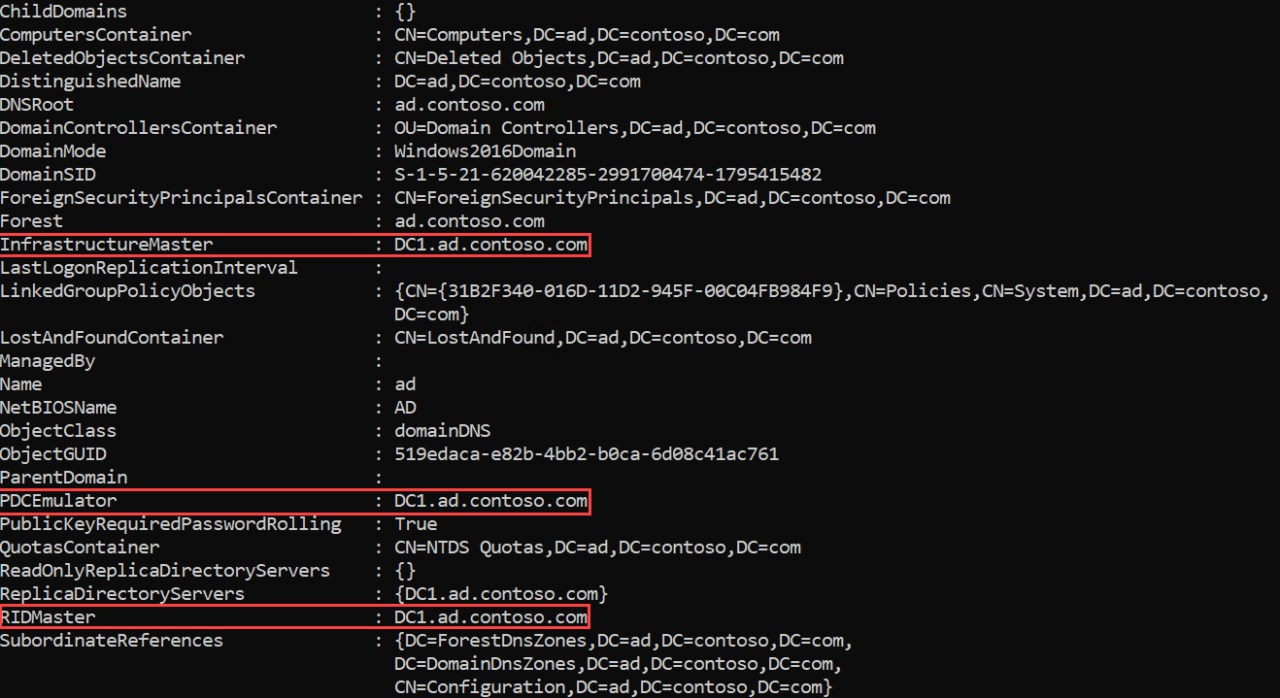 7 Steps to Migrate Windows 2012 R2 Domain Controllers to Windows Server 2019 (Image Credit: Russell Smith)
6. Demote your old domain controller
Now that you have moved the FSMO roles to the new DC, you can safely demote the old Windows Server 2012 R2 domain controller. You can demote a DC using Server Manager. One way to demote a DC is to use the Remove Roles and Features command in the Manage menu to remove the AD DS server role. Removing the role will open the Active Directory Domain Services Configuration wizard and take you through the steps to demote the DC before the AD DS role can be removed.
Alternatively, you can use the Uninstall-ADDSDomainController and Uninstall-WindowsFeature PowerShell cmdlets to demote the DC and uninstall the AD DS server role respectively.
7. Raise the domain and forest functional levels
Finally, you can raise the domain and forest functional levels to Windows Server 2016. Even if you are running Windows Server 2019, the highest functional levels are Windows Server 2016. You can confirm the domain and forest levels using Get-ADDomain and Get-ADForest cmdlets.
And that is it! As you can see, while there are several steps, it is relatively simple to migrate a DC to a more current version of Windows Server. So, I encourage you to look at migrating any DCs that are running anything below Windows Server 2016.
More from Russell Smith
Project Volterra, Hybrid Loop, and NPUs to Supercharge AI on Your Devices

Windows 11 Approved for Broad Deployment and ‘One Outlook’ Drops for Insiders

Microsoft Takes on Rival Calendly with Outlook Bookings — Plus the Latest IT News Updates
Whether it’s Security or Cloud Computing, we have the know-how for you. Sign up for our newsletters here.

Microsoft Announces Entra, A New Identity and Access Management Suite
May 31, 2022 | Rabia Noureen
Microsoft Releases Out-Of-Band Patches to Fix Windows AD Authentication Issues
May 20, 2022 | Rabia Noureen

Cloud Conversations – Ståle Hansen on Digital Wellbeing and Viva Explorers
May 19, 2022 | Laurent Giret
How to Access Active Directory
May 17, 2022 | Michael Reinders

Microsoft Rolls Out Azure AD Verifiable Credentials Service to More Customers
Full Guide | Upgrade Windows Server 2012 R2 to 2019 Securely
To upgrade Windows Server 2012 r2 to 2019 on the same hardware and keep all the server roles and data intact, in-place upgrade is a good idea. Theoretically it shouldn’t delete any of your data, but it’s best to make a backup before upgrading just in case.

By Delia  / Last update January 27, 2022
Why upgrade to Windows Server 2019
If you are still running older system like Windows Server 2012 or 2012 r2, maybe it’s time to move on and upgrade to the latest version — Windows Server 2019. Here are some of the significant reasons:
◇ Newer system has better compatibility with new services and applications.
◆ Windows Server 2019 makes it easier to integrate Linux with the new features like Linux Containers on Windows, Windows Subsystem for Linux (WSL), and the new Windows Server 2019 application platform.
◇ Windows Server 2019 builds on its strong foundation of security. Now it can not only block threats, but also monitor and reacts to perceived threats.
◆ Windows Server 2019 has been designed to work with or in the Cloud. It’s easier for users to connect their existing local environments to Microsoft Azure.
In addition, Windows Server 2012 R2 has ended mainstream support in 2018, and the end of extended support is in 2023. It means Microsoft will focus on newer OS like 2019, and an upgrade can bring you better follow-up support.
Can Windows Server 2012 r2 be upgraded to 2019?
First of all, the answer is yes. In-place upgrade enables you to upgrade older system to the newer one directly while keeping the same hardware and all the settings, server roles, data intact without flattening the server.
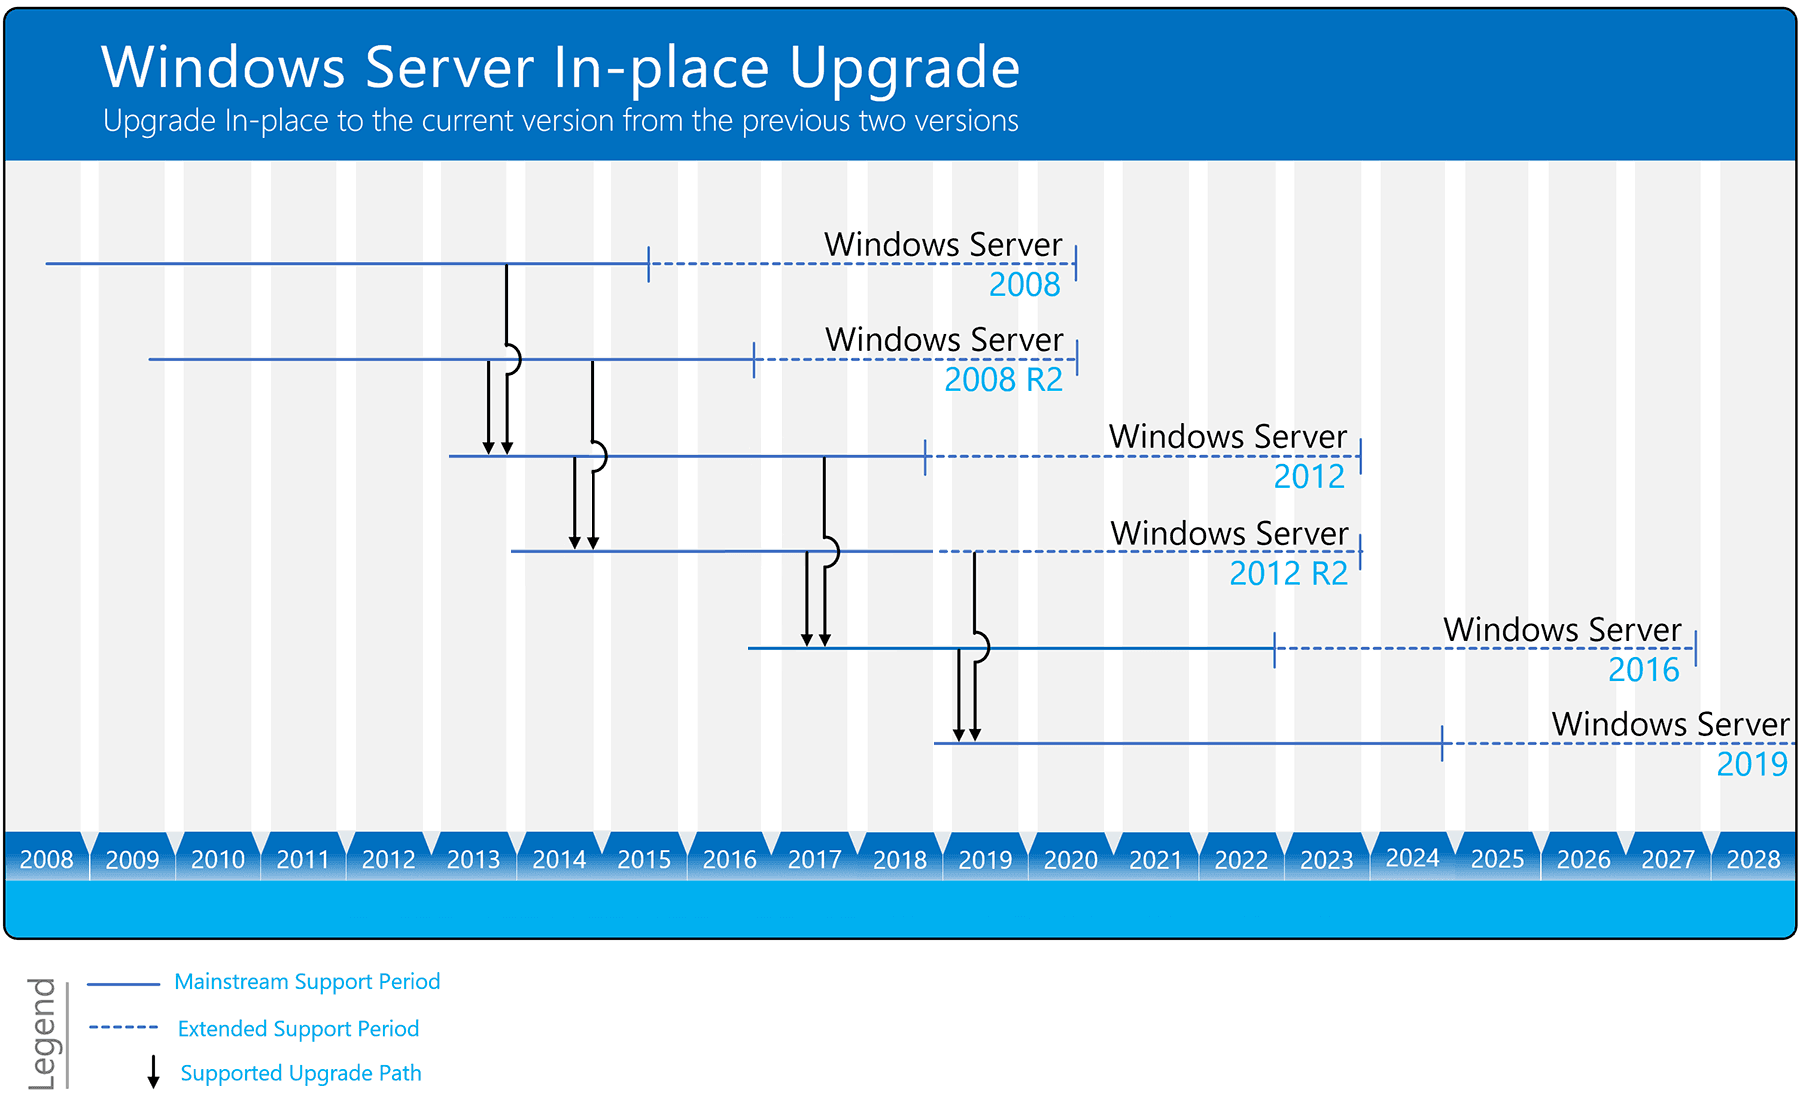
As shown in the figure below, in-place upgrade is supported between any two operating systems that are linearly connected, so you are allowed to upgrade Windows Server 2012 r2 to 2019, indeed.
However, if you want to upgrade Windows Server 2012 to 2019, you’ll need to in-place upgrade it to 2016, then 2016 to 2019. Otherwise you can only clean install 2019 to overwrite the existing operating system, and to avoid data loss, it’s necessary to backup the server in advance. This is also true for older OS like Windows Server 2008 (r2).
Must-know information for Windows Server 2019 upgrading
◉ Windows Server 2019 has its own system requirements. If your computer does not meet the minimum standards, you will not be able to upgrade to Server 2019 successfully.
System requirements of Windows Server 2019
1.4 GHz 64-bit processor
Compatible with x64 instruction set
Supports NX and DEP
Supports CMPXCHG16b, LAHF/SAHF, and PrefetchW
Supports Second Level Address Translation (EPT or NPT)
512 MB (2 GB for Server with Desktop Experience installation option)
ECC (Error Correcting Code) type or similar technology, for physical host deployments
Disk space for system partition
Network adapter requirements
An Ethernet adapter capable of at least gigabit throughput
Compliant with the PCI Express architecture specification
DVD drive (if you intend to install the operating system from DVD media)
◉ How much does upgrade Windows Server 2012 r2 to 2019 cost? Well, there are many factors involved in this question, like hardware, virtualization and so on. But if you mean the cost of license for upgrading, the answer is clear. Microsoft generally doesn’t offer an upgrade sale, so you need to purchase a copy or Windows Server 2019 separately. Here’s a list for your reference.
Pricing and licensing overview
Pricing Open NL ERP
Highly virtualized datacenters and cloud environments
Windows Server CAL
Physical or minimally virtualized environments
Windows Server CAL
Small businesses with up to 25 users and 50 devices
Specialty servers (server license)
No CAL required
◉ Another issue worth considering is that some third-party applications may not be compatible with the latest systems. So to avoid subsequent troubles, you’d better check whether they support Windows Server 2019 or not before upgrading.
◉ In-place upgrade Server 2012 r2 to 2019 might also be supported by public or private cloud companies, but you need to check with your cloud provider for the details. Additionally, you cannot perform an in-place upgrade on any Windows Server configured to Boot from VHD. In-place upgrade from Windows Storage Server Editions to Windows Server 2019 is not supported, either. In this case, you could do a migration or clean installation instead.
Guide to in-place upgrade Windows Server 2012 r2 to 2019
Preparations before upgrading:
>> Patch your Windows Server 2012 r2 with the latest updates.
>> Insert and mount the Windows Server 2019 setup media.
>> Before upgrading, Microsoft suggests you to collect some information of the device. You can use it for troubleshooting purpose when the upgrade fails.
Go to C:\Windows\system32 and run “systeminfo.exe”. Copy and store the system information.
Open Command Prompt, type “ipconfig /all” and press Enter. Copy and store the configuration information.
Open Registry Editor, go to the HKEY_LOCAL_MACHINE\SOFTWARE\Microsoft\WindowsNT\CurrentVersion, then copy and store the Windows Server BuildLabEx (version) and EditionID (edition).
>> Although an in-place upgrade should not delete anything theoretically, there are also reported data-loss cases. So after you’ve collected related information, it’s highly recommend to make a backup of your operating system and important data.
>> Note you can’t have any virtual machines running during the in-place upgrade.
To perform Windows Server 2019 in-place upgrade:
1. Locate the Windows Server 2019 setup media, run setup.exe directly.
2. Select Download updates, drives and optional features (recommended) and click Next.
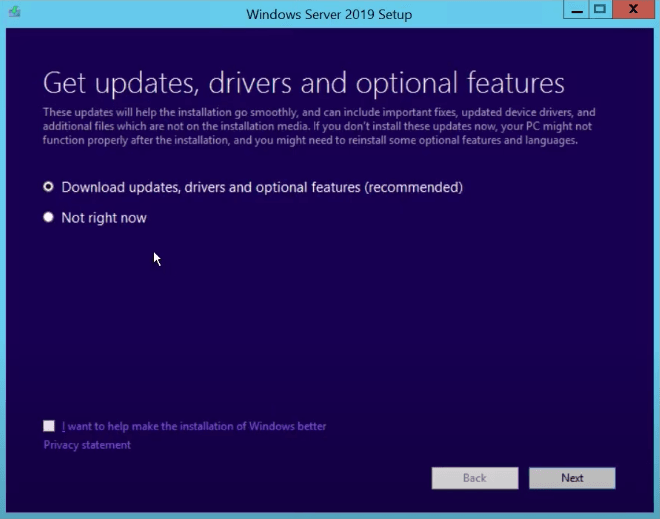
3. It will take some time to check device configuration, click Next when it’s done.
Whether you need to enter a license key to proceed is depending on the distribution channel you received the Windows Server 2019 setup media from.
4. Choose an edition of Windows Server 2019 that you want to install, click Next.
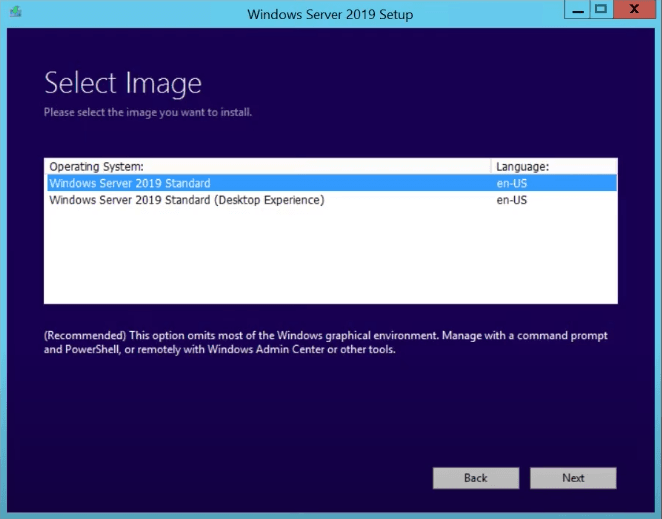
5. Accept the terms, then you can choose whether to keep personal files and apps. Click Next to continue.
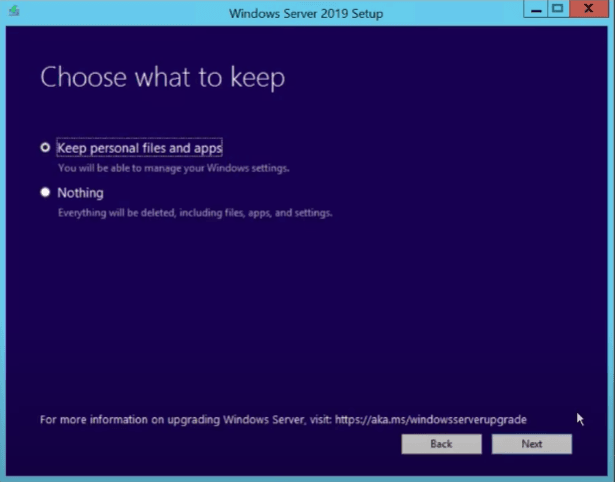
6. If there’s anything incompatible with Windows Server 2019, it will prompt you a message requiring you to Confirm.
7. Wait for a while and click Install to start upgrading. After finishing, your PC will automatically restart.
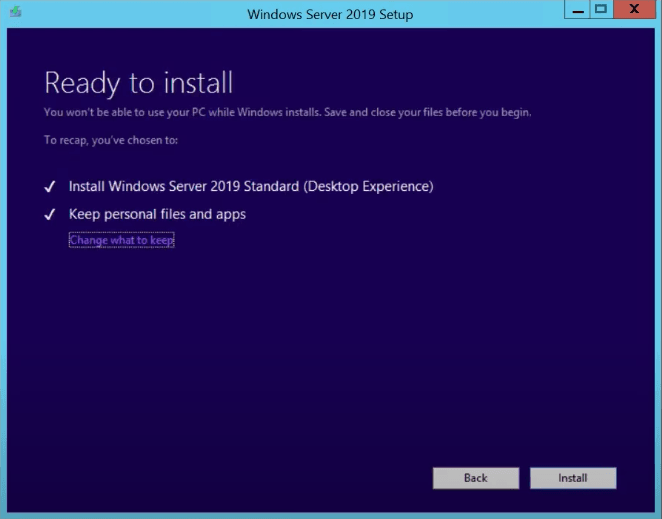
Now you’ve in-place upgraded Server 2012 r2 to 2019, you could take a little more time to make sure your operation is successful.
Check your current edition:
You can open Registry Editor and go to HKEY_LOCAL_MACHINE\SOFTWARE\Microsoft\WindowsNT\CurrentVersion, then check the edition of your Windows Server in ProductName.
Backup server in case of any data loss after upgrading
Although Windows Server comes with a backup utility Windows Server Backup, if you ever used it, you’ll find it complicated, slow, and not fully functional. It also has some conspicuous limitations such as the 2 TB limit for backup, the numbers of backups it could keep, the lack of individual file backup feature, etc.
With all these concerns, I prefer to use AOMEI Backupper as a Windows Server Backup alternative. It has different editions, and the Server edition is specially designed for Windows Server.
AOMEI Backupper Server supports Windows Server 2003, 2008, 2011, 2012, 2016, 2019, 2022 (including R2), Windows SBS 2003, 2008, 2011 and Windows XP, Vista, 7, 8, 8.1, 10, 11. No matter you want to upgrade Windows Server 2012 r2 to 2019, 2016 to 2019 or 2022, you could use this software to backup server to internal/external hard drive, NAS, network share, cloud service, etc.
As for functionality, it includes file/folder/partition/disk/system level backup & restore with many useful options. For instance, you can create scheduled incremental or different backup, set up retention policy to auto delete older backup, restore system image to different hardware, etc. And the operation is much simpler than WSB.
Moreover, it contains Sync features to copy your data with original format and structure, Clone features to duplicate hard drive and therefore migrate Windows Server to SSD. Have a try and find more practical tools.
Backup Windows 2012 r2 before upgrading:
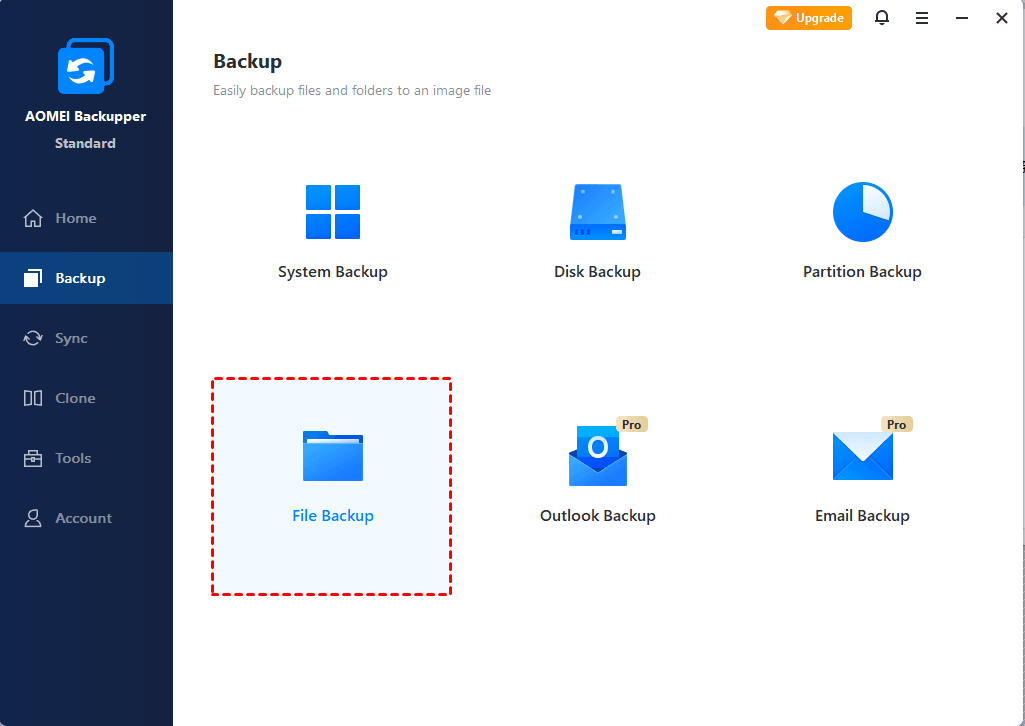
1. Click Backup on the left pane and choose a backup type. To show you how to perform individual file backup, I’ll take File Backup as an example. Optionally, you can also use System Backup in case of upgrade failure.
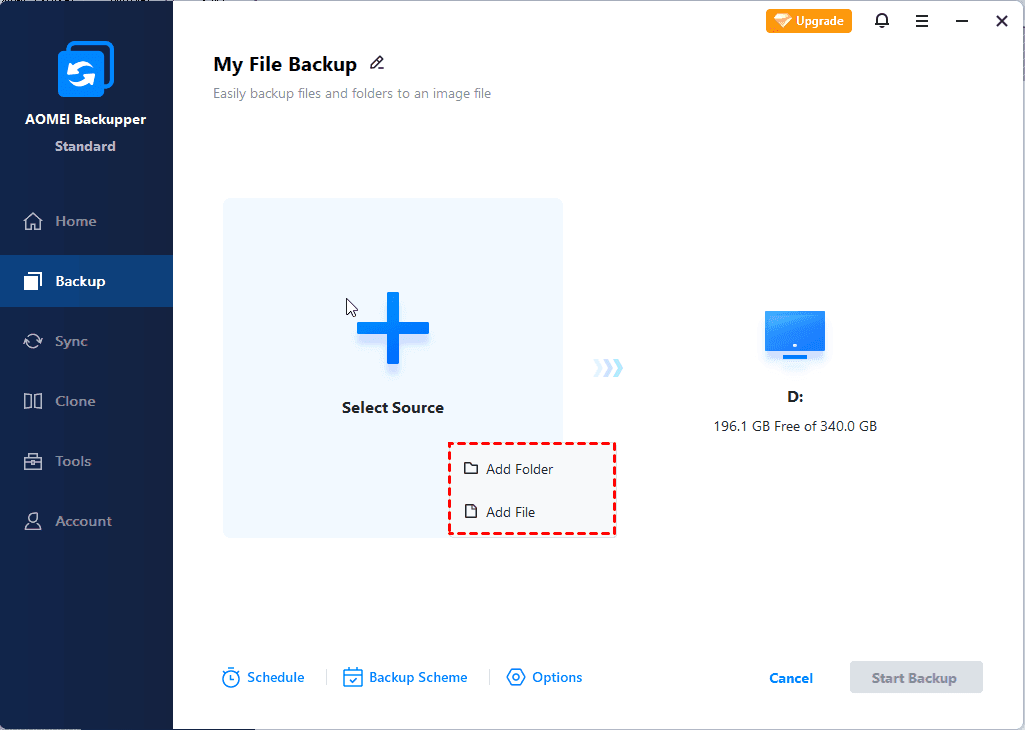
2. Tap Add Folder or Add File to select the data you want to backup, then specify a destination to store it.
For the source folder, you can tap the funnel icon to include/exclude files with specific suffix in Filter settings.
For the destination path, you can choose to Select a network location or Select a cloud in the drop-down menu.
3. After that, you can manage more settings to customize the backup, and then Start Backup.
Options: Manage compression level, image splitting, backup encryption, comment, email notification, etc.
Backup Schedule: Set up an automatic task on basis of daily/weekly/monthly/event triggers/USB plug in.
Backup Scheme: You can choose backup method as full/incremental/differential, and enable automatic cleanup to delete obsolete backups automatically.
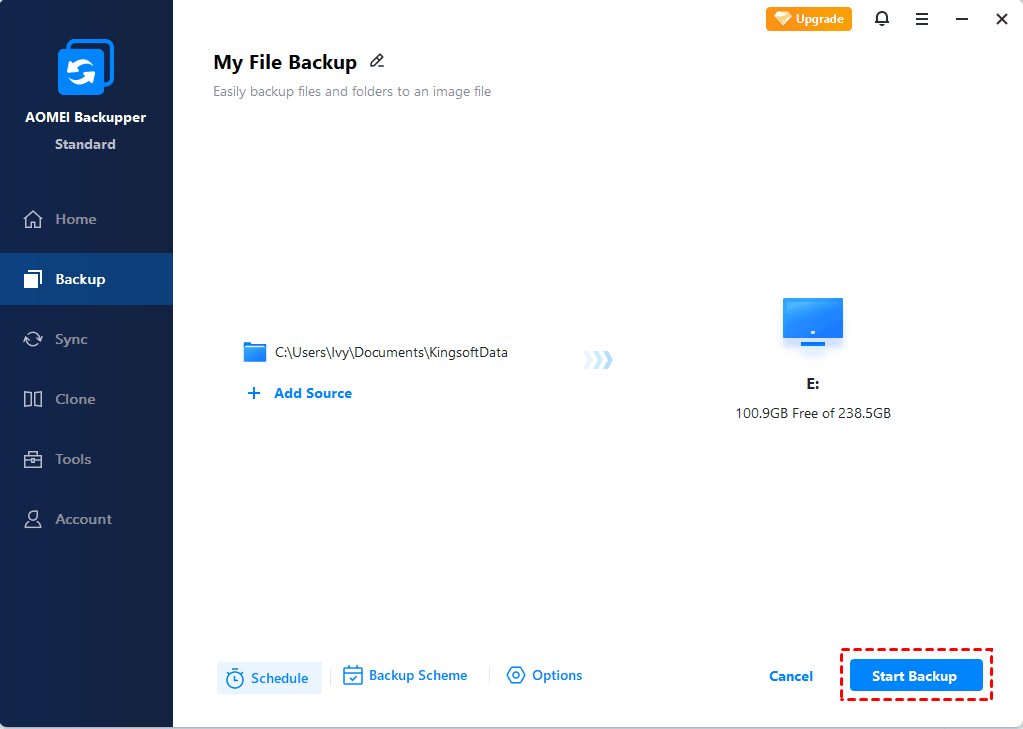
With this simple operation, you could backup whatever you want to keep before upgrading Windows Server 2012 r2 to 2019. Thus even if something goes wrong in the process of upgrading, you can easily retrieve important files or restore the operating system to an earlier state.
Conclusion
You can in-place upgrade Windows Server 2012 r2 to 2019 directly, and this process shouldn’t delete any of your files. But to avoid any unwanted data loss, it’s still recommended to backup important files in advance. Besides, if you want to upgrade Server 2012 or 2008 to 2019 through clean installation, backup is especially essential.
AOMEI Backupper is an ideal backup & restore solution for Windows Server with its high compatibility and complete features. In addition to basic data protection, it also enables you to automatically backup Windows Server to cloud, bare metal restore Windows Server to different hardware, restore Windows Server to virtual machine and so on.