NOMAD: Оптимизация «черных ящиков» в домашних условиях
Оптимизируемый (минимизируемый) функционал рассматривается как «черный ящик», за его вычисление отвечает отдельно имплементированный скрипт или программа (при работе в batch-mode) или специально реализованный С++-класс (при работе в library-mode). Оптимизация ведется при помощи алгоритма MADS
Исходники поставляются под лицензией LGPL, доступны версии для Unix, Linux, Mac OS X и Windows, для скачивания не требуется регистрация, но нужно заполнить небольшую форму (имя, организация, город, страна).
Зачем это нужно
Базовый сценарий таков. Вы разрабатываете вундервафлю, которая делает свой посильный вклад во имя всеобщего блага. В процессе работы используются крутые супер-современные методы и алгоритмы, настраиваемые через числовые параметры, которые вынесены у вас в конфиги (если просто не светятся в коде в виде магических цифр). У системы есть некоторый показатель качества, вычисляемый неизвестно как, и сейчас он находится на отметке 98 %, а вам неймется достигнуть 99.5 %. Хочется инструмент, которому можно было бы выдать «крутилки», и пойти попить чайку, в то время, как он поднимет качество системы чуть-чуть повыше. Неплохим инструментом для решения такого класса задач является NOMAD.
Частный случай. Для решения одной и той же задачи вы используете два разных алгоритма. Задача подразумевает некоторую классификацию или оценку входного объекта (пример — распознавание), на выходе вы получаете вектор значений оценок (пример — выходной вектор альтернатив у нейронной сети). На одном типе исходных данных лучше работает первый алгоритм, на другом — второй алгоритм, а четко разграничить типы входных данных вы по каким-то причинам не можете. Возможным выходом из положения является использование обоих алгоритмов, и «усреднение» результатов а-постериори. Вопрос только в том, с какими коэффициентами (весами) проводить усреднение результатов. Для определения оптимальных коэффициентов усреднения можно использовать NOMAD, если назначить функционалом, скажем, суммарное количество ошибок или некоторый суммарный штраф на заданной выборке входных данных.
Как этим пользоваться
Рассмотрим несложный пример использования NOMAD в режиме batch mode. Задача такая: вы хотить построить простую функцию, разбивающую объекты из множества X на два класса: A и B. Проведя небольшое статистическое исследование, вы обнаружили, что существуют признаки f1, f2 и f3, свидетельствующие о принадлежности объекта x какому-то классу. f1, f2 и f3 — функции от объекта, значением которых является действительное число. Классифицирующую функцию будем искать в виде C(x) = a1*f1(x) + a2*f2(x) + a3*f3(x) + b, где a1, a2, a3 — действительные числа, а b — целое от -1 до 1. Если C(x) >= 0, то будем говорить, что x принадлежит A, иначе x принадлежит B. Загвоздка в том, что если мы ошиблись и определили объект x к множеству B, хотя он на самом деле из A, то это конечно неприятно, но не смертельно, а вот если мы определили x в A, а должны были в B, то это в 100 раз хуже.
Есть несколько остроумных способов решить эту задачу, мы же, для примера, построим оценочный функционал и найдем коэффициенты при помощи NOMAD.
Пусть есть обучающая база, содержащая такие данные: истинный класс (куда мы должны определить
x) и значения признаков f1(x), f2(x), f3(x). База представляет собой такой текстовый файл: (скажем, base.data)
Функционал определяем таким образом: просматриваем базу, если произошла ошибка — то приибавляем к значению функционала стоимость этой ошибки. Стоимость ошибки «надо А, а мы сказали В» равна единице, стоимость ошибки «надо В, а мы сказали А» равна 100.
Пишем простую программку, принимающую в качестве единственного аргумента среды файл с коэффициентами a1, a2, a3, b и выводящую в стандартный поток вывода значение функционала.
Следующий шаг — конфигурационный файл NOMAD: (скажем, params.nomad)
В последней строчке — искомые коэффициенты.
Дополнительные возможности
В конфигурационном файле есть возможность указать огромное количество дополнительных параметров алгоритма оптимизации, в данном обзоре описаны лишь основные.
Есть также возможность использовать NOMAD как статическую С++-библиотеку (режим library mode). В этом случае нужно написать класс, вычисляющий функционал, что то вроде:
Послесловие
Пример получился слегка натянутым, для более эффективного поиска нужно было конечно использовать режим library mode. Кроме того, функционал в данном случае представляет собой сумму масштабированных сигнальных функций, можно было существенно облегчить работу алгоритму, если аппроксимировать эти сигнальные функции какими-нибудь сигмоидами. Функционал, по крайней мере, получился бы непрерывным. Но цель — проиллюстрировать — достигнута.
Буду рад услышать про другие инструменты, позволяющие выполнять что-то подобное, если кому-то таковые известны и есть опыт успешного применения.
HashiCorp Nomad — From Zero to WOW!
Nomad is a popular workload scheduler for not only containers, but for VMs and static binaries as well. In this post, I’ll show you how to get going from scratch, right from downloading and installing Nomad and running your first job, through to scaling up your application. Let’s get started!
For a video presentation of a 20 minute application setup on Nomad published in 2021, visit Deploy Your First App with HashiCorp Nomad in 20 mins
Contents
Introduction
It can be daunting when first looking at a new piece of software. There’s a balance to be struck between getting up and running as quickly as possible, while also trying to make sure you understand what it is you are doing. Getting started guides often try to jump to the advanced use cases before you are truly comfortable with the basics, let alone everything in between!
This guide will walk you through all the steps to getting Nomad running, explaining along the way what it is you are doing, and where to go for more information.
What Is Nomad?
Before we run any commands, it’s important to understand what Nomad is. Nomad is a modern, lightweight workload scheduler. But what is a scheduler? When I was a server engineer, I was the workload scheduler. Application teams that wanted to deploy their code would raise a ticket and throw their application code over to my team to arrange storage, compute and networking.
This was not a particularly fast or scalable solution. Any issues with the deployment would need to go back to the application team to resolve, and often problems would be blamed on each other — “it works on my machine” would be muttered frequently.
It was also rare that we could purchase additional equipment to run the new application on, so it often meant having to find a home for it on the existing infrastructure.
Thankfully we now have Nomad to do this work for us. By creating a pool of compute, storage, and networking, we can let Nomad decide where it’s most efficient to run our application.
By abstracting away the underlying operational aspects of infrastructure, developers can be granted access to perform deployments directly with Nomad, without needing to raise tickets or involve other teams.
Not Just Containers
When people think of schedulers, they often associate them with the running of containers. It’s rare to find an organisation that has migrated all of their workloads to containers. We still live in a world where we need to manage many different types of technologies. That’s why Nomad supports a wide range of task drivers such as Docker, Java and binaries running natively on the host operating system.
Nomad also has a pluggable architecture allowing the addition of new technologies to extend the functionality of Nomad even further.
Improving Efficiency
Bin packing is the process of filling bins in a way that maximises the utilisation of bins, and therefore minimises the overall number of bins needed. Nomad optimises the use of resources by efficiently bin packing workloads onto servers.
Many servers operate at around 2% utilisation. With Nomad, we might get that up to around 20% utilisation, or even higher if desired. That might not sound like a massive jump, but if we do the math(s), if we previously needed 100 servers to run our applications, with Nomad we’d only need 10.
How Nomad Works
Before getting to the hands-on info, it’s important to explain a little bit about how Nomad works so things make more sense later on.
Architecture
At a high level, the architecture of a single region Nomad deployment looks like this:

Within a region, we have both clients and servers. Servers are responsible for accepting jobs from users, managing clients, and computing task placements. Clients are machines that tasks can be run on. Each region may have clients from multiple datacenters, allowing a small number of servers to handle very large clusters (perhaps consisting of thousands of clients running millions of tasks).
In some cases, maybe for availability, scalability, or compliance, you may wish to run multiple regions. Nomad supports federating multiple regions together into a single cluster. At a high level, this setup looks like this:

In this blog, we will keep things very simple and run both the server and client on a single node. Check out the Nomad website for more information on clustering.
Jobs are the primary configuration that users interact with when using Nomad. A job, or job file, is a declarative specification of what tasks or workloads Nomad should run.
When a job is submitted or updated, Nomad will create an evaluation to determine what actions need to take place. If Nomad determines a workload needs to be started, as is the case when a new job is submitted, a new allocation will be created and scheduled on a client.
Allocations
An allocation is a mapping between a task group in a job and a client node. A single job may have hundreds or thousands of task groups, meaning an equivalent number of allocations must exist to map the work to client machines. Allocations are created by the Nomad servers as part of scheduling decisions made during an evaluation
API-driven — but don’t panic!
Nomad, like all HashiCorp products, is an API-driven product. Don’t worry if your curl-fu is not up to scratch. Nomad also has a web UI and a CLI to make it easy to work with. Ultimately however you interact with Nomad, those commands are translated to API calls. The good news is this means you can entirely automate Nomad if you wish, as 100% of the functionality is in the API!
Key Definitions
The Nomad job specification defines the schema for Nomad jobs. Job files are written in the HashiCorp Configuration Language (HCL), which strikes a nice balance between human readable and editable code, and is machine-friendly.
There are many pieces to the job specification although not all are required. Some of the key ones are below.
A specification provided by users that declares a workload for Nomad.
Task Group
A set of tasks that must be run together on the same client node. Multiple instances of a task group can run on different nodes.
The smallest unit of work in Nomad.
Task Driver
Represents the basic means of executing your Tasks e.g. Docker, Java, Qemu etc.
Resources
Describes the requirements a task needs to execute such as memory, network, CPU and more.
Starting Simple
Now the fun begins — we are going to get started with downloading, installing and running Nomad! The theory above will help you to understand what we are doing, so if you’ve skipped straight to this section, go back and spend a couple of minutes reading it — it will help in the long run!
A quick caveat — your operating system might work differently from the one used in this guide (MacOS). If you find a command or job is not working as expected, you might need to modify it to work in your particular environment. Refer back to the Nomad documentation for the most up to date information. At present Nomad only supports Windows containers when running on Windows. The examples given below are for Linux containers. If you want to use them as is and are running Windows, consider running a Linux VM to complete the examples.
Prerequisites
To complete the hands-on components you will need:
- Internet connectivity to download binaries and containers
- An up to date installation of Windows, Linux or MacOS
- An installation of Docker for your operating system
Download and Install
Nomad is a single binary. It can be run as both the server and client components, as well as the CLI client to interact with the Nomad servers. One binary to rule them all!
Download and installation is therefore very simple.
-
the appropriate package for your system.
- Unzip the downloaded file into any directory.
- (Optional) Place the binary somewhere in your PATH to access it easily from the command line.
That’s all! One of the strengths of Nomad is its simplicity. Having a single binary also makes upgrading Nomad much easier too.
Running Nomad
In this blog, we are going to use Nomad in “dev mode”. This runs Nomad on a single machine as both the server and client. The nice thing is we’ll be able to interact with Nomad in the same way we would if we were running hundreds or thousands of nodes.
One important note — in dev mode, Nomad will not persist any data. That’s fine for experimenting and prototyping, but not something you should do in production. Also in production, we’d recommend keeping workloads on client nodes and not scheduling work on the server nodes. Check out the Nomad documentation for more information on running it in production.
Starting Nomad in dev mode is very simple from the command line:
At this point, you should see the Nomad agent has started and started to output some log data similar to this:
From the log data, you will be able to see that the agent is running in both client and server mode, and has claimed leadership of the cluster. Additionally, the local client has been registered and marked as ready.
Leave this terminal window open, and open a new window if you wish to run any subsequent CLI commands. When you want to stop Nomad, return to the terminal window where it is running and press CTRL+C .
(Optional) Disabling the Java Task Driver
When starting the Nomad agent, it will perform fingerprinting of your system to detect CPU, memory, disk space, as well as which task drivers are available. When Nomad tries to detect the version of Java on MacOS, and it is not installed, the following dialog box is displayed from the operating system:

This won’t impact the running of Nomad, but as the fingerprinting takes place on a regular cadence, and every time it attempts to detect Java this dialog box will appear and take focus, it quickly becomes annoying.
Fortunately we can tell Nomad to blacklist the Java driver, preventing it from attempting a detection and therefore we won’t trigger the prompt. To do so we use an additional piece of client configuration.
If you are already running Nomad and want to avoid this annoyance, stop the agent from the command window by pressing CTRL+C .
Ideally you should save the additional configuration from above into a config file, and pass the path to the file to the -config parameter like this:
As we are only testing Nomad at this stage, I’ll use a Bash trick to add the config to a temporary file that will be added as an argument to the command line.
Bye bye annoying Java prompt!
Nomad Web UI
Once we have the Nomad agent running, we can access the web user interface by visiting http://localhost:4646 in a browser.

The jobs section looks pretty bare when you first start it up — we are going to fix that shortly!
The UI also shows us the Clients and Servers in the cluster. In this case, we will see the same node appear in each section. By clicking on the node name, information about that node will be displayed including OS type, Nomad version, and which resources and task drivers are available.
For more information, take a look at the Web UI tutorial.
Running Our First Job
Now that Nomad is up and running, we can schedule our very first job. We will be running the http-echo Docker container. This is a simple application that renders an HTML page containing the arguments passed to the http-echo process such as “Hello World”. The process listens on a port such as 8080 provided by another argument.
Job File
A simple job file that describes this looks like this:
In this file, we will create a job called http-echo , set the driver to use docker and pass the necessary text and port arguments to the container. As we need network access to the container to display the resulting webpage, we define the resources section to require a network with port 8080 open from the host machine to the container.
Running the Job in the Web UI
While we could use the CLI or API to run our job file, it is very easy to schedule the job from the Web UI.
From the Jobs section of the Web UI, click the Run Job button in the top right. This will take you to a screen where you can paste your job file contents into the Job Definition text box and click Plan .

When we plan a job in Nomad, it determines the impact it will have on our cluster. As this is a new job, Nomad will determine it needs to create the task group and task:
Click Run and Nomad will allocate the task group to a client (in our case there is only one client) and start running the task. Once the job is running, visit http://127.0.0.1:8080 in your browser and you will see the http-echo webpage with the text we passed as an argument in the job file:

Scaling Up Our Job
It’s very likely that you will want to run more than one instance of your application to provide high availability and capacity.
You may have noticed the count parameter in the job file above. If we were to increase this count from 1 to 5, and schedule the job again, we would run into an error during the plan phase:

Running only a single client means port 8080 can only be allocated once — the other 4 instances of our application cannot be placed because port 8080 will be already be in use by the first instance. One solution would be to add another 4 nodes to our cluster, giving us the ability to allocate port 8080 on each of those nodes to our application. Once we increase our count to 6, we will once again face a port collision and so a better strategy is needed.
One thing to note if you see a different number of unplaced tasks — in dev mode, Nomad will bind to the loopback interface and perform networking fingerprinting to determine which IP addresses are available. Depending on how a machine is configured, Nomad may detect both IPv4 and IPv6 addresses, and will use them when allocating tasks. In this scenario, the plan in Nomad reflects that it will allocate one of the tasks on the IPv6 address and one on the IPv4 address. Sadly Docker does not support IPv6 on MacOS, and therefore the task will never be started.
Making Jobs Dynamic
In our job file, we statically assigned port 8080 to our application. Nomad supports the use of dynamic port assignment. To do this, we simply remove static = 8080 from our job file so it looks like this:
We will need to reference this dynamically assigned port as an argument in our job file to let the http-echo process know which port to listen on. Nomad provides a number of Runtime Environment Variables that make this simple. The one we need to use is NOMAD_PORT_<label> , where <label> is the name we gave to our port, which in our case is simply http .
We can use the runtime environment variables elsewhere in our code, such as in the text argument that is passed to the http-echo container. These changes result in a config stanza in the job file that looks like this:
A Scaled Up Dynamic Job
Putting these changes together gives us this job file:
Running this by clicking the Run Job button in the Nomad Web UI gives us a successful plan:
Click Run and Nomad will start up 5 instances of the application, and assign a random port to each. The port numbers can be viewed in the UI by clicking on the job name and then each allocation in turn:

Each of the 5 allocations will be using a different dynamic port. While it is possible to query Nomad to obtain these ports, it can become somewhat laborious, so let’s look at an easier way to access our application.
Service Discovery
Applications have long had the need to be able to communicate with other resources and components. Back when the monolithic application ruled the world, this was generally an in-memory call. But as we’ve begun to decompose applications into more discrete units such as separating the web server from the database server, this communication typically takes place over a network. For components to be able to talk to each other, they need to know the network address to establish communication with. And as we move to micro-service based architectures, the problem has gotten even harder to manage.
For a long time we hard coded IP addresses into application code to solve this. As we moved to larger environments, we started to rely more on things such as DNS and load balancers. These solutions come with a cost, both monetarily and technically.
As platforms have become much more dynamic and elastic, mainly thanks to the success of the public cloud providers, IP addresses, load balancers and DNS cannot solve the challenges that come with ephemeral environments where IP addresses are rapid changing as services come up and down. As we often run multiple instances of an application, health checking is important to ensure failed instances are not returned in an address lookup, something DNS alone cannot provide.
Consul
Consul is a popular service discovery tool made by HashiCorp. It allows services to easily register themselves in a central catalog when they start up. When an application or service needs to communicate with another component, the central catalog can be queried using either an API or DNS interface to provide the required addresses.
In order to use Consul, we need to solve two challenges:
- We need a way to run Consul
- We need to register our http-echo application in the catalog
We can solve both of these easily with Nomad!
Running Consul in Nomad
There are different approaches to running Consul. In this example, we will schedule Consul in Nomad to run natively on my Mac using the raw_exec task driver. Rather than using a container in the Docker engine, raw_exec will run a task in the same OS as Nomad is running in.
While Docker containers provide a level of resource isolation, the raw_exec driver does not. In situations where you want to run an application natively on your OS, but also provide isolation of a tasks access to resources, the exec driver is a great choice. This relies on the underlying isolation primitives of the operating system, which are presently only found in the Linux kernel, so that rules out using it here on MacOS.
Nomad provides an artifact stanza to which we can provide a URL to a zip file containing the Consul binary. Nomad will then download and unzip this file for us, meaning there is nothing to install ahead of time! In the example below, the source parameter is set to the location of the Consul binary for MacOS. You can find the link to the binary for different operating systems in the downloads section of the Consul website.
Here is a job file to run Consul with the raw_exec driver:
Consul, like Nomad, has a “dev mode” to get up and running quickly — with the same caveats as before that this is not meant for production! The config stanza in the job file contains the command that will be run to start Consul, which will simply be consul agent -dev .
Running this by clicking the Run Job button in the Nomad Web UI gives us this plan:
Click Run to schedule the job. Once the task is running, access Consul in a web browser on http://127.0.0.1:8500.

The Services tab shows a list of all services that are registered in Consul’s catalog. Nomad automatically registers itself with a number of heath checks!
Registering a Service in Nomad
There are multiple ways to register a service in Consul. Fortunately Nomad has a first class integration that makes it very simple to add a service stanza to a job file to perform this registration for us.
To register our http-echo application, we simply add this to our job file:
We provide a name to register our service with in the Consul catalog, as well as specify the port — recall from earlier that we used http as the label in our job file for the network port — this will be the random port number Nomad assigns to the task when the job is run.
We can also specify a number of tags which will be used later.
The check stanza allows you to define what health check should be performed by Consul to ensure the service is healthy. Any services failing the health check will be removed from the response returned by Consul when a query for a service is made.
The job file now looks like this:
Running this by clicking the Run Job button in the Nomad Web UI will result in this plan, the same as we saw last time, but Nomad will now register the http-echo instances in Consul when they start up:
Click Run and then switch to the Consul Web UI. As the services start and are registered, http-echo will appear in the list of services. Clicking http-echo will show more information, including all of the port numbers that have been dynamically assigned.

While it is relatively easy to query Consul via DNS or API to retrieve these port numbers, web browsers themselves are not able to easily perform this action and route between the various running instances of our application. To solve this browser limitation, we will need to use one more tool.
Load Balancing
So that we can provide our web browser with a single IP address and port to make viewing our application easier, we will use a load balancer in front of our http-echo application to route us between the various running instances.
There are multiple ways to perform load balancing with Nomad which will depend on your environment and preferred load balancer. One of the options is to use Fabio. Fabio is a TCP reverse proxy, originally developed by the eBay Classifieds Group, that is automatically configured using information from Consul. This makes it very simple to use, and ideal for our setup.
Fabio, like Nomad and Consul, is a single binary. It is very easy to run as a job in Nomad, following the same pattern we used with Consul.
As this is using the raw_exec task driver, within the artifact stanza, the source URL points to the MacOS binary. Binaries for other systems can be found in the Fabio repository on GitHub.
As the original filename contains information about the version and architecture of the binary, the destination parameter is used to rename the binary to fabio to make the command within the config stanza easier to read and work with. It also means fewer changes to our job file when a new release of Fabio becomes available.
Fabio can be run without any additional parameters and will use a pseudo-random strategy for load balancing between multiple instances of the same application. In our job file, an additional argument of -proxy.strategy=rr is passed to the Fabio command to use a round-robin strategy instead.
Running this by clicking the Run Job button in the Nomad Web UI will result in the following plan:
Click Run and when Fabio has been scheduled and is running, it will automatically use the tags that were provided to Consul when the job was registered, to automatically configure itself with the instances running on the various dynamic ports.
If you are running on MacOS, you may need to click Allow if this window appears:

The tag urlprefix-/http-echo tells Fabio to add the instance to the route /http-echo . The instances of the application are then available by visiting http://127.0.0.1:9999/http-echo in a browser.
By refreshing the web page, Fabio will return each of the five instances of the http-echo application in turn before cycling back to the first instance and repeating the pattern.
As instances of the http-echo application are added or removed, perhaps as we scale up the application, or as instances fail and are marked as unhealthy by Consul, Fabio will keep in sync with the information in Consul and only load balance between healthy instances.
Upgrading An Application
Our application is running well — we have multiple instances available, being load balanced automatically. Should an instance fail, Nomad will automatically restart it for us.
There is another occasion when we want Nomad to restart an application for us — to upgrade an application to a newer version.
Nomad supports multiple update strategies. Broadly they are:
- Rolling upgrades
- Blue/green deployments
- Canary deployments
With a rolling upgrade, a defined number of instances are restarted with a new version of the application. Once they are in a healthy state, another set of the same defined number of instances are restarted with the new version, and so on until all instances have been updated. Nomad will even revert to an older, healthy job if a deployment fails.
In a blue/green deployment, there are two complete but separate deployments. One of the deployments will be active, that is to say, it is receiving traffic or in service. The inactive deployment can be updated and tested, and once confirmed as healthy, it will be marked as active and start receiving traffic, while the other is marked as inactive. This process is repeated for all subsequent deployments.
A canary deployment is a way to test a new version of a job before beginning a rolling upgrade. This is the strategy we will use to update our http-echo application.
Canary Deployments
For all upgrade strategies, Nomad provides an update stanza. For a canary deployment, it will look like this:
Here we specify we want Nomad to start up 1 canary instance of the new version of the application. It is possible to specify a higher number and create multiple instances of the new version of the job to perform testing. In our case, 1 canary instance will be sufficient.
The max_parallel parameter specifies the number of allocations within a task group that can be updated at the same time once we confirm our canary instance works as intended. By setting this to be equal to the number of instances running, we will update our entire application in parallel. To prevent an outage of service, it is possible to set this to a lower number, which will increase the total time taken to perform the update, but will ensure some instances will continue to operate while others are upgraded.
It is also necessary to change the job file so that an update is triggered, such as changing the version of a Docker image that should be run. In this example, the text argument passed to the http-echo application is amended, which is sufficient to trigger an update in Nomad:
It is important not to change the name of the job so Nomad understands this is a change to an existing job. The complete job file with the update stanza looks like this:
Running this by clicking the Run Job button in the Nomad Web UI will result in the following plan (some of the output has been trimmed to show only the changes to the job):
Click Run and Nomad will create 1 canary instance of the application running the new version. The existing 5 instances will not have been changed and will still be running the old version of the job.

Return to Fabio on http://127.0.0.1:9999/http-echo and refresh the web page until the instance running the updated application with the new text appears.

Promoting a Canary Deployment
Once the canary instance is running and any testing is successfully completed, the deployment is promoted triggering an update to the existing running instances.
From the http-echo-dynamic-service job view in the Web UI, click Promote to begin the update of the old version of the application. When complete, return to Fabio and refresh the web page to see all 5 instances now running the new version of the application.

Summary
This post covered a lot — well done to you for making it all the way through to the end! Starting right from zero, we covered:
- Downloading, installing and running Nomad
- Running a job in Nomad and accessing a web application
- Scaling up and running multiple instance of that web application
- Service discovery and health checking
- Load balancing
- Updating an application
I think that takes us all the way to WOW!
Hopefully you found this useful and are enjoying using Nomad. Please see the resources below to help you carry on with your learning!
Настройка кластера Nomad с помощью Consul и интеграция с Gitlab
В последнее время стремительно растет популярность Kubernetes — все больше и больше проектов внедряют его у себя. Я же хотел коснуться такого оркестратора, как Nomad: он отлично подойдет проектам, где уже используются другие решения от компании HashiCorp, например, Vault и Consul, а сами проекты не являются сложными в плане инфраструктуры. В данном материале будет инструкция по установке Nomad, объединения двух нод в кластер, а также интеграции Nomad с Gitlab.

Тестовый стенд
Немного о тестовом стенде: используются три виртуальных сервера с характеристиками 2 CPU, 4 RAM, 50 Gb SSD, объединенных в общую локальную сеть. Их названия и IP адреса:
- nomad-livelinux-01: 172.30.0.5
- nomad-livelinux-02: 172.30.0.10
- consul-livelinux-01: 172.30.0.15
Установка Nomad, Consul. Создание Nomad кластера
Приступим к базовой установке. Несмотря на простоту установки, я опишу ее для целостности статьи: по сути она была создана из черновиков и заметок для быстрого доступа в случае необходимости.
Прежде, чем приступить к практике обсудим теоретическую часть, потому что на данном этапе важно понимание будущей структуры.
У нас существует две ноды номада и мы хотим объединить их в кластер, также на будущее время нам потребуется автоматический скейлинг кластера — для этого нам понадобится Consul. С помощью этого инструмента кластеризация и добавление новых нод становится очень простой задачей: созданная нода Nomad подключается к Consul агенту, после чего производит подключение к существующему Nomad кластеру. Поэтому в начале мы установим Consul сервер, настроим базовую http авторизацию для веб-панели (она по умолчанию без авторизации и может быть доступна по внешнему адресу), а также сами Consul агенты на Nomad серверах, после чего только приступим к Nomad.
Установка инструментов компании HashiCorp очень проста: по сути, мы просто перемещаем бинарный файл в bin директорию, настраиваем конфигурационный файл инструмента и создаем его сервис файл.
Загружаем бинарный файл Consul и распаковываем его в домашнюю директорию пользователя:
Теперь у нас есть готовый бинарный файл consul для дальнейшей настройки.
Для работы с Consul нам требуется создать уникальный ключ с помощью команды keygen:
Перейдем к настройке конфигурации Consul, создаем директорию /etc/consul.d/ со следующей структурой:
В директории bootstrap будет находиться конфигурационный файл config.json — в нем мы зададим настройки Consul. Его содержимое:
Разберем по отдельности основные директивы и их значения:
- bootstrap: true. Включаем автоматическое добавление новых нод в случае их подключения. Отмечу, что мы не указываем здесь точное число ожидаемых нод.
- server: true. Включаем режим сервера. Consul на этой виртуальной машине будет выступать на данный момент единственным сервером и мастером, ВМ Nomad’a буду клиентами.
- datacenter: dc1. Указываем название датацентра для создания кластера. Он должен быть идентичен и на клиентах, и на серверах.
- encrypt: your-key. Ключ, который также должен быть уникальным и совпадать на всех клиентах и серверах. Генерируется с помощью команды consul keygen.
- start_join. В этом списке мы указываем список IP адресов, к которым будет осуществляться подключение. На данный момент оставляем только собственный адрес.
На данном этапе мы можем запустить consul с помощью командной строки:
Это неплохой способ отладки сейчас, однако, на постоянной основе использовать этот способ не получится по очевидным причинам. Создадим сервис файл для управления Consul через systemd:
Содержимое файла consul.service:
Запускаем Consul через systemctl:
Проверяем: у нас сервис должен быть запущен, а выполнив команду consul members мы должны увидеть наш сервер:
Следующий этап: установка Nginx и настройка проксирования, http авторизации. Устанавливаем nginx через пакетный менеджер и в директории /etc/nginx/sites-enabled создаем конфигурационный файл consul.conf со следующим содержимым:
Не забудьте создать .htpasswd файл и сгенерировать для него логин и пароль. Данный пункт требуется для того, чтобы веб-панель не была доступна всем, кто знает наш домен. Однако, при настройке Gitlab нам придется от этого отказаться — в противном случае мы не сможем задеплоить в Nomad наше приложение. В моем проекте и Gitlab, и Nomad находятся только в серой сети, поэтому такой проблемы здесь нет.
На остальных двух серверах устанавливаем Consul агенты по следующей инструкции. Повторяем действия с бинарным файлом:
По аналогии с предыдущим сервером создаем директорию для конфигурационных файлов /etc/consul.d со следующей структурой:
Содержимое файла config.json:
Сохраняем изменения и переходим к настройке сервис-файла, его содержимое:
Запускаем consul на сервере. Теперь, после запуска мы должны в nsul members увидеть настроенный сервис. Это будет означать, что он успешно подключился к кластеру как клиент. Повторите тоже самое на втором сервере и после этого мы сможем приступить к установке и настройке Nomad.
Более подробная установка Nomad описана в его официальной документации. Есть два традиционных способа установки: загрузка бинарного файла и компиляция из исходников. Я выберу первый способ.
Примечание: проект очень быстро развивается, часто выходят новые обновления. Возможно, к моменту завершения статьи выйдет новая версия. Поэтому рекомендую перед прочтением проверить актуальную версию Nomad на данный момент и загружать именно ее.
После распаковки мы получим бинарный файл Nomad’a весом в 65 Мб — его необходимо переместить в /usr/local/bin.
Создадим data директорию для Nomad’a и отредактируем его service файл (его, скорее всего, не будет существовать в начале):
Вставляем туда следующие строчки:
Однако, не спешим запускать nomad — мы еще не создали его конфигурационный файл:
Итоговая структура директории будет следующей:
Файл nomad.hcl должен содержать следующую конфигурацию:
Содержимое файла server.hcl:
Не забудьте изменить конфигурационные файл на втором сервере — там потребуется поменять значение директивы http.
Последним на данном этапе остается настройка Nginx для проксирования и установки http авторизации. Содержимое файла nomad.conf:
Теперь мы можем получить доступ к веб-панели по внешней сети. Подключаемся и переходим на страницу servers:
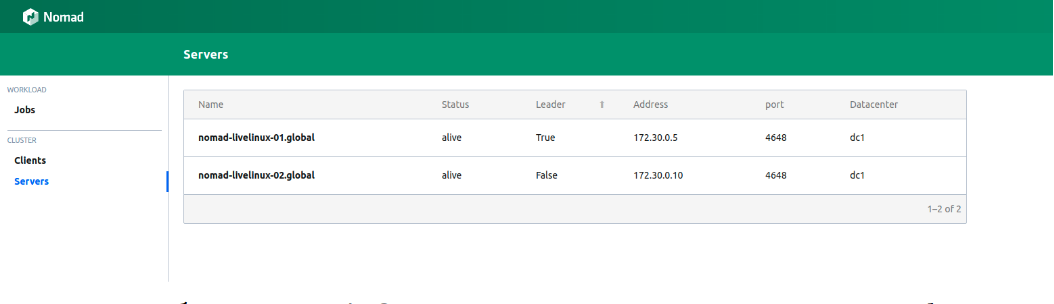
Изображение 1. Список серверов в кластере Nomad
Оба сервера успешно отображаются в панели, тоже самое мы увидим в выводе команды nomad node status:
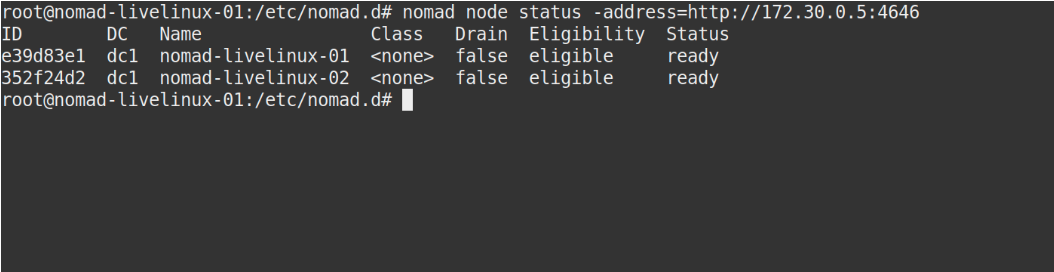
Изображение 2. Вывод команды nomad node status
Что же со стороны Consul? Давайте посмотрим. Переходим в панель управления Consul, на страницу nodes: 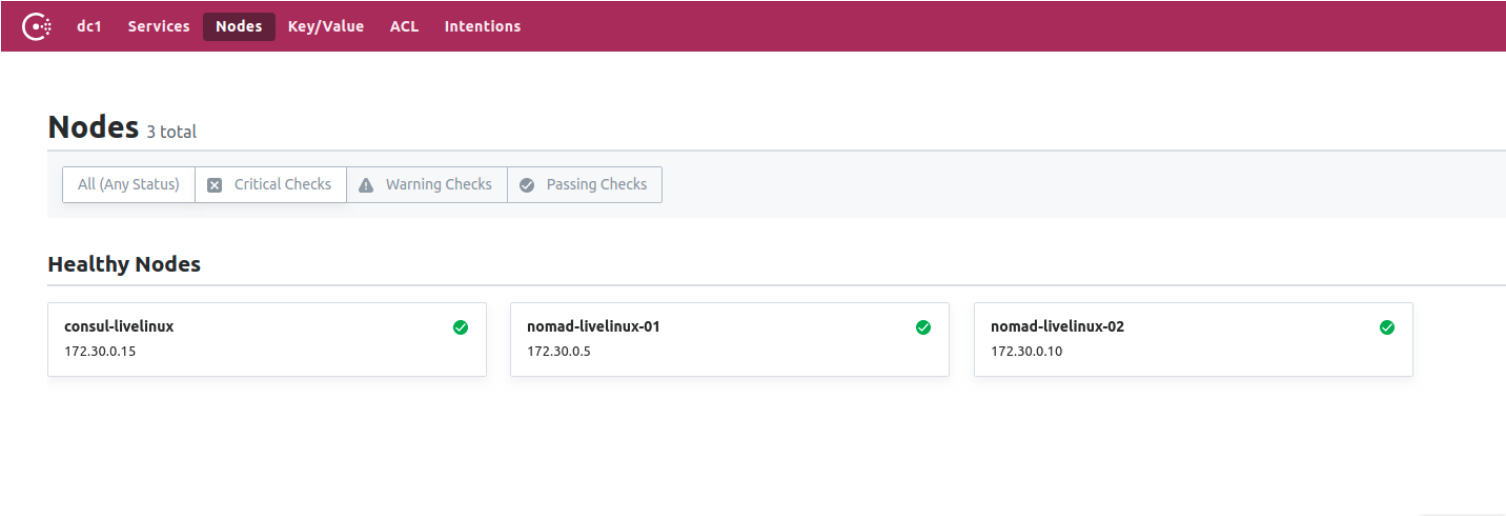
Изображение 3. Список нод в кластере Consul
Теперь у нас есть подготовленный Nomad, работающий в связке с Consul. В завершающем этапе мы приступим к самому интересному: настроим доставку Docker контейнеров из Gitlab в Nomad, а также поговорим о некоторых других его отличительных особенностях.
Создание Gitlab Runner
Для деплоя докер образов в Номад мы будем использовать отдельный раннер с бинарный файлом Nomad’а внутри (тут, кстати, можно отметить еще одну особенность приложений Hashicorp — по отдельности они представляют из себя единственный бинарный файл). Загрузите его в директорию раннера. Для него создадим простейший Dockerfile со следующим содержимым:
В этом же проекте создаем .gitlab-ci.yml:
В итоге у нас будет доступный образ раннера Номада в Gitlab Registry, теперь мы можем перейти непосредственно в репозиторий проекта, создадим Pipeline и настроим nomad job Nomad’a.
Настройка проекта
Начнем с файла job’s для Nomad. Мой проект в этой статье будет достаточно примитивен: он будет состоять из одной таски. Содержимое .gitlab-ci будет следующим:
Здесь деплой происходит в ручном режиме, но вы можете настроить его на изменение содержимого директории проекта. Pipeline же состоит из двух этапов: из сборки образа и его деплоя в номад. На первом этапе мы собираем докер образ и пушим его в наш Registry, на втором же запускаем нашу job в Nomad.
Обратите внимание, что у меня закрытый Registry и для успешного пулла докер-образа мне требуется авторизоваться в нем. Лучшим решением в данном случае является заключение логина и пароля в Vault с последующей интеграцией его с Nomad. Nomad нативно поддерживает Vault. Но для начала в самом Vault установим необходимые policy для Nomad, их можно загрузить:
Теперь, создав необходимые policy мы в блоке task в файле job.nomad добавим интеграцию с Vault:
Я использую авторизацию по токену и прописываю его непосредственно здесь, также есть вариант указания токена как переменной при запуске nomad agent:
Теперь мы можем использовать ключи с Vault. Принцип работы прост: мы создаем файл в Nomad job, который будет хранить в себе значения переменных, например:
Вот таким несложным подходом можно настроить доставку контейнеров в кластер Nomad и работать с ним в дальнейшем. Я же скажу, что в какой-то степени я симпатизирую Nomad — он больше подходит для небольших проектов, где Kubernetes может вызвать дополнительные сложности и не будет реализовывать свой потенциал до конца. К тому же, Nomad отлично подойдет начинающим — он просто устанавливается и конфигурируется. Однако, при тестировании на некоторых проектах я сталкиваюсь с проблемой его ранних версий — многих базовых функций просто нет или они некорректно работают. Тем не менее, я считаю, что Nomad будет дальше развиваться и в будущем обрастет нужными всем функциями.
Автор: Илья Андреев, под редакцией Алексея Жадан и команды «Лайв Линукс»