Insert Update Delete Data Rows using MySQL Workbench
Insert, Update, Delete Data Rows using MySQL Workbench
In this article, I am going to discuss How to Insert, Update, and Delete Records in a Table in MySQL Database using MySQL Workbench. Please read our previous article, where we discussed how to create, alter and drop database tables using MySQL Workbench.
Insert, Update, Delete Data Rows using MySQL Workbench
Now we will see how to insert, update and delete data rows using MySQL Workbench. For this, we need a table. So, let us first create a database called the school and then create a table called students within the school database. Then we will see how to insert, update, delete records from the Students table. So, please use the below SQL Script to create the school database and Students table.
Once you execute the above scripts, then the School database and Students table will be created. Under the SCHEMAS menu, select the database name i.e. School, expand the tables folder, and you can see the table Students that we created as shown in the below image.

When we hover the mouse pointer, over the ‘Students’ table name, then you can see three icons appears. The first icon will give you information about the table. If you want to update the table schema like adding a new column(s), updating an existing column, changing data type, or deleting a column, then you need to click on the second icon. The third icon shows you the table data. Click on the third table icon as shown in the below image.

Once you click on the table icon i.e. the third icon, it which will open a new window, in which the upper section shows the MySQL statement, while the lower section shows the data rows present in the Students table. At this moment, we don’t have any data row in the Students table. So, the table shows NULL data row values as shown in the below image.

How to Insert Data Rows to MySQL Database table using MySQL Workbench?
To enter a new data row, just select the respected column and type the data value. It’s something similar to the Microsoft Excel spreadsheet. Enter a couple of data rows and click on the Apply button as shown in the below image. Here, I am going to insert three records.

Once you click on the Apply button, it will open the below Apply SQL Script to Database window. Simply verify the SQL Script and if everything fine, then click on the Apply button to save the data rows as shown in the below image.

Once you click on the Apply button, it will open the following popup, simply click on the click Finish button as shown in the below image.

We can also import the data rows from an external ‘CSV file with a similar table structure and data columns and that we will discuss in our next article.
How to Update Data Rows using MySQL Workbench?
We can edit the previously saved data row using MySQL Workbench. Let’s say we want to update the FirstName as Preety and Age as 16 of Student whose StudentId is 2. Then you can update the data directly here and then click on the Apply button as shown in the below image.

Once you click on the Apply button, it will open the following Apply SQL Script to Database window and if you further notice this time, it generates an SQL update statement and Click on the Apply button save the changes to the database as shown in the below image.

Once you click on the Apply button, it will open the below window, and here simply click on the Finish button as shown in the below image.

How to Delete Data Rows using MySQL Workbench?
To delete an individual row from the table, select the data row, right-click the ‘right icon’ in-front of the row and select the ‘delete row’ option. For example, if you want to delete the student whose id is 3, then select the third row and then right-click on it and click on the Delete Row(s) as shown in the below image.
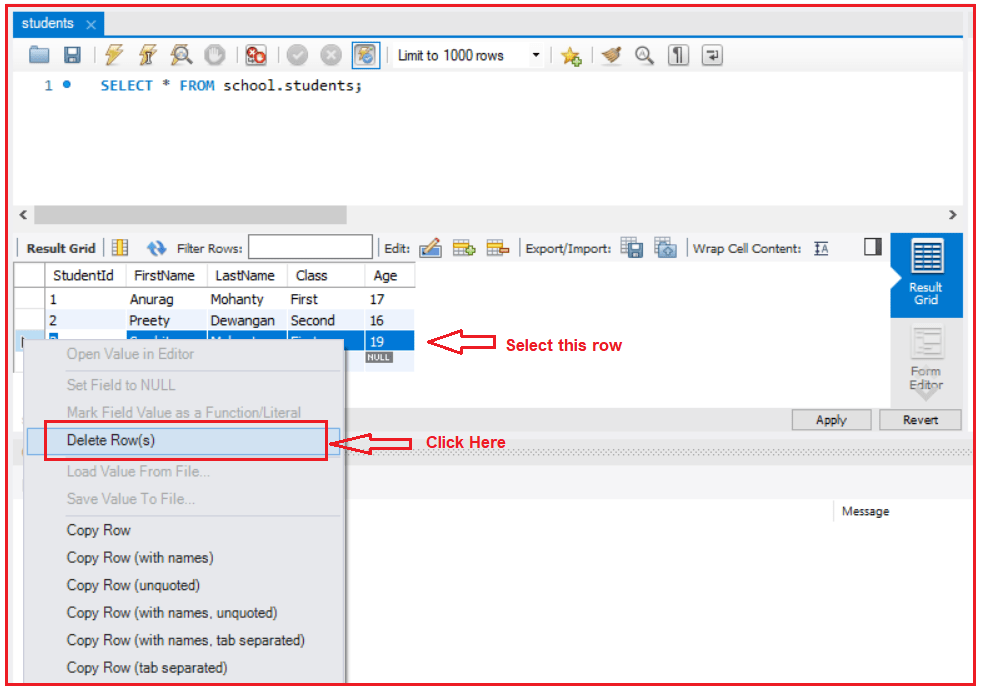
This will delete the row immediately from the GUI. To delete the row from the database, click on the Apply button as shown in the below image.

Once you click on the Apply button, it will open the below window with the Delete statement. Click on the Apply button to save the changes into the database as shown in the below image.

Once you click on the Apply, it will open the below window, simply click on the Finish button.

As of now, we have seen how to create, update and delete rows using the GUI provided by MySQL Workbench. It is also possible in MySQL workbench, to create, update and delete data rows using raw SQL script.
Insert, Update, Delete using SQL Script in MySQL Workbench:
Let us see how to perform insert, update and delete operations using SQL Script in MySQL Workbench. First, open a new query tab and then execute the following SQL Script which will Insert two records into the Students table of the School database.
Now, we want to update the FirstName of the Student whose Id is 3 and LastName of the Student whose Id is 4. Then the following Update SQL Script will update the same in the Students table.
Now, we want to delete the student whose IDs are 3 and 4. Then the following DELETE SQL Script will delete the same from the Students table.
In the next article, I am going to discuss Database Export and Import using MySQL Workbench. Here, in this article, I try to explain How to Insert, Update, Delete Data Rows using MySQL Workbench and I hope you enjoy this Insert, Update, Delete Data Rows using MySQL Workbench article.
Как добавить запись в таблицу MySQL
В MySQL для добавления записей в таблицу используется команда INSERT.
Для того, что бы ответить на вопрос: Как добавить запись в таблицу MySQL ?
Рассмотрим общий синтаксис команды INSERT. А после этого разберем на примерах добавление данных в таблицу.
Синтаксис команды выглядит следующим образом:
Общие положения работы команды INSERT:
— Задает имя таблицы, в которую будет вставлена новая строка. На момент запуска команды INSERT таблица с таким именем должна существовать в базе данных.
— Если указан этот параметр, то вставка новой записи будет отложена до тех пор, пока другие сценарии не закончат чтение из этой таблицы. Надо отметить, что если таблица часто используется, то при указании этого параметра может пройти достаточно много времени, прежде чем данная команда будет выполнена.
— Если указан этот параметр, то после выполнения команды INSERT сценарий сразу же получит ответ от БД о успешной вставке новой записи, а запись будет вставлено только после завершения использования данной таблицы другим сценарием. Это может быть удобно, если требуется высокая скорость работы скрипта. Данный параметр работает только с таблицами типа ISAM и MyISAM. Следуем отметить, что если таблица, в которую происходит вставка записи, в данный момент не используется другими запросами, то команда INSERT DELAYED будет работать медленнее, нежели INSER. Так что рекомендуется использовать параметр DELAYED только при большой нагрузке на таблицу.
— Если некоторые поля таблицы имеют ключи PRIMARY или UNIQUE, и производится вставка новой строки, в которой эти поля имеют дублирующее значение, то действие команды аварийно завершается и выдается ошибка №1062 («Duplicate entry ‘val’ for key N»). Если в команде INSERT указано ключевое слово IGNORE, то вставка записей не прерывается, а строки с дублирующими значениями просто не вставляются.
Рассмотрим простой пример добавления данных в таблицу MySQL подробнее.
Как добавить запись в таблицу MySQL ?
Исходные данные:
У нас уже есть работающая MySQL в которой создана база данных и в ней создана таблица с именем ‘my_table’ и в таблице созданы поля: ‘ID’, ‘name’, ‘surname’, ‘bithday’, где:
Mysql workbench как добавить данные в таблицу
Table of Contents
This tutorial provides a quick hands-on introduction to using MySQL Workbench for beginners. If you have used MySQL Workbench before you can safely skip this tutorial.
To complete this tutorial you will need to have a locally installed MySQL Server. If you only have access to a remote MySQL server you will need to enter appropriate connection parameters when required. This tutorial requires MySQL Workbench version 5.2.16 or above. You also need a basic understanding of MySQL concepts. This tutorial demonstrates the procedures on Microsoft Windows, they are, however, the same for all supported platforms.
4.1. Administering a MySQL Server
In this section you will see how you can use MySQL Workbench to connect to a server in order to carry out administrative functions, such as starting and stopping the server.
Launch MySQL Workbench. You will be presented with the Home screen:
Figure 4.1. Getting Started Tutorial — Home Screen
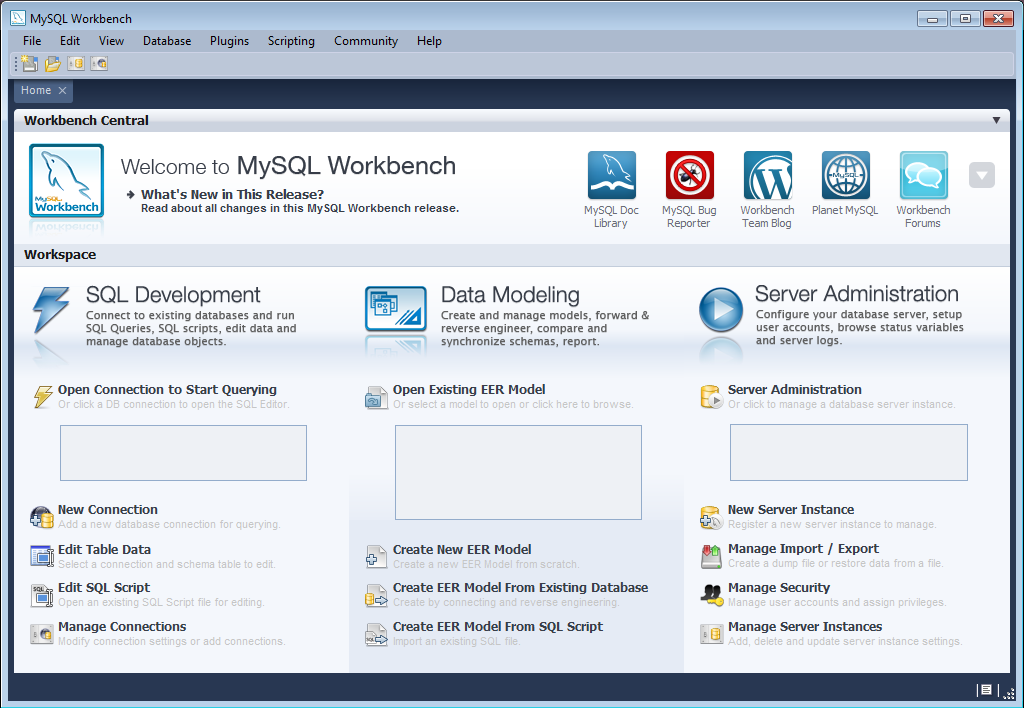
In order to administer your MySQL Server you need to first create a Server Instance. This contains information about the target server, including how to connect to it. From the Home screen of MySQL Workbench, click New Server Instance . The Create New Server Instance Profile wizard will be displayed.
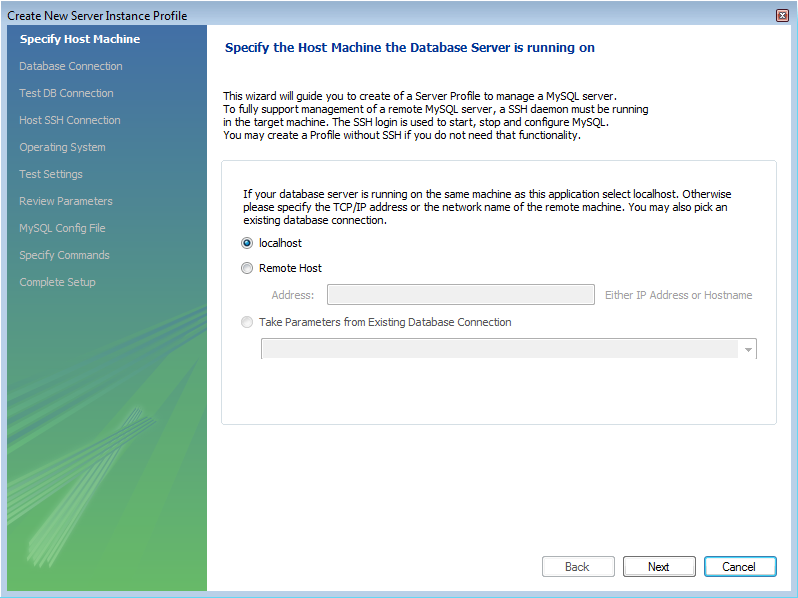
In this tutorial we will connect to a locally installed server, so click Next .
Figure 4.2. Getting Started Tutorial — Specify Host Machine
Next you will set up a connection, or select an existing connection to use to connect to the server. Assuming you have not already created a connection, you can use the default values here, although if your MySQL Server has a password set for root, you can set it here by clicking on Store in Vault. This allows you to connect to the server without needing to enter a password each time. It is also possible to use another account to connect to the server by setting the username and password here, if required.
Figure 4.3. Getting Started Tutorial — Database Connection
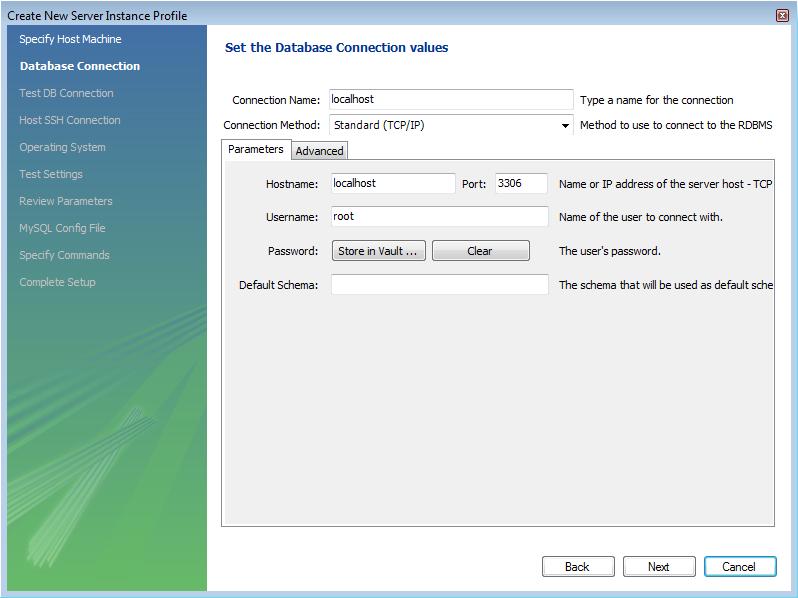
You can now click Next .
The connection will now be tested. You should see that the connection was successful. If not click Back and check that you have entered the information required.
Figure 4.4. Getting Started Tutorial — Connection Test
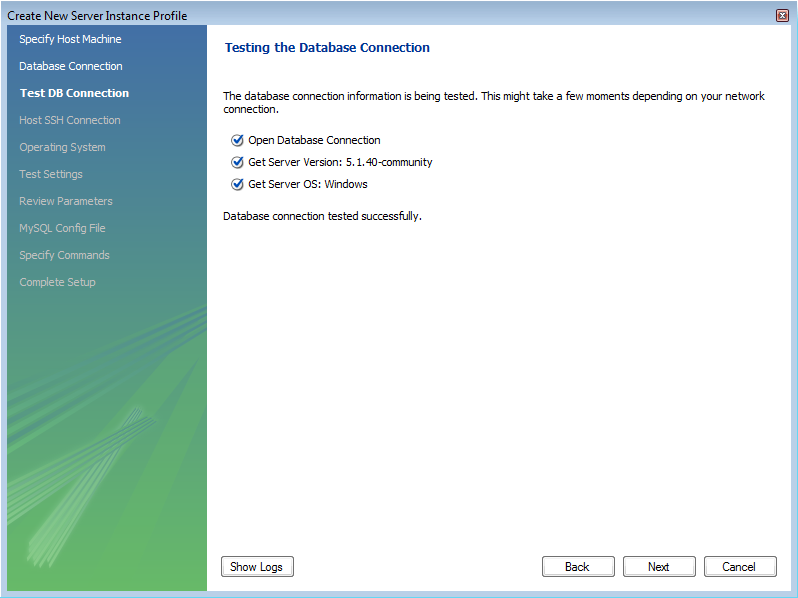
If everything tested correctly, click Next .
On this screen you will set the operating system and installation type. In this case the installation is Microsoft Windows, and the installation type is MySQL 5.1 x86 Installer Package. Setting these options allows MySQL Workbench to determine location of configuration files, and the correct start up and shut down commands to use for the server.
Figure 4.5. Getting Started Tutorial — Operating System

Once you have set the operating system and installation type, click Next .
The wizard will now check that it is able to access the start up and shut down commands, and access the MySQL Server configuration file.
Figure 4.6. Getting Started Tutorial — Test Host Settings
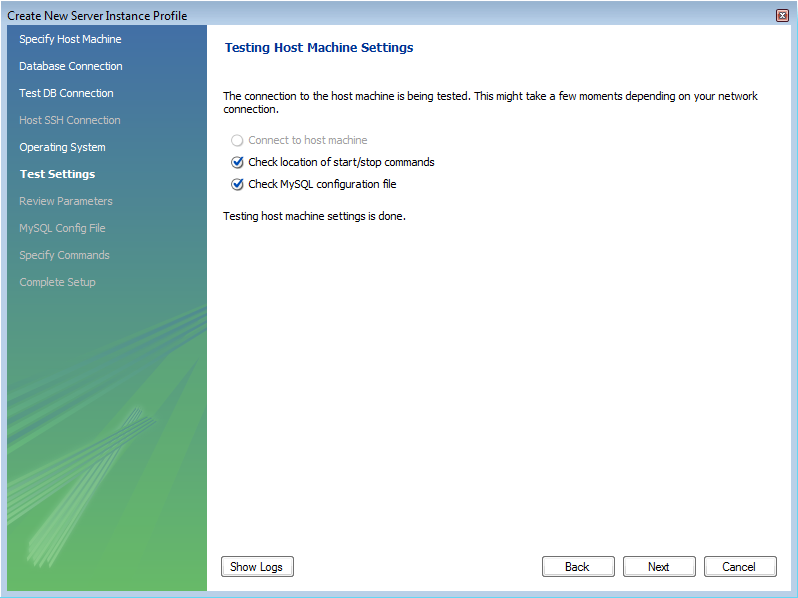
Check that everything is in order and then click Next .
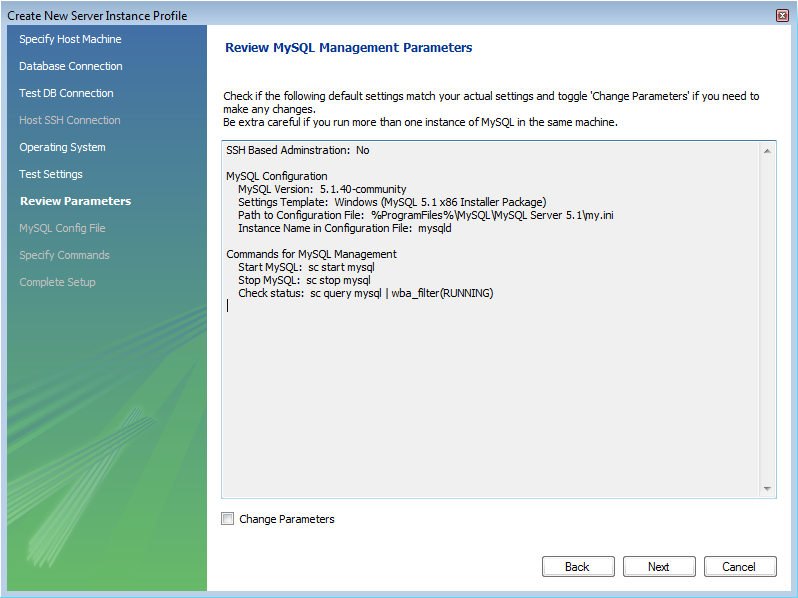
You now have a chance to review the configuration settings so far. The information displayed varies slightly depending on platform, connection method and installation type:
Figure 4.7. Getting Started Tutorial — Review Settings
Finally you can give the server instance a suitable name. This will be used to select this particular instance from a list of available instances.
Figure 4.8. Getting Started Tutorial — Instance Name
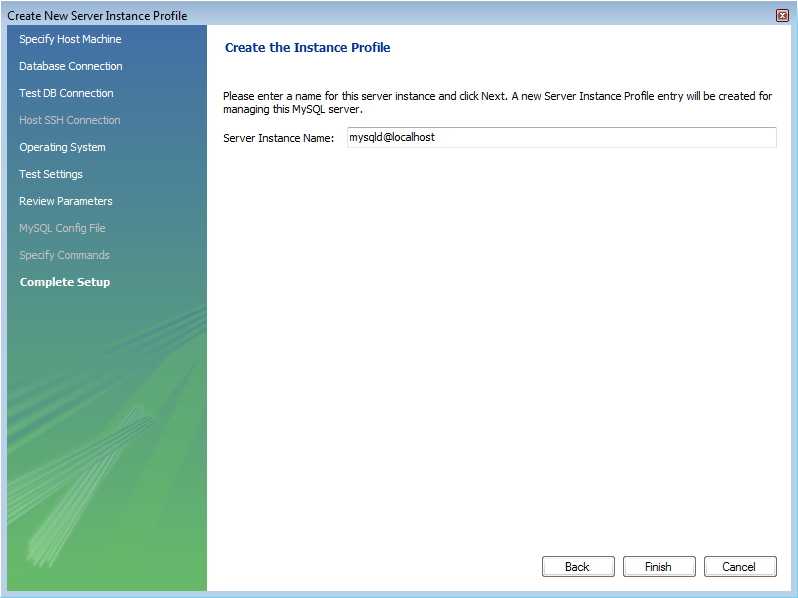
Having set the desired name, you can click Finish to complete the server instance creation process.
You will now be returned to the Home screen. You will see the new server instance you created, along with the new connection you created as part of the above procedure.
Figure 4.9. Getting Started Tutorial — Home Screen Instance
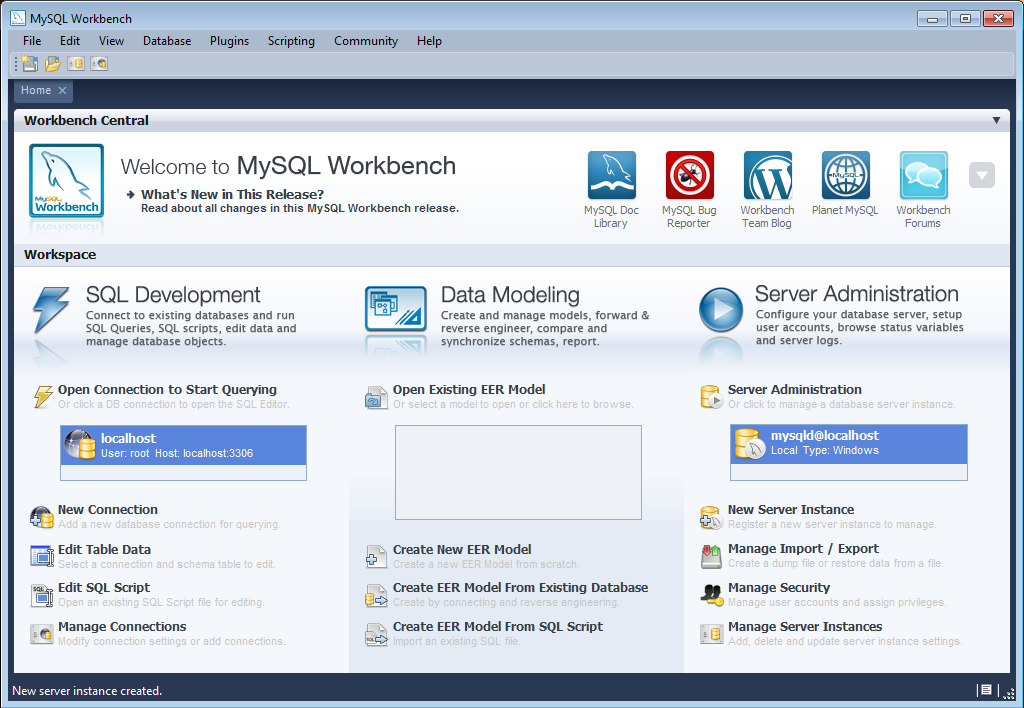
You are now ready to test your new server instance.
From the Home screen, double-click the Server Instance you created. The Administrator will open on the Startup configuration page.
Figure 4.10. Getting Started Tutorial — Admin Startup
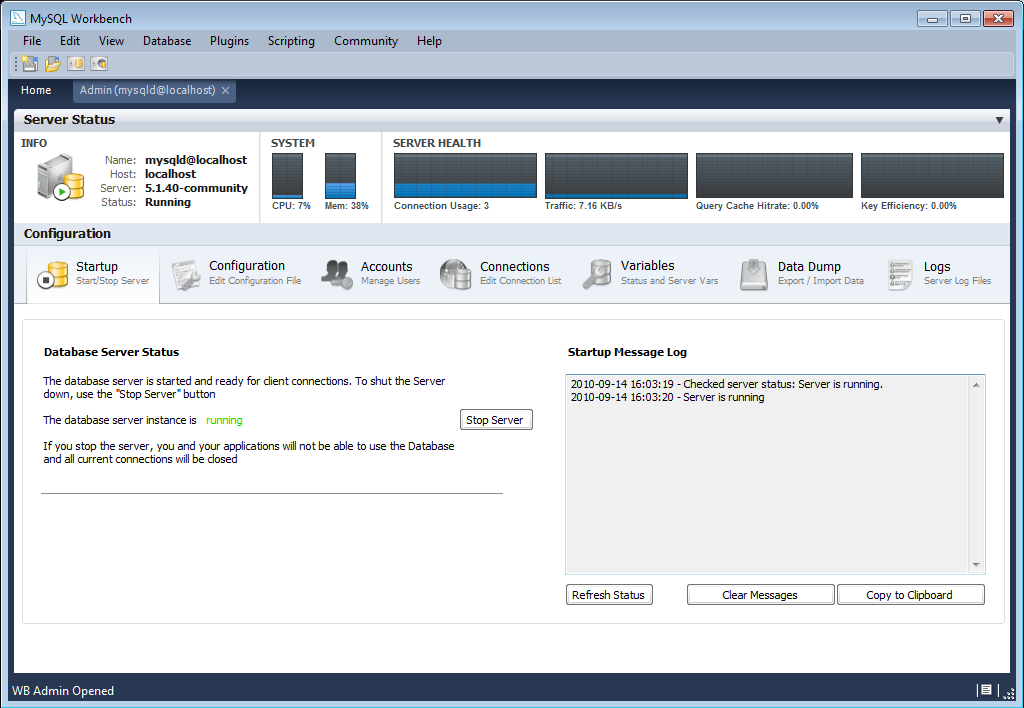
Click the Stop Server button. The message window will show that the server has stopped.
Click the Start Server button to resume the server. The message window will confirm that the server is running.
You have now seen how to create a server instance to allow you to manage a MySQL server.
4.2. Creating a Model
In this section you will learn how to create a new database model, create a table, create an EER Diagram of your model, and then forward engineer your model to the live database server.
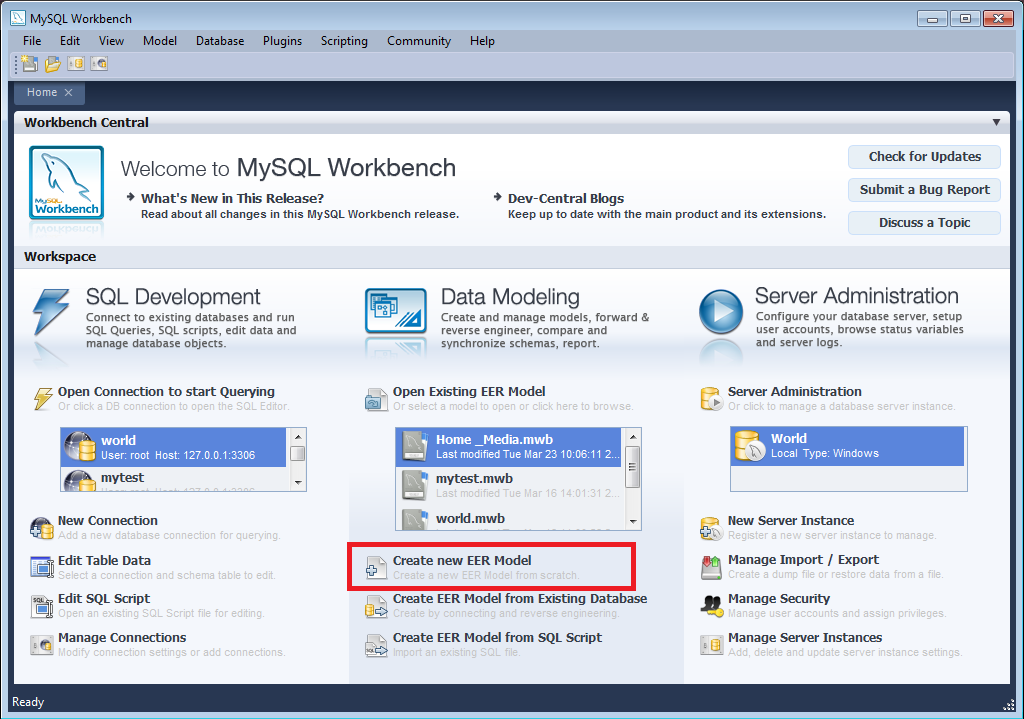
Start MySQL Workbench. On the Home screen select Create new EER Model . A model can contain multiple schemata. Note that when you create a new model, it contains the mydb schema by default. You can change the name of this schema to serve your own purposes, or simply delete it.
Figure 4.11. Getting Started Tutorial — Home Screen
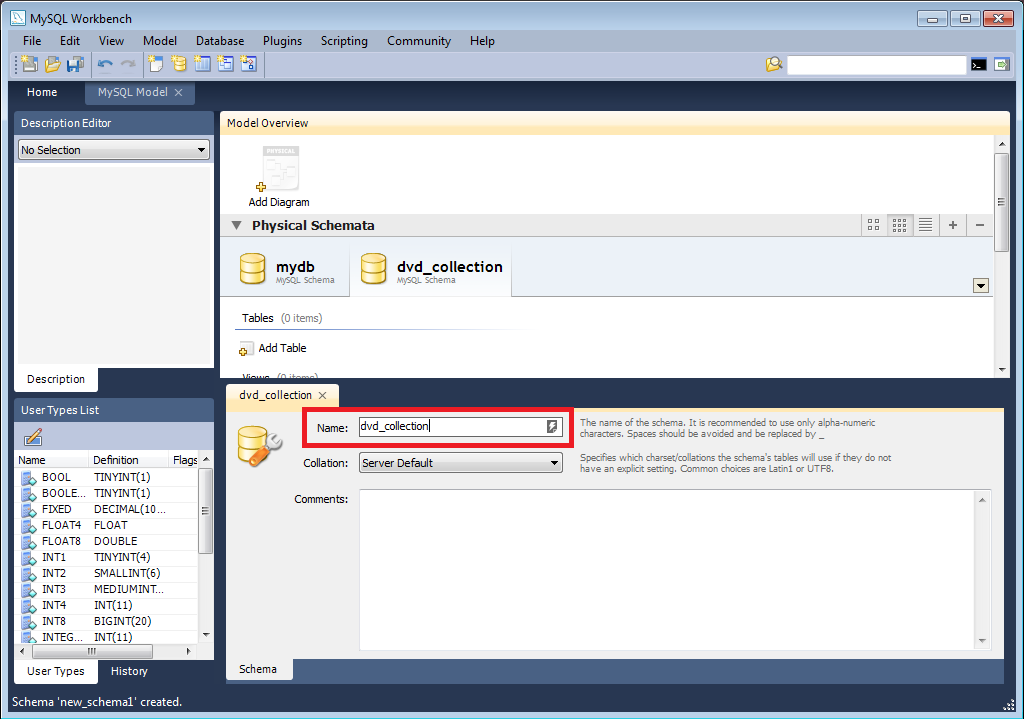
On the Physical Schemata toolbar, click the button + to add a new schema. This will create a new schema and display a tabsheet for the schema. In the tabsheet, change the name of the schema to “ dvd_collection ”, by typing into the field called Name . Ensure that this change is reflected on the Physical Schemata tab. Now you are ready to add a table to your schema. If at this stage you receive a message dialog asking to rename all schema occurrences, you can click Yes to apply your name change.
Figure 4.12. Getting Started Tutorial — New Schema
In the Physical Schemata section double-click Add Table .
Double-click table1 to launch the table editor (you may not have to do this as the table editor will automatically load at this point if you are using later versions of MySQL Workbench). In the table editor, change the name of the table to “ movies ” and press Enter .The table editor will then switch from the Table tab to the Columns tab, to allow you to enter details of your table columns.
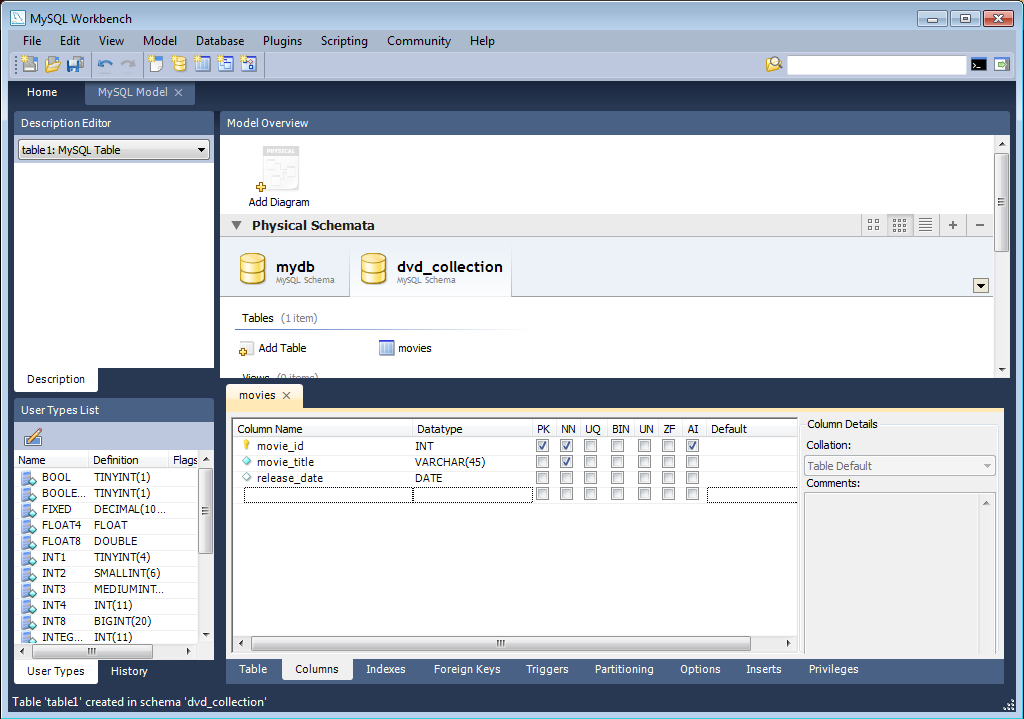
Change the name of the first column to “ movie_id ”. Select a data type of INT . You will then make this column have the following properties: primary key, not null, autoincrement. To do this click the PK , NN , and AI checkboxes.
Add two further columns:
| Column Name | Data Type | Column Properties |
|---|---|---|
| movie_title | VARCHAR(45) | NN |
| release_date | DATE (YYYY-MM-DD) | None. |
Figure 4.13. Getting Started Tutorial — Columns
Now you can obtain a visual representation of this schema so far. From the main menu select Model , Create Diagram from Catalog Objects . The EER Diagram will be created and displayed.
Figure 4.14. Getting Started Tutorial — EER Diagram
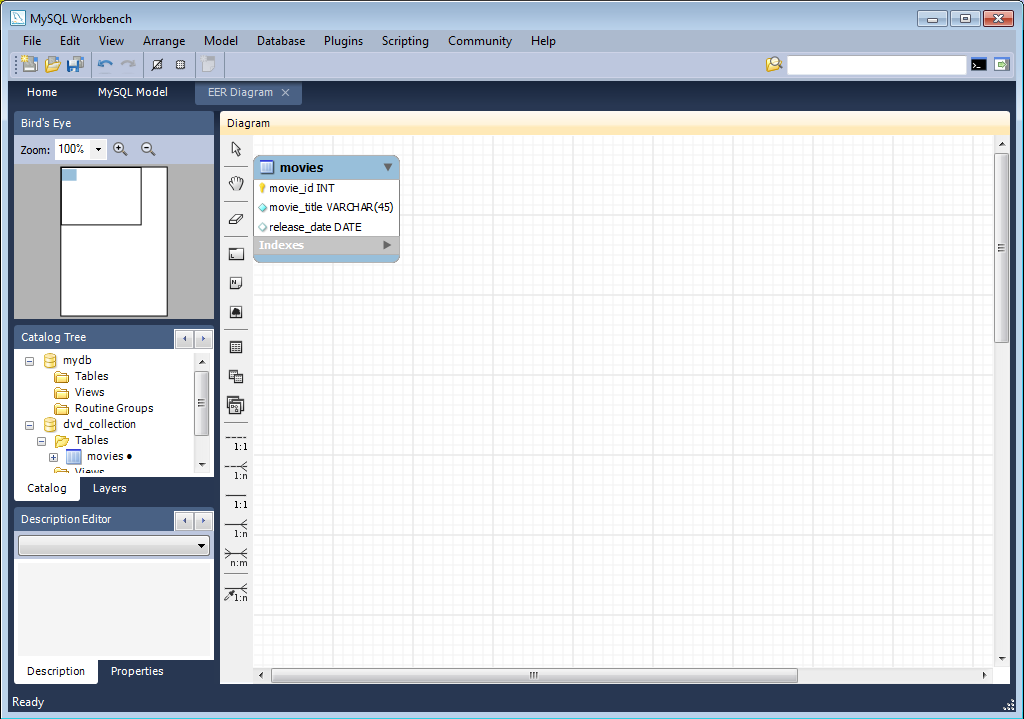
Now, in the table editor, change the name of the column “ movie_title ” to “ title ”. Note that the EER Diagram is automatically updated to reflect this change.
At this point you can save your model. Click the main toolbar button Save Model to Current File . In this case you have not yet saved this file so you will be prompted to enter a model file name. For this tutorial enter “ Home_Media ”. The Home_Media model may contain further schemata in addition to dvd_collection , such as cd_collection . Click Save to save the model.
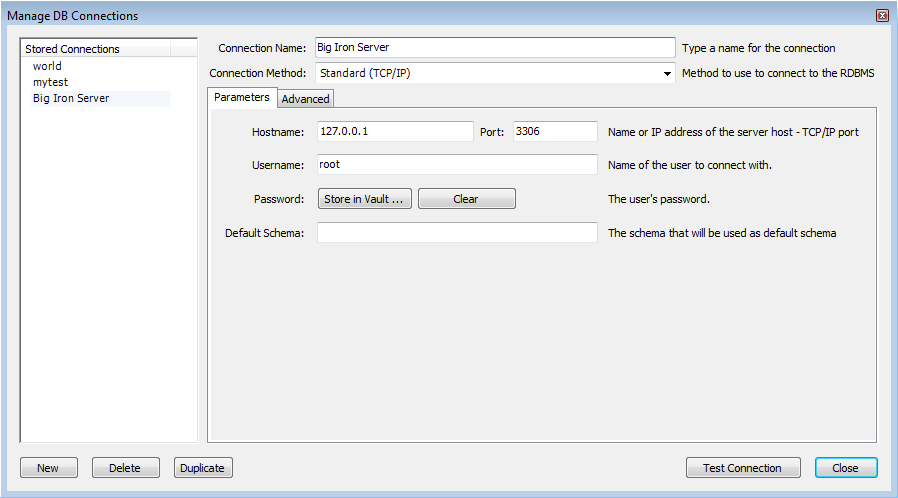
You can synchronize your model with the live database server. First you need to tell MySQL Workbench how to connect to the live server. From the main menu select Database , Manage Connections. .
In the Manage DB Connections dialog click New .
Enter “ Big Iron Server ” for the connection name. This allows us to identify which server this connection corresponds to, although it is possible to create multiple connections to the same server.
Enter the username for the account you will use to connect to the server.
Click on the Store in Vault. button and enter the password for the username you entered in the previous step. You can optionally ignore this step, and you will be prompted for this password whenever MySQL Workbench connects to the server.
Click Test Connection to test your connection parameters. If everything is OK at this point you can click Close .
Figure 4.15. Getting Started Tutorial — Manage Connections
You are now ready to forward engineer your model to the live server. From the main menu select Database , Forward Engineer. . The Forward Engineer to Database wizard will be displayed.
The first page of the wizard is the Catalog Validation page. Click the Run Validations button to validate the Catalog. If everything is in order the wizard will report that validaton finished successfully. Click Next to continue.
The Options page of the wizard shows various advanced options. For this tutorial you can ignore these and simply click Next .
On the next page you can select the object you want to export to the live server. In this case we only have a table, so no other objects need to be selected. Click Next .
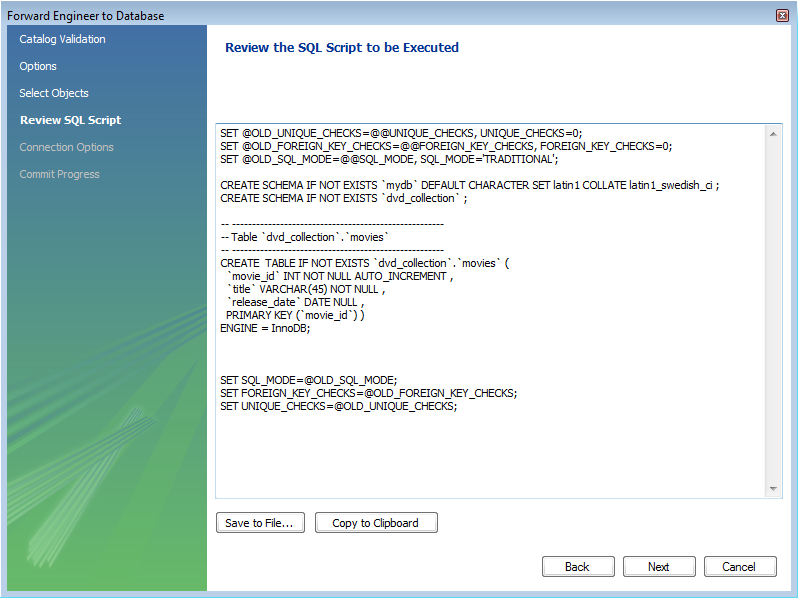
The next screen, Review SQL Script, displays the script that will be run on the live server to create your schema. Review the script to make sure that you understand the operations that will be carried out. Click Next .
Figure 4.16. Getting Started Tutorial — Review Script
Select the connection you created earlier, “ Big Iron Server ”. Click Execute . Check the messages for any erros, and then click Close to exit the wizard.
Ensure that the script ran without error on the server and then click Close . As a simple test that the script worked launch the MySQL Command Line Client. Enter SHOW DATABASES; and identify your schema. Enter USE dvd_collection; , to select your schema. Now enter SHOW TABLES; . Enter SELECT * FROM movies; , this will return the empty set as you have not yet entered any data into your database. Note that it is possible to use MySQL Workbench to carry out such checks, and you will see how to do this later, but the MySQL Command Line Client has been used here as you have probably used this previously.
Ensure that your model is saved. Click Save Model to Current File on the main toolbar.
4.3. Adding Data to Your Database
In the previous section you created a model, schema, and table. You also forward engineered your model to the live server. In this section you will see how you can use MySQL Workbench to add data into your database on the live server.
On the Home screen click the link Edit Table Data in the SQL Development area of the Workspace. This launches Edit Table Data wizard.
Figure 4.17. Getting Started Tutorial — Edit Table Data
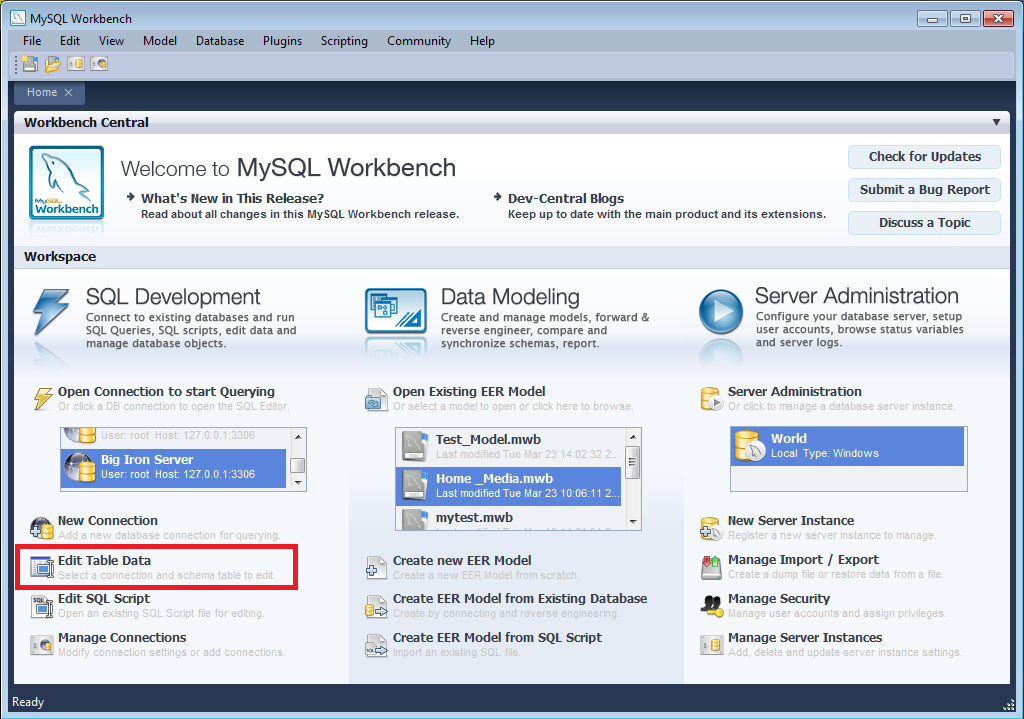
In the wizard select the “ Big Iron Server ” connection from the stored connection drop down listbox. Click Next .
Select the schema, dvd_collection . Select the table to edit, movies . Click Finish .
You will see a data grid. This is where you can enter the data for your database. Remember that the movie_id was set to be autoincrement, so you do not need to enter values directly for this column. In the data grid enter the following movie information:
| title | release_date |
|---|---|
| Gone with the Wind | 1939-04-17 |
| The Hound of the Baskervilles | 1939-03-31 |
| The Matrix | 1999-06-11 |
| Above the Law | 1988-04-08 |
Note: do not modify any values in the movie_id column.
Now click the Apply changes to data source button in the toolbar located in the bottom right corner. A list of SQL statements will be displayed. Confirm that you understand the operations to be carried out. Click Apply SQL to apply these changes to the live server.
Confirm that the script was executed correctly and then click Finish .
View the data grid again and observe that the autoincrement values have been generated.
Figure 4.18. Getting Started Tutorial — Edit Data
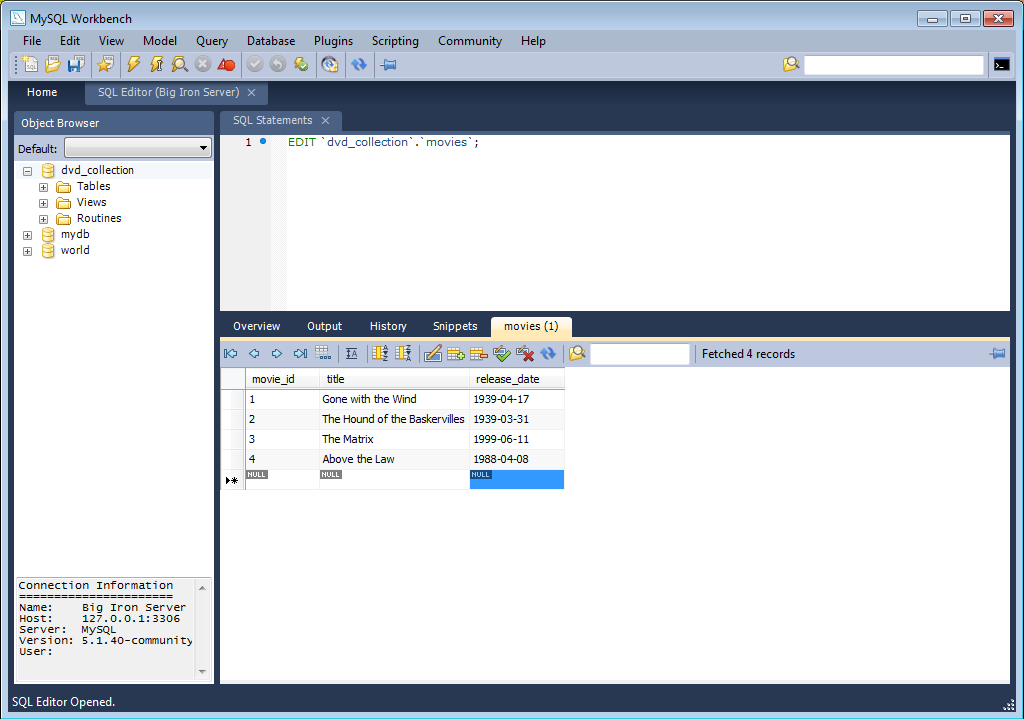
Now you will check that the data really has been applied to the live server. Launch the MySQL Command Line Client. Enter SELECT * FROM movies; to see the data just entered.
You can also carry out a similar check from within MySQL Workbench. Click on the Home screen tab.
Click the link Open Connection to start Querying in the SQL Development section of the Workspace. This will launch the Connect to Database dialog. Select “ Big Iron Server ” from the drop down listbox. Click OK .
A new SQL Editor tab will be displayed. In the SQL Statements area enter the following code:
Now click the Execute SQL Script in Connected Server toolbar button. This resembles a small lightning bolt. The SQL Editor will display a new Result tab contain the result of executing the SQL statements.
Figure 4.19. Getting Started Tutorial — Results
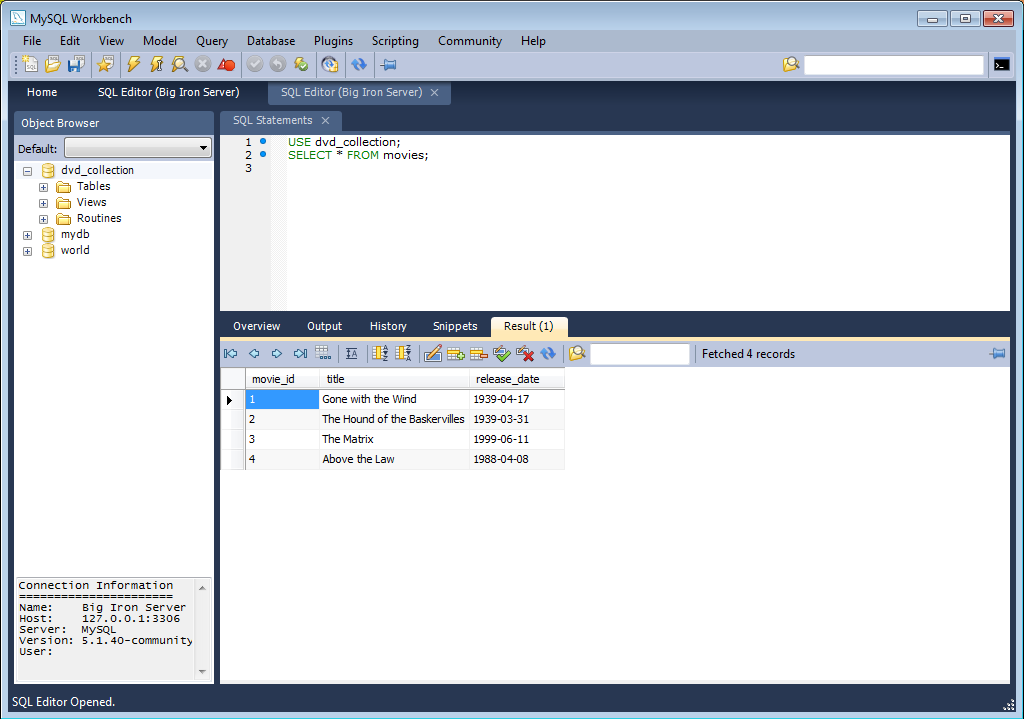
In this section of the tutorial you have learnt how to add data to your database, and also how to execute SQL statements using MySQL Workbench.