What is ‘LocalserviceNoNetworkFirewall’ and How to Fix its High CPU Usage?
Fix: ‘LocalserviceNoNetworkFirewall’ High CPU Usage
LocalserviceNoNetworkFirewall is a part of Windows security and is used by Windows Defender (or by other Windows API-based firewalls) in their operations. Usually, this service does not use much CPU or memory.
But the issue arises, when this service starts eating a chunk of memory along with high CPU usage (in some cases, more than 50%) and causes the system to be so sluggish that it becomes impossible to use the system.
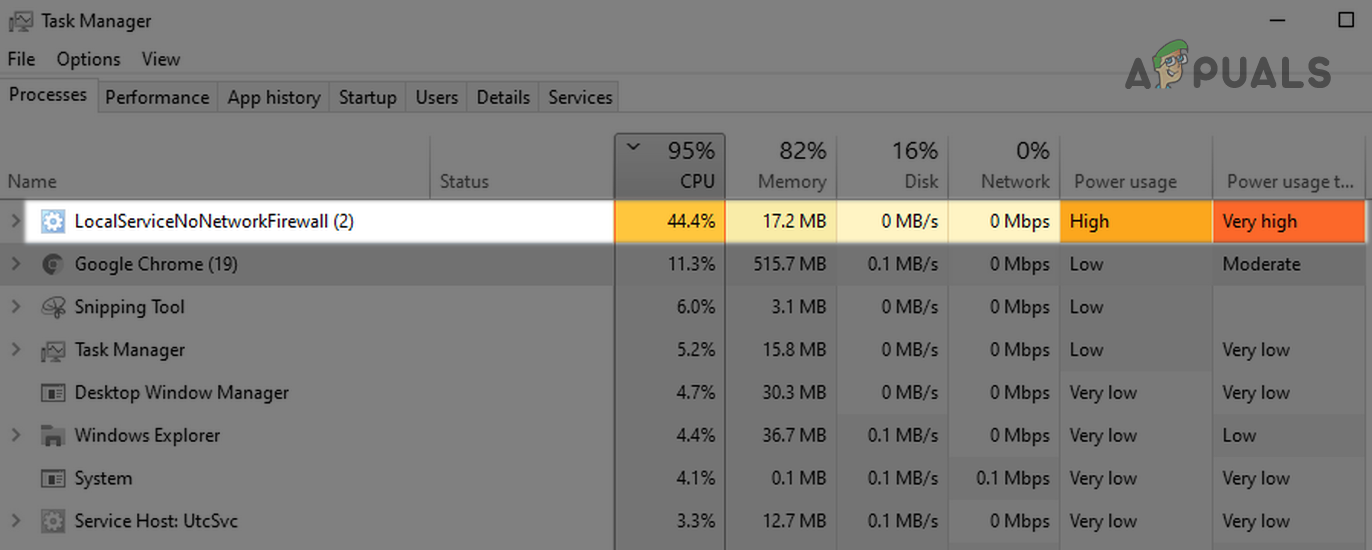 High CPU Usage by LocalserviceNoNetworkFirewall
Many things can trigger a high CPU usage by the LocalserviceNoNetworkFirewall but we identified the following chiefly responsible for the issue:
- Conflicting Firewalls: If you are using another firewall (especially, that is using the Windows Defender API) along with the Windows firewall, the two may conflict with each other, resulting in high CPU usage.
- A Large Number of Conflicting Firewall Rules: If an old installation of a 3 rd party firewall has included thousands of inbound/outbound rules, while Windows defender has its own such rules, these conflicting rules may require the firewall to use the excessive CPU to execute all of them.
- Corrupt Installation of 3 rd Party Security Product: If the 3rd party security product like Avast Premium has become corrupt, then this corruption can cause the excessive use of the CPU by the LocalserviceNoNetworkFirewall.
- Corrupt Settings of Windows Firewall: The LocalserviceNoNetworkFirewall service may show a high CPU usage if the Windows firewall settings have become corrupt due to interference from the other security product.
Keep in mind that some of the users may fail to perform the under-mentioned solutions on their systems because the system can be very sluggish. In such a case, you may try the solutions after disconnecting the system from the Internet (either by unplugging the ethernet cable or switching off the router) or try them in the safe mode of your system.
Restart the Windows Firewall
The high CPU usage by the LocalserviceNoNetworkFirewall could be a temporary glitch of the Windows Firewall and restarting the same may solve the problem.
- Right-click Windows and open Task Manager.
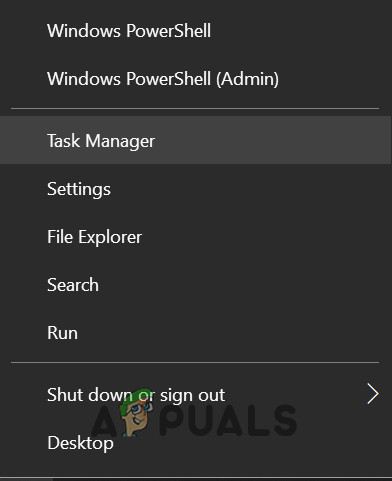 Open the Task Manager from the Quick Access Menu
 - Now head to the Services tab and right-click on WinDefend (Microsoft Defender Antivirus Service).
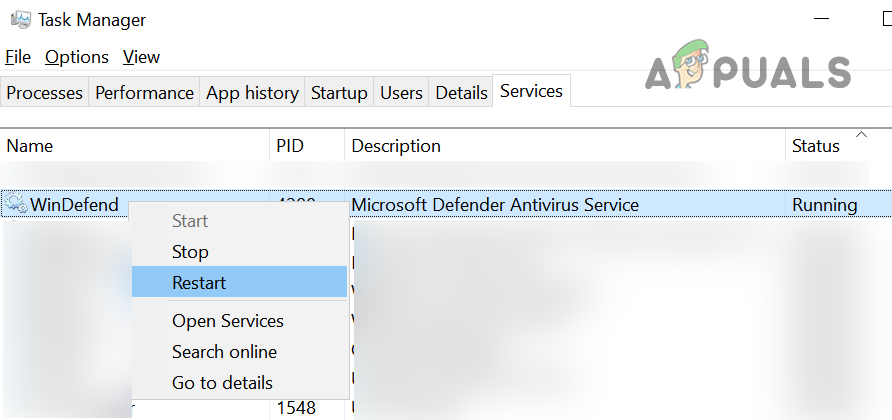 Restart the Windows Defender Service
 - Then, in the sub-menu, select Restart and once the service is restarted, check if the CPU usage is back to normal.
Update the PC’s Windows to the Latest Build
The incompatibility between the outdated OS and other system modules (like a driver or a 3 rd party firewall) may cause the high CPU usage by LocalserviceNoNetworkFirewall. Here, updating the PC’s Windows to the latest build may solve the high CPU.
- Click Windows, search, and open the System Settings of Check for Updates.
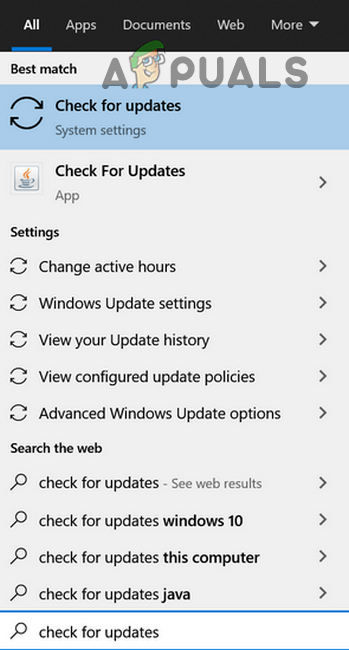 Open Check for Updates
 - Now, in the Windows Update, click on Check for Updates.
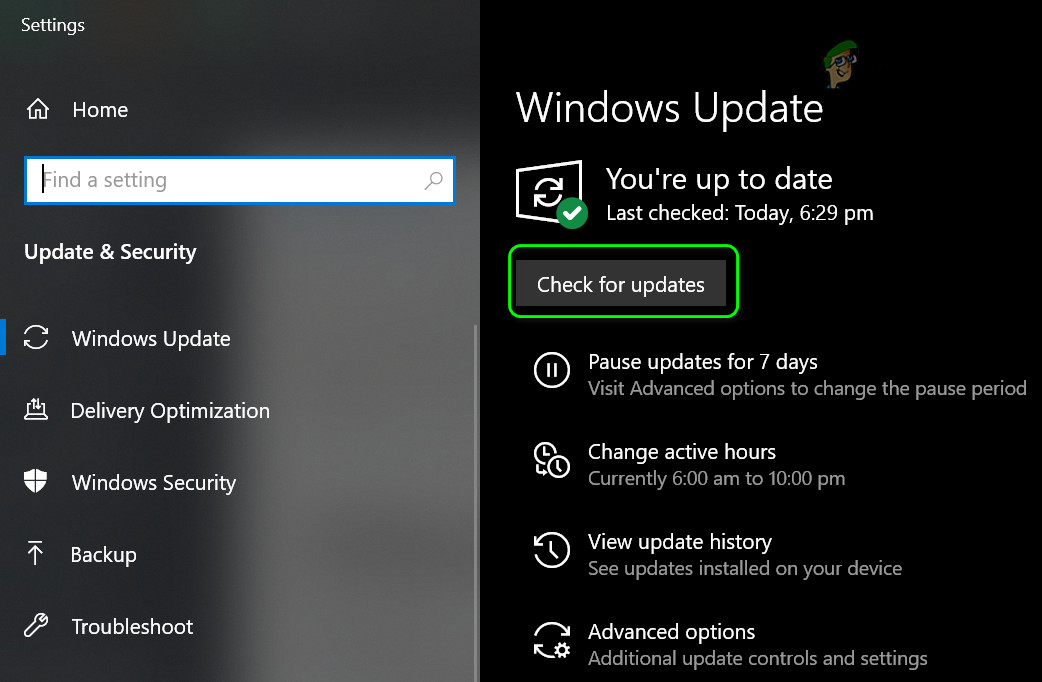 Check for Windows Updates
 - If it shows some updates are available, then download and install those updates.
- Once the PC’s Windows is updated to the latest build, check if the high CPU usage by LocalserviceNoNetworkFirewall is normalized.
Disable/ Enable the 3 rd Party Security Firewall and Windows Defender Firewall
If you are using more than one firewall on your system i.e., Windows Firewall and a 3 rd party firewall (like GlassWire), then one may not be working properly with the other due to a glitch and causing the issue. In this context, disabling and enabling both firewalls may solve the problem.
- Right-click on the 3 rd party firewall like GlassWire in the system’s tray and select Exit.
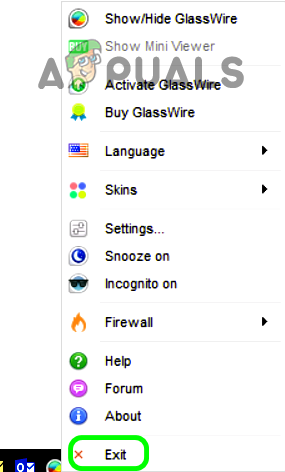 Exit GlassWire from the System’s Tray
 - Now click Windows and type Windows Defender.
- Then right-click on Windows Defender Firewall with Advanced Security and select Run as Administrator.
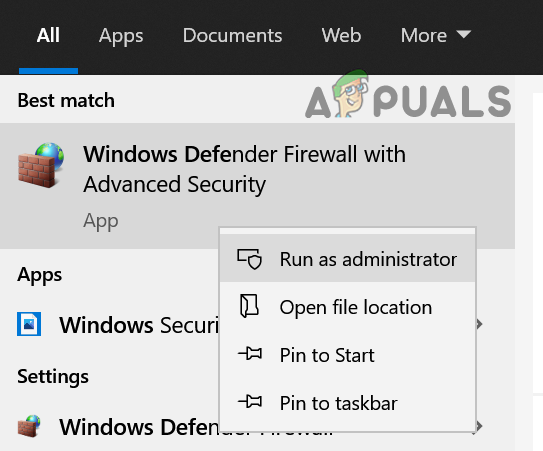 Open Windows Defender as Administrator
 - Now click on Windows Defender Firewall Properties and for the following profiles, set the Firewall State to the off position to disable the Windows Firewall:
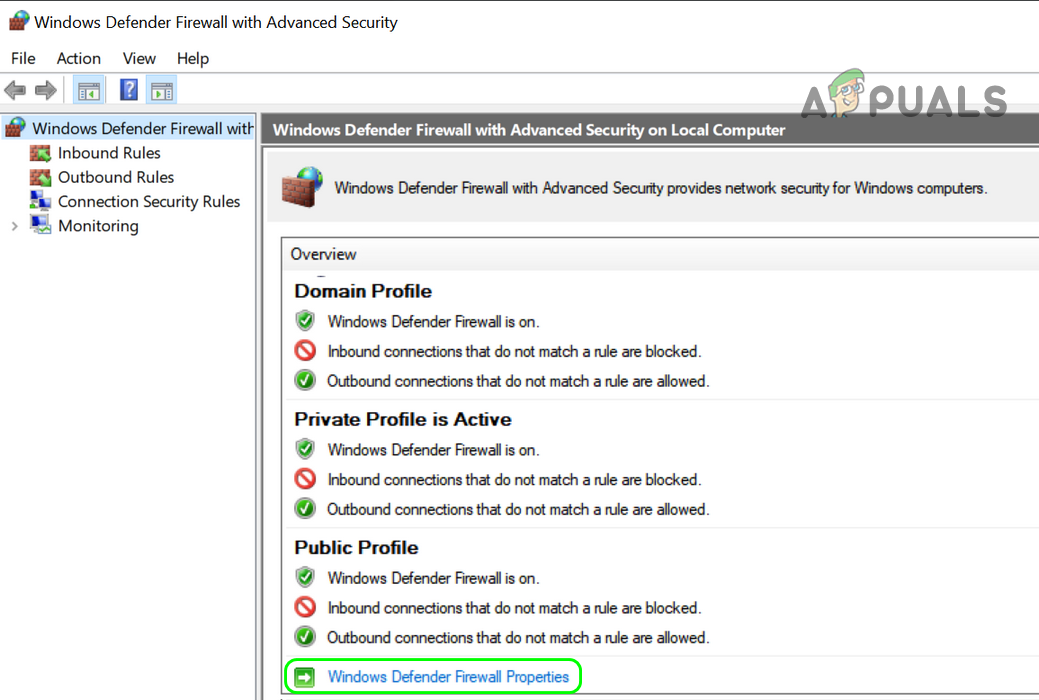 Open Windows Defender Firewall Properties
 - Then apply your changes and close the Windows Defender.
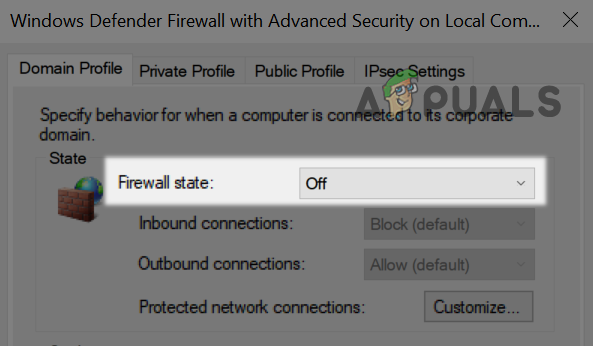 Disable Firewall for All the Profiles of Windows Defender Firewall
 - Again, open the Windows Defender and enable its Firewall as discussed above.
- Now close the Windows Defender and enable/launch the 3 rd party firewall to check if the LocalserviceNoNetworkFirewall issue is resolved.
Revert the Driver Update
If your system recently got through a driver update, especially, ATI Radeon driver, then that update may conflict with the system’s firewall, and reverting the update may solve the problem.
- Right-click Windows and open Device Manager.
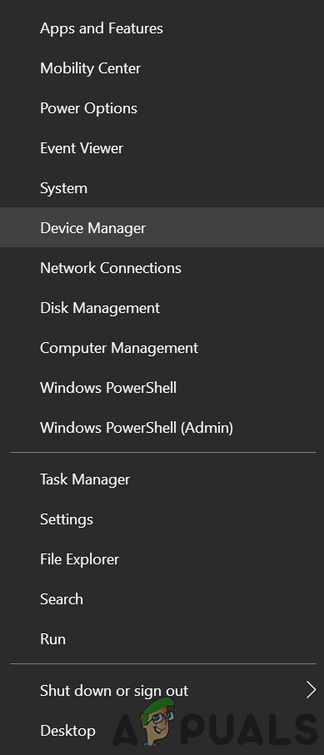 Open Device Manager
 - Now expand the latest updated device (e.g., Display Adapters) and double-click on the device (e.g., ATI Radeon).
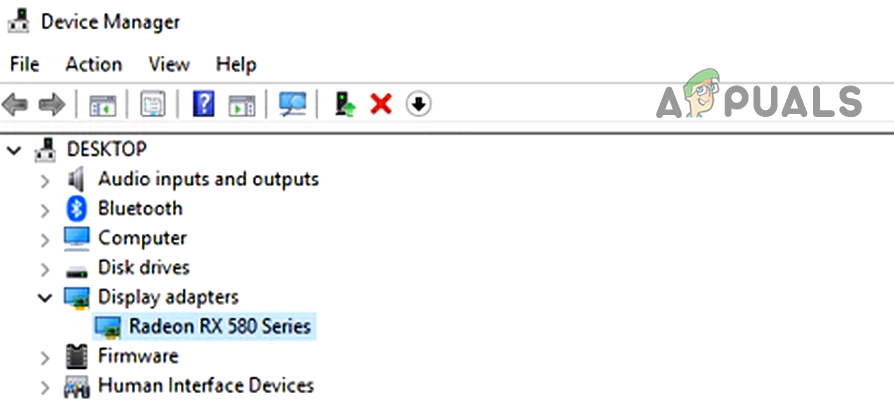 Double-click on Radeon Device in the Device Manager
 - Now head to the Driver tab and click on Roll Back driver (if applicable).
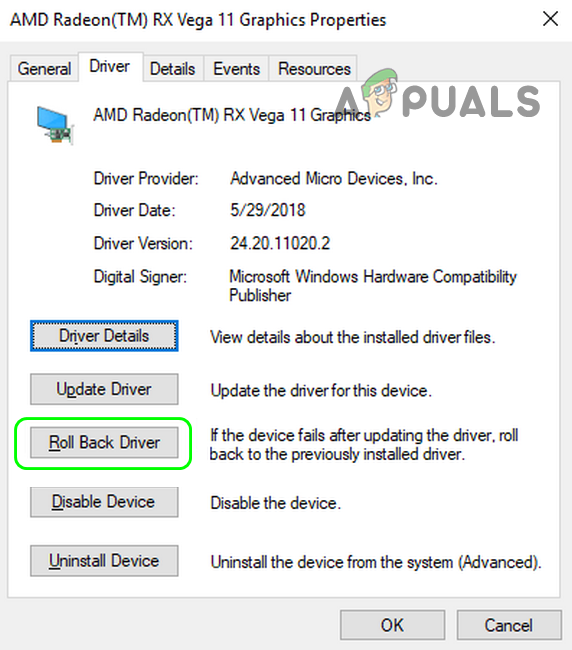 Roll Back the Radeon Driver
 - Then follow the prompts to revert the driver update and restart your system.
- Upon restart, check if the high CPU usage is resolved. If so, then you may defer the driver update, till the issue is reported to solve.
Reset the Windows Firewall to its Defaults
Any customization of the Windows firewall (e.g., a newly added inbound or outbound rule) may have caused the overload on the system, thus causing the issue. In such a scenario, resetting the Windows Firewall to its defaults may solve the problem.
- Click Windows, type, and open Windows Security.
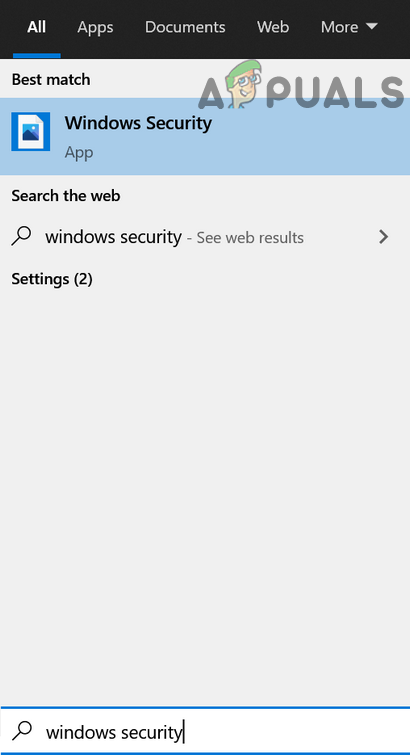 Open Windows Security
 - Now, in the left pane, head to the Firewall & Network Protection.
- Then click on the Restore Windows Firewall to its Defaults.
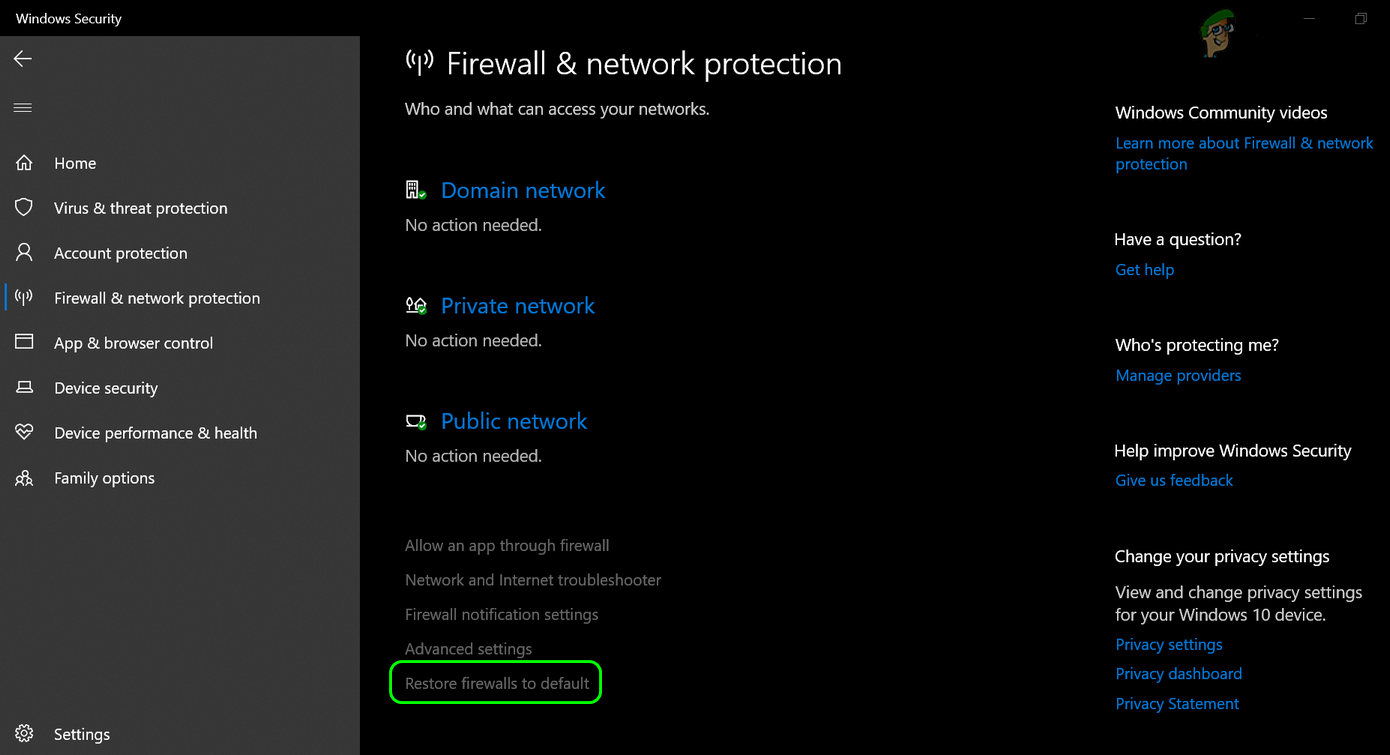 Restore the Windows Firewall to the Defaults
 - Now head to the Virus & Threat Protection tab (in the left pane) and under Virus & Threat Protection Settings, click on Manage Settings.
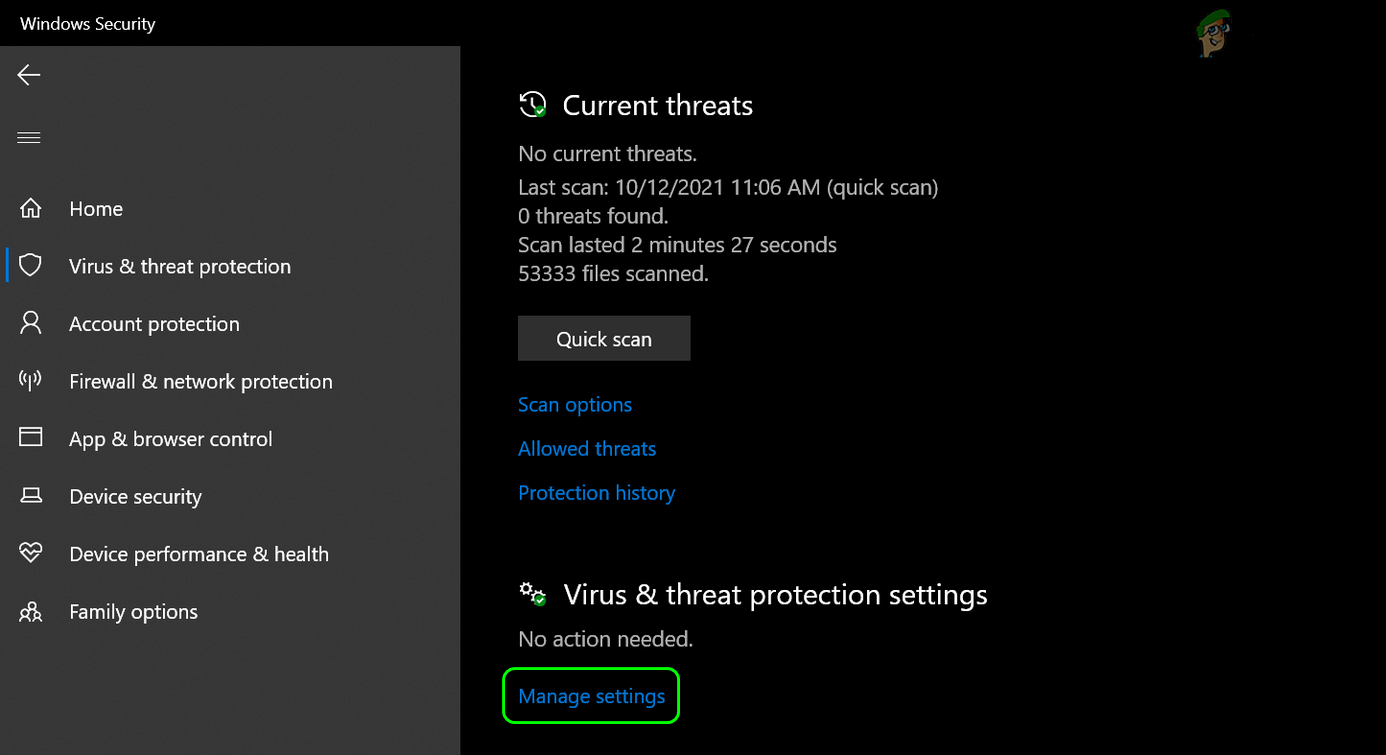 Open Manage Settings Under Virus & Threat Protection Settings
 - Then open Add or Remove Exclusions under Exclusions.
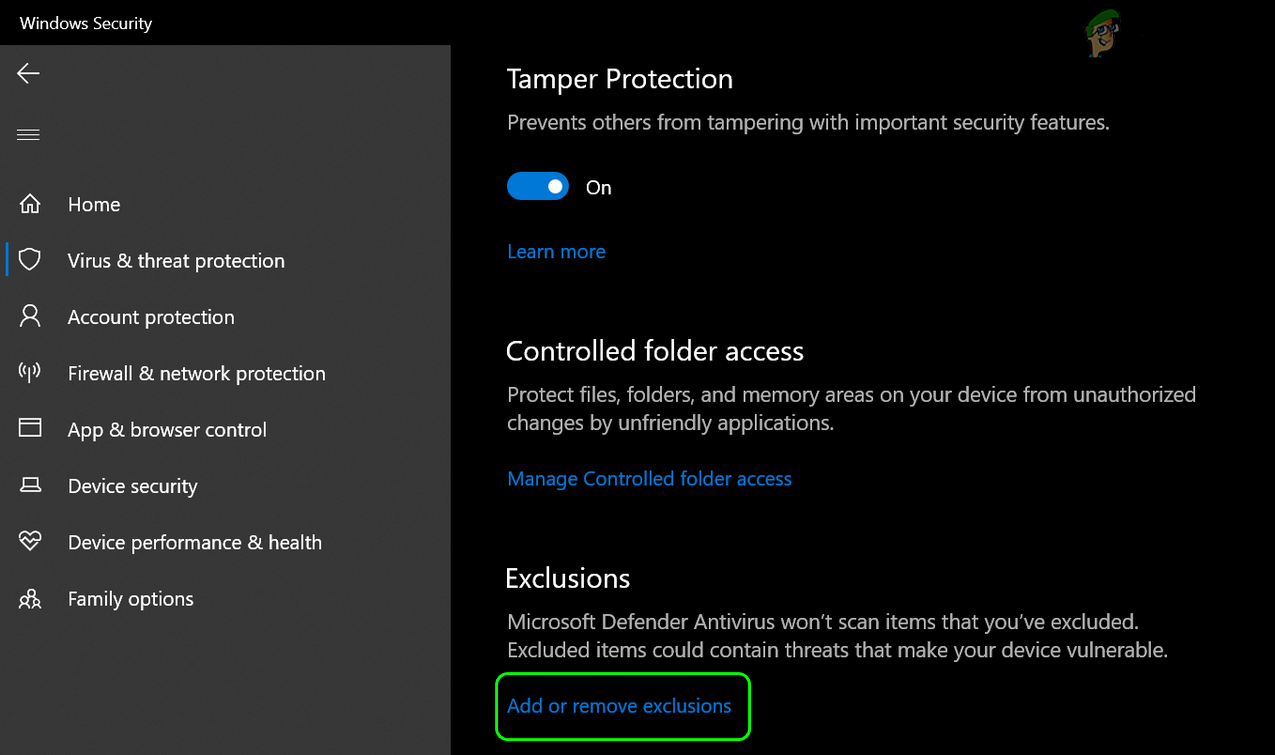 Click on Add or Remove Exclusions Under Exclusions
 - Now click on Add an Exclusion and select Folder.
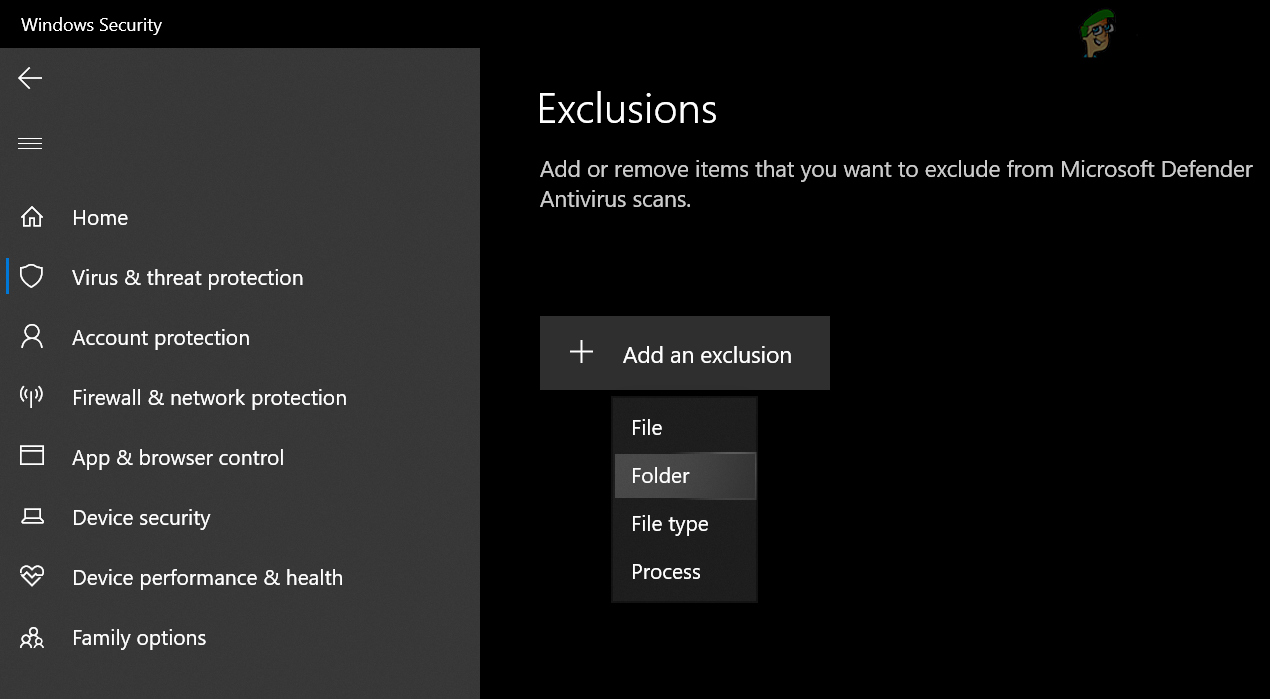 Add a Folder Exclusions in the Windows Security
 - Then enter the following path in the address bar:
- Now click on Select Folder and close the Windows Security.
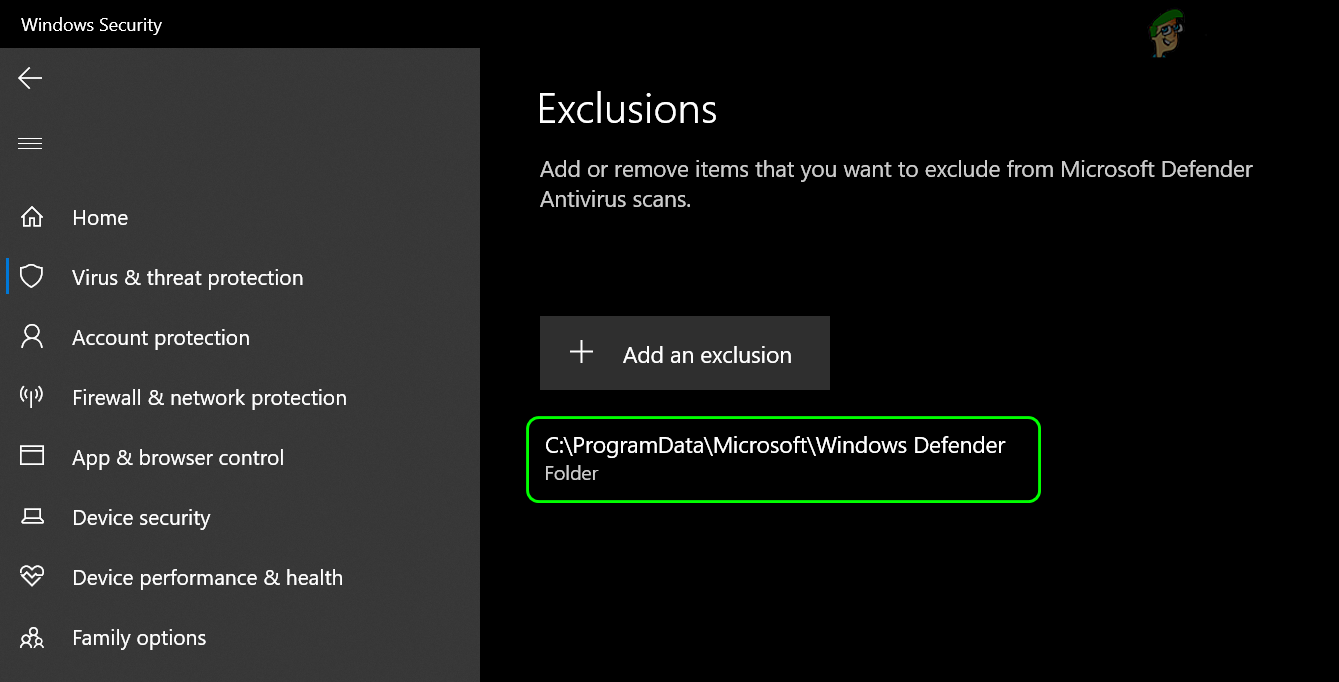 Add Windows Defender in the Exclusions of Windows Security
 - Then restart your PC and upon restart, check if the high CPU usage issue is resolved.
Edit the Cisco Umbrella Settings
Many of the Cisco Umbrella (a cybersecurity product) users reported that this application caused the high CPU usage on their system’s due to a bug. If you are using the Umbrella application, then check if the same is not causing the issue for you. Before proceeding, make sure that you are using the latest version of the Cisco Umbrella client.
Disable IP Layer Enforcement Feature of Cisco Umbrella
- Navigate to the Centralized Settings of the Umbrella Roaming client and open its Advanced Settings.
- Now, in the section of Enable Intelligent Proxy, uncheck Enable IP-Layer Enforcement and click Continue to save your changes.
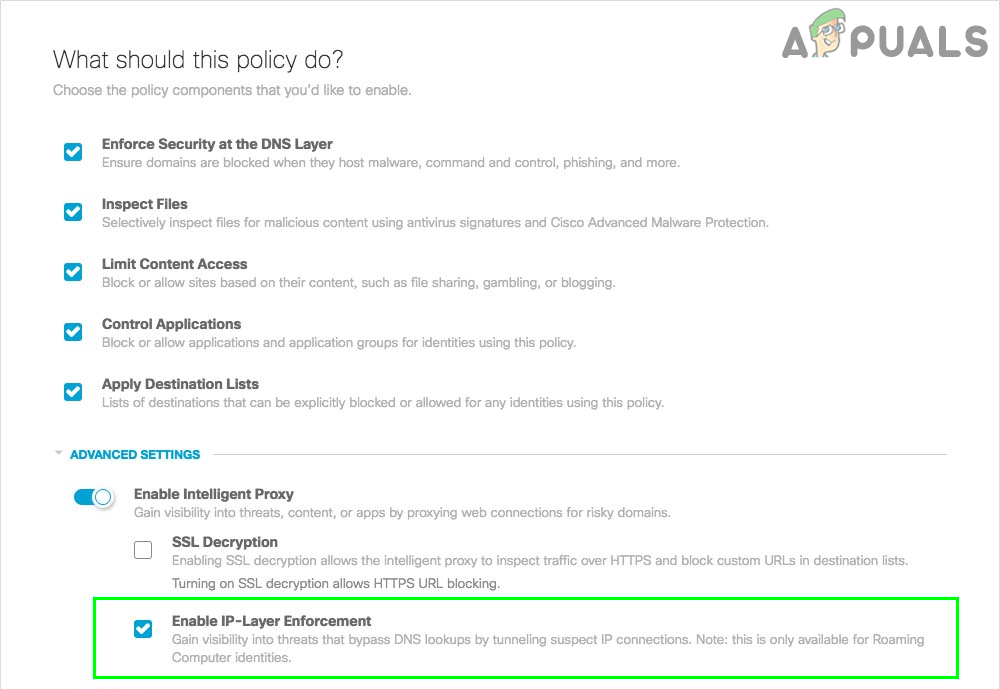 Uncheck Enable IP-Layer Enforcement in Cisco Umbrella
 - Now restart your phone and upon restart, check if the High CPU usage issue is resolved.
Disable the Cisco Umbrella Service
- Click Windows and type Services.
- Then, right-click on it and select Run as Administrator.
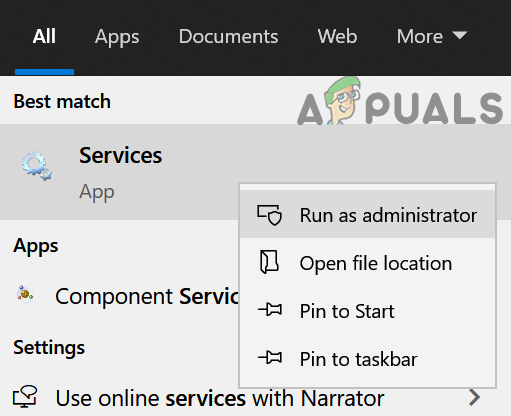 Open Services as Administrator
 - Now double-click on the Umbrella service and set its Startup type to Disabled.
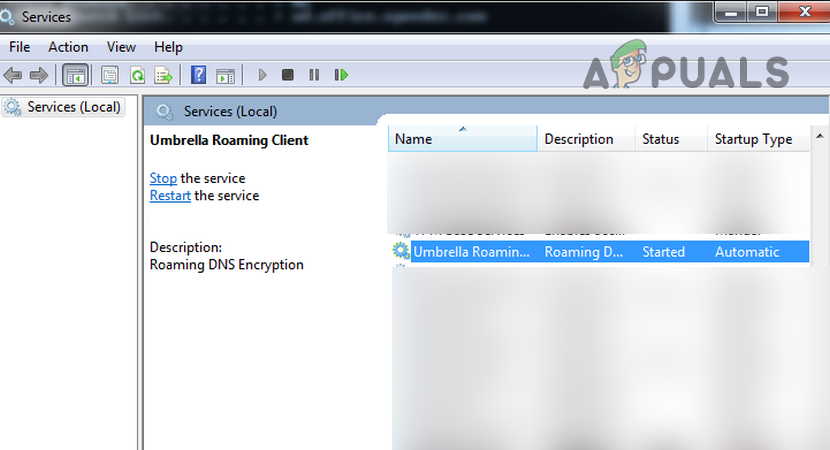 Open the Umbrella Client Service
 - Then click on the Stop button and reboot your PC.
- Upon reboot, check if the High CPU usage is normalized.
- If not, then check if uninstalling the Umbrella client clears out the issue. If so, you may reinstall the client to check if the issue does not return. If it does, then you may contact Cisco support to find the feature triggering the issue.
Delete the Firewall Rules
If there are some firewall rules added to the Windows firewall e.g., from a previous installation of a 3 rd party firewall (like a Trend Micro), whereas the Windows firewall has its own set of similar rules, then that can overload the Windows firewall to execute all the conflicting rules. In such a case, deleting the firewall rules in the Windows firewall may solve the problem.
- Click Windows and type Windows Firewall.
- Then, right-click on Windows Firewall with Advanced Security and select Run as Administrator.
- Now, in the right pane, click on Export Policy and then save the file (just in case…).
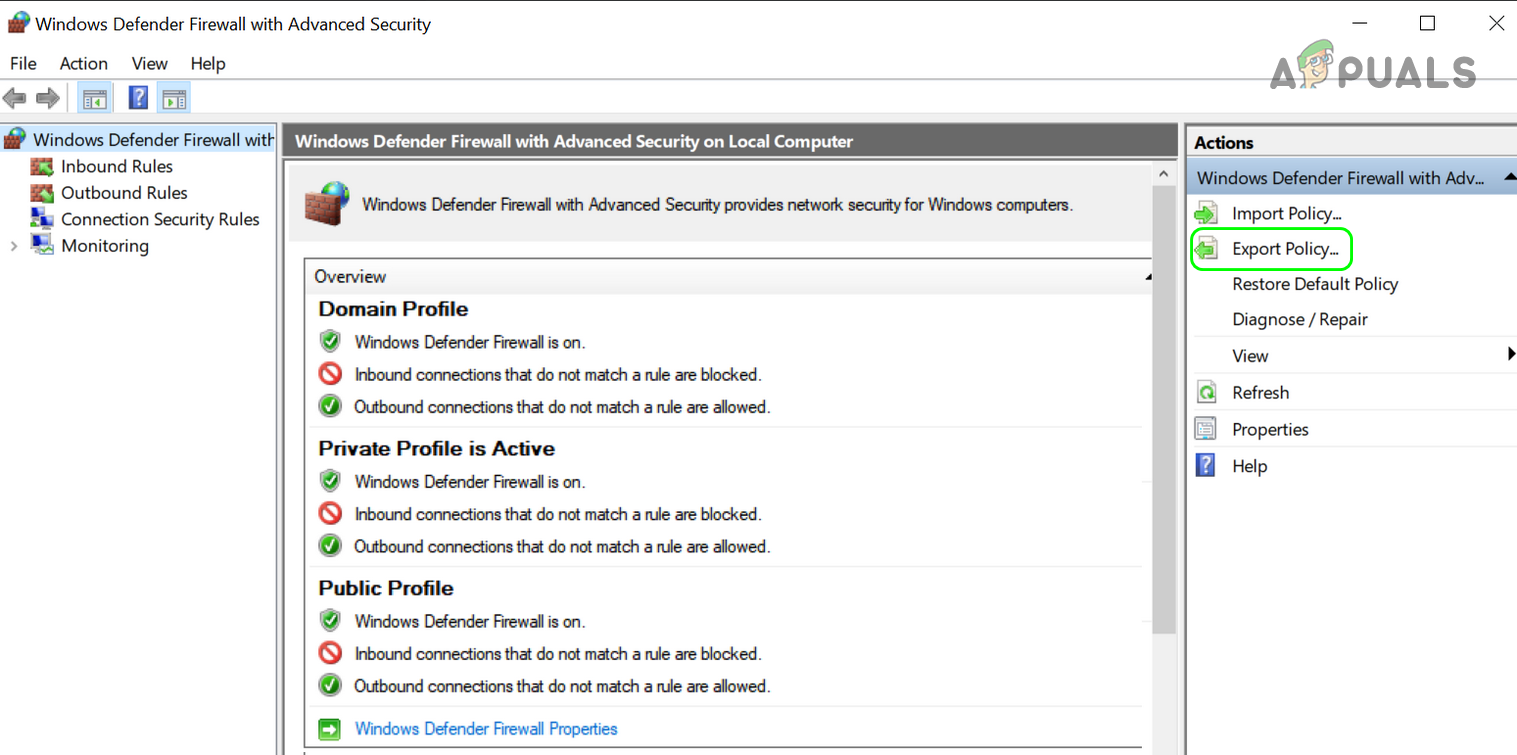 Export Policy of the Windows Defender
 - Then select the Inbound Rules tab and in the right pane, delete the rules you do not want to keep or not required. It may take some time to complete but be careful, do not delete something essential.
- Now repeat the same in the Outbound Rules tab and check if the issue is resolved.
- If that did not work or you do not want to check every rule, then, in the left pane, select Windows Defender Firewall with Advanced Security and expand the Action menu.
- Now select Restore Default Policy and then confirm to restore the policy.
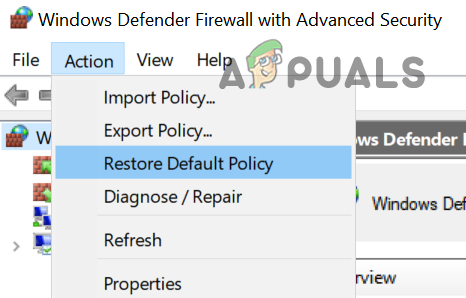 Restore Windows Defender Firewall to Default Policy
 - Then close the Windows Defender Firewall window and check if the CPU usage issue is resolved.
- If you cannot open the Windows Defender Firewall or its rules cannot be edited, then boot your system into the Safe Mode.
- Now click Windows and type WF.MSC.
- Then right-click on it and select Run as Administrator.
- Now check if repeating steps 4-6 solves the LocalserviceNoNetworkFirewall issue.
Reinstall the 3 rd Party Security Product
If you are using a 3 rd party security product like Avast Premium, its corrupt installation may conflict with the Windows Firewall and thus cause the issue at hand. In such a scenario, reinstalling the 3 rd party security product may solve the problem.
- Right-click Windows and open Apps & Features.
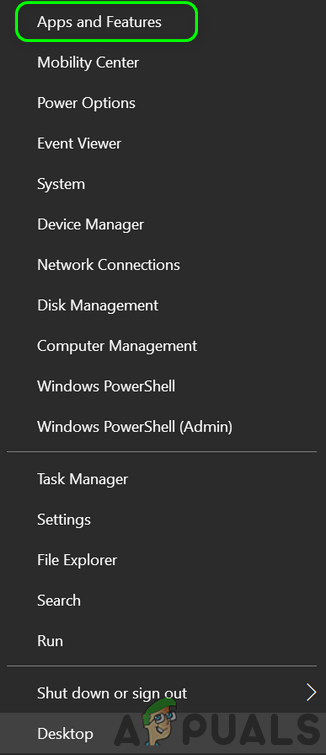 Open Apps & Features
 - Now click to expand the security product (e.g., Avast) and click on Uninstall.
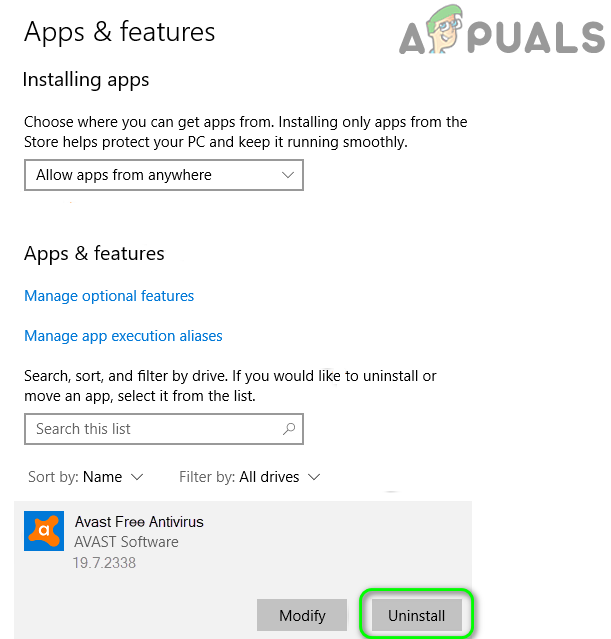 Uninstall Avast Antivirus
 - Then follow the prompts to completely uninstall the product and reboot your PC.
- Upon reboot, check if the LocalserviceNoNetworkFirewall issue is resolved.
- If not, then download the security product removal tool from the OEM’s website (like the Avast website) and remove any left-over traces of the security product.
- Now check if the system is not sluggish anymore. If so, then you may reinstall your security product, if it does not cause the issue again.
- If that did not work, then clean boot your PC and check if that resolves the issue. If so, then you may find the problematic application/process/service by one by one re-enabling the ones that were disabled during the clean boot process.
Edit the System’s Registry
If nothing has worked for you so far, then editing the Windows Defender-related registry values may solve the problem.
Warning: Proceed at your own risk as editing the PC’s registry is a skillful task and if not done right, you may cause everlasting damage to your data/system.
- Firstly, to be safe, create a backup of the system’s registry.
- Now click Windows, type, and open Notepad.
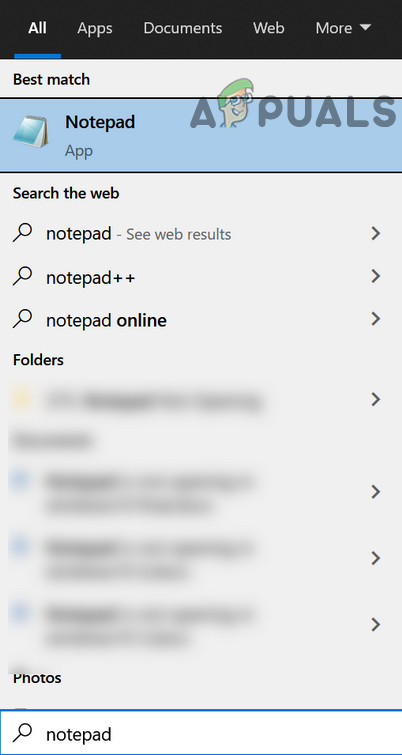 Open Notepad
 - Then copy and paste the following in the Notepad:
- Then expand the File menu and click Save.
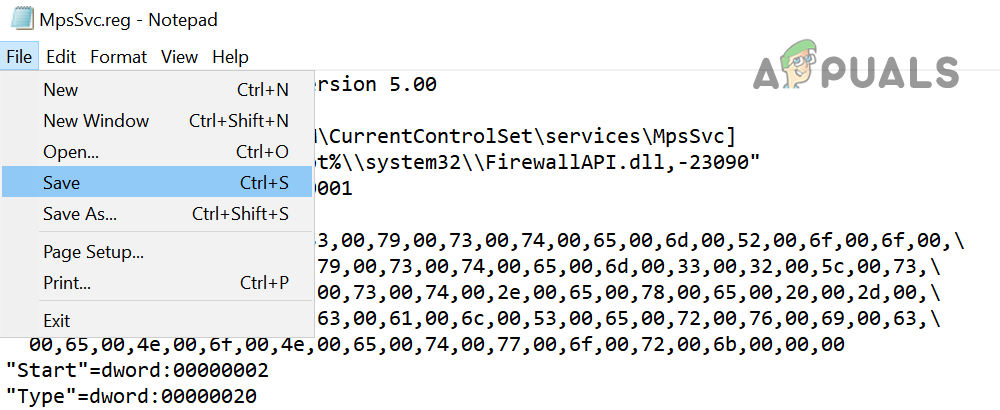 Save the File with .reg Extension
 - Now select a location to save the file, preferably on the desktop of your system, and enter the name for the file with .reg extension e.g., MpsSvc.reg.
- Then close the Registry Editor and right-click on the above-mentioned file (e.g., MpsSvc.reg).
- Now select Merge and then confirm to merge the registry keys.
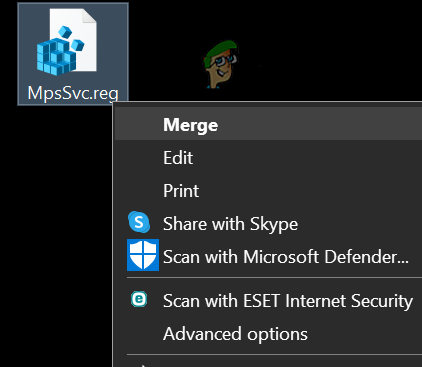 Merge the Registry Key to the Registry
 - Then restart your system and upon restart, hopefully, the CPU will not be throttling.
If nothing works, then you may perform a clean installation of Windows to get rid of the high CPU usage by LocalserviceNoNetworkFirewall.
Исправить LocalServiceNoNetworkFirewall High CPU or Power Usage
LocalServiceNoNetworkFirewall — это служба, используемая брандмауэром Защитника Windows и являющаяся частью системы безопасности Windows. В общих сценариях он не потребляет много памяти и ресурсов. Однако некоторые пользователи жаловались, что служба LocalServiceNoNetworkFirewall потребляет слишком много ресурсов ЦП или энергии в диспетчере задач Windows 11/10. Некоторые пользователи сообщили, что он потребляет более 50% ЦП на их ПК. Для многих пользователей это сделало их систему вялой и замедлила работу ПК, что сделало ее почти сложной в использовании.
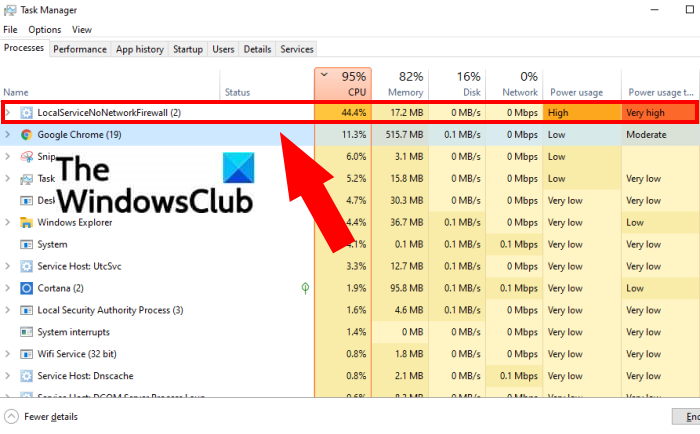
Если вы столкнулись с той же проблемой, мы покажем вам, как вы можете избавиться от этой проблемы. В этом посте мы собираемся обсудить несколько рабочих исправлений, которые помогли пользователям решить проблему. Давайте проверим.
Почему LocalServiceNoNetworkFirewall использует так много ЦП?
После анализа нескольких отчетов выясните возможные причины, которые могут вызвать эту проблему:
- Если вы используете брандмауэр стороннего производителя и он конфликтует с брандмауэром Windows, эта проблема может быть вызвана.
- Если вы установили слишком много правил в брандмауэре Windows, это может привести к чрезмерной загрузке ЦП LocalserviceNoNetworkFirewall. В этом случае вы можете попробовать удалить собственные правила брандмауэра.
- Эта проблема может быть вызвана поврежденной установкой стороннего брандмауэра, который конфликтует с брандмауэром Windows. В этом случае удаление и повторная установка стороннего брандмауэра может помочь вам решить проблему.
- Другой причиной этой проблемы могут быть поврежденные настройки или настройки брандмауэра Windows. Если сценарий применим, вы можете установить для брандмауэра Windows конфигурацию по умолчанию, чтобы решить проблему.
Основываясь на сценарии, который, по вашему мнению, лучше всего подходит для вас, вы можете попробовать соответствующее исправление из руководства, чтобы решить эту проблему.
Исправить LocalServiceNoNetworkFirewall High CPU or Power Usage
Вот способы исправить высокую загрузку ЦП службой LocalServiceNoNetworkFirewall в Windows 11/10:
- Перезапустите брандмауэр Windows.
- Обновите Windows до последней сборки.
- Отключите, а затем включите сторонний брандмауэр безопасности и брандмауэр Защитника Windows.
- Отмените обновление драйвера.
- Восстановите брандмауэр Windows по умолчанию.
- Удалите правила брандмауэра.
- Переустановите сторонний пакет безопасности.
1]Перезапустите брандмауэр Windows
Это может быть временный сбой брандмауэра Windows, который может вызывать высокую загрузку ЦП LocalServiceNoNetworkFirewall. В этом случае вы сможете решить проблему, перезапустив брандмауэр Windows. Для этого вы можете выполнить следующие шаги:
- Во-первых, откройте диспетчер задач, используя горячую клавишу Ctrl + Shift + Esc.
- В диспетчере задач перейдите на вкладку «Службы» и найдите службу WinDefend (антивирусная служба Microsoft Defender).
- Теперь щелкните правой кнопкой мыши службу WinDefend.
- Затем выберите в контекстном меню опцию «Перезагрузка».
- После перезапуска службы проверьте, решена ли проблема.
Если проблема все еще не устранена, вам нужно будет попробовать некоторые дополнительные методы устранения неполадок, чтобы исправить ее. Итак, переходим к следующему потенциальному исправлению.
2]Обновите Windows до последней сборки
Если вы используете устаревшую версию ОС Windows, рассмотрите возможность обновления ее до последней сборки. Некоторые проблемы несовместимости с ОС и другими системными модулями могут вызывать высокую загрузку ЦП службой LocalServiceNoNetworkFirewall. Итак, обновите свою Windows, а затем посмотрите, исправлена ли ошибка сейчас. Обновление Windows рекомендуется для повышения стабильности вашей системы, а также для исправления некоторых ошибок.
Чтобы обновить Windows, откройте приложение «Настройки» и перейдите в раздел «Центр обновления Windows». Здесь вы можете нажать на Проверить обновления кнопку и загрузите и установите все доступные обновления. Если вы используете последнюю сборку ОС и по-прежнему сталкиваетесь с этой проблемой, вы можете перейти к следующему исправлению.
3]Отключить, а затем включить сторонний брандмауэр безопасности и брандмауэр Защитника Windows.
Вы используете несколько брандмауэров на своем ПК? Если да, проблема может быть связана с этим. Чтобы решить эту проблему, вы можете попробовать отключить оба брандмауэра, а затем снова их включить.
Прежде всего закройте сторонний брандмауэр, который вы используете. Для этого щелкните правой кнопкой мыши брандмауэр на панели задач и нажмите кнопку «Выход», чтобы закрыть его. Вы также можете открыть этот диспетчер задач и завершить процессы, связанные со сторонним брандмауэром.
После этого откройте брандмауэр Защитника Windows в режиме повышенной безопасности от имени администратора и нажмите кнопку Свойства брандмауэра Защитника Windows. Теперь установите для параметра «Состояние брандмауэра» значение «Выкл.» Для профиля домена, частного профиля и открытого профиля. Затем нажмите кнопку «Применить»> «ОК», чтобы применить изменения.
Затем вы можете открыть брандмауэр Защитника Windows и включить / установить для него значение Вкл. А затем запустите сторонний брандмауэр. Посмотрите, решит ли этот метод проблему за вас.
Связано: брандмауэр Windows с оснасткой повышенной безопасности не удалось загрузить
4]Отменить обновление драйвера
Если вы недавно установили какое-либо обновление драйвера, есть вероятность, что оно может конфликтовать с брандмауэром Windows. Если сценарий применим, вы можете попробовать откатить последние обновления драйверов и посмотреть, решит ли это проблему для вас.
5]Сбросить брандмауэр Windows до значений по умолчанию
Высокая загрузка ЦП LocalServiceNoNetworkFirewall может быть вызвана настройками брандмауэра. Например, если вы добавили правила для входящего или исходящего трафика или еще какие-то настройки в брандмауэр, это может перегрузить вашу систему. В этом случае вы можете попробовать сбросить брандмауэр Windows до настроек по умолчанию и посмотреть, устранена ли проблема.
Сначала откройте приложение «Безопасность Windows» из поиска, а затем перейдите на вкладку «Брандмауэр и защита сети». Затем нажмите кнопку «Восстановить настройки брандмауэра по умолчанию».
После этого перейдите на вкладку «Защита от вирусов и угроз» и нажмите «Управление настройками». Затем нажмите «Добавить» или «Удалить исключения» и нажмите «Добавить исключение», а затем выберите «Папка». Теперь введите C: ProgramData Microsoft Защитник Windows местоположение и нажмите Выбрать папку.
Наконец, закройте безопасность Windows и перезагрузите компьютер, чтобы проверить, решена ли проблема сейчас.
6]Удалите правила брандмауэра
Если в брандмауэр Windows добавлены правила из предыдущей установки брандмауэра стороннего производителя, и есть конфликты с собственными правилами брандмауэра Windows, это может вызвать эту проблему. Итак, вы можете удалить правила брандмауэра, чтобы решить проблему. Вот основные шаги для этого:
- Откройте брандмауэр Windows в режиме повышенной безопасности и на правой панели нажмите «Политика экспорта», чтобы сохранить существующую политику на всякий случай.
- Перейдите на вкладку Правила для входящих подключений и удалите настраиваемые правила, которые хотите удалить. Однако не удаляйте важные правила.
- Сделайте то же самое для исходящих правил, перейдя на вкладку Исходящие правила. Посмотрите, решит ли это проблему, а если нет, перейдите к шагу (4).
- Щелкните меню «Действие», выберите параметр «Восстановить политику по умолчанию» и подтвердите процесс.
- Закройте окно и проверьте, решена ли проблема.
7]Переустановите сторонний пакет безопасности.
Если вы установили сторонний пакет безопасности, и он установлен неправильно или с ним связаны поврежденные установочные файлы, есть вероятность, что он конфликтует с брандмауэром Windows и, следовательно, вызывает проблему. В этом случае вы можете попробовать переустановить сторонний брандмауэр или пакет безопасности, который вы установили в своей системе. Итак, сначала удалите пакет безопасности через приложение «Настройки». Затем перезагрузите компьютер и посмотрите, не снизилось ли использование ЦП LocalServiceNoNetworkFirewall.
Позже вы можете загрузить установку для вашего пакета безопасности с официального сайта и установить его обратно на свой компьютер.
Почему мой процессор так сильно загружен без причины?
Если у вас слишком мало оперативной памяти и в вашей системе работает слишком много ресурсоемких приложений и программного обеспечения, это может привести к высокой загрузке ЦП. Высокая загрузка ЦП в вашей системе также может быть результатом работы вредоносных программ или вирусов на вашем компьютере. Чтобы решить эту проблему, вы можете попробовать удалить ненужные приложения, запустить Chkdsk, отключить индексатор поиска Windows, обновить драйверы устройств, изучить отчет о работоспособности системы и запустить сканирование SFC и DISM. Вы можете попробовать еще несколько советов, чтобы решить проблему высокой загрузки ЦП на вашем ПК.
Что такое высокий процессор хоста поставщика WMI?
Хост поставщика WMI, также известный как Windows Management Instrumentation Provider Service, является важной службой, необходимой для управления приложениями. Если у него слишком большая загрузка ЦП, вы можете решить проблему, запустив средство устранения неполадок обслуживания системы, запустив средство устранения неполадок производительности системы, устраните неполадки в состоянии чистой загрузки или проверив журналы средства просмотра событий для выявления проблемных процессов. Вы можете ознакомиться с полным руководством по исправлению высокой загрузки ЦП хоста поставщика WMI (WmiPrvSE.exe).
Теперь прочтите: Исправить Систему, прерывающую высокую загрузку ЦП в Windows.
.
[Fix] Local Service No Network Firewall | High CPU Usage Issue (100% Working)
Usually, the LocalServiceNoNetworkFirewall service consumes low CPU and Memory power. But it may consume high CPU usage instead. In that scenario, it is a problem indeed.
I understand that you are currently facing this pain issue and searching for an immediate solution.

Don’t worry. I am writing this article for you. Here you will get all possible fixes. You will also know about the service and why it may turn into a pain issue for you. Let’s explore.
What is Local Service No Network Firewall Service?
The Service is a part of the Windows Security Firewall. The Windows Defender used it to operate the function. Generally, it does not consume a high CPU and Memory. But, it turns into a problem when it starts consuming high CPU or Memory.
Why Does the Service Consume High CPU Usage?
The consuming high CPU & Memory usage issue can be created for many reasons. These are-
- The issue may take place because of the Windows Firewall settings corruption. In this case, you can solve the issue by making some settings-related changes.
- It can happen for an extreme amount of firewall rules and policies. So, you may need to delete the unusual rule and policy.
- The conflict between Windows and third-party firewalls is a big reason that causes the issue most. If you use two firewalls parallelly, it will happen in most cases.
- If you use a third-party security app, installing a corrupted one may be a reason. So, when the issue occurs with you, you may need to execute a clean install of the third-party security firewall.
What to Do If Local Service No Network Firewall Consumes High CPU Usage
As consuming high CPU usage by the service is unusual, and if you face it, you will need to take proper steps to solve it. Before jumping to the details, let’s have a glimpse at the list first.
- Fix 1: Reenable The Windows And Third-Party Security Firewall
- Fix 2: Restart the WinDefend service
- Fix 3:Check for Latest Windows Update
- Fix 4: Roll-back Driver Update
- Fix 5: Restore Firewalls to Default
- Fix 6: Delete the Firewall Policy
- Fix 7: Reinstall Third-party Security App
Fix 1: Reenable The Windows And Third-Party Security Firewall
As the conflict between the Windows and third-party security firewall is the major reason behind the issue creation, the first thing I would recommend you to reenable the two firewalls. I will attach the process in detail below.
Step 1
Right-click on the Start menu. Find out the ‘Task Manager’ from the appeared list. While finding, click on it.

Step 2
Accordingly, the ‘Task Manager’ window will appear. From here, you need to right-click on the running third-party security firewall app and press the ‘End task’ option. In the end, close the ‘Task Manager’.

Step 3
Next, tap the Windows key and type ‘windows defender firewall with advanced security’. Consequently, the app preface will appear on the interface. You need to click on the ‘Run as administrator’.

Step 4
Then, you need to find and select the ‘Windows Defender Firewall Properties’ option.

Step 5
In this step, you need to tap the ‘Domain Profile’, ‘Private Profile’, and ‘Public Profile’ tabs one by one. You have to turn their ‘Firewall State’ into ‘Off’. Then, press the ‘Apply’ and ‘Ok’. In the end, close the appeared window.

Step 6
You have to follow step 3 to step 5 again. Here, the exception only will be to turn the ‘Domain Profile’, ‘Private Profile’, and ‘Public Profile’ sections’ ‘Firewall State’ into ‘On’.
Step 7
Finally, launch the third-party security firewall and check the existence of the discussed issue.
In most cases, the fix is enough to get rid of the issue. By any chance, if it does not work for you, there will be several options that still exist.
Fix 2: Restart the WinDefend Service
After failing to resolve the issue in the first attempt, you can restart the
WinDefend service from task manager. You will get the direction step by step below to execute the fix.
Step 1
Right-click on the Start menu. Then select ‘Task Manager’ from the appeared list.

Step 2
Consequently, the ‘Task Manager’ window will become evident. You have to tap the ‘Services’ tab. You will find it on the top menu.

Step 3
After that, scroll down to the bottom to find out the ‘WinDefend’. It will be listed alphabetically.

Step 4
Right-click on the ‘WinDefend’ service. Then click on the ‘Restart’ option. As a result, it will complete the process within a moment.

Finally, check the issue. By any chance, it still exists, you will have to follow the next fixes.
Fix 3: Check for Latest Windows Update
You can solve the issue by checking for the latest Windows Update. The process will be easy to apply. You need to follow the below steps.
Step 1
Tap the Windows and ‘I’ keys together. Accordingly, you will get the ‘Settings’ window access. From here, you have to find out the ‘Update & Security’ category and click on it.

Step 2
After that, select the ‘Windows Update’ section from the left side menu.

Step 3
Then look at the right portion of the appeared interface. Here you will see the ‘Check for updates’ option. You may also see the recommended Windows Update status. Whatever, you need to take action as on-screen direction.

After completing the checking and executing process, you need to cross-check the issue.
Fix 4: Roll-back Driver Update
The issue may arise from the latest driver update of any device. So, to solve it, you can revert the recent driver update. I will include the process below.
Step 1
Tap the Windows key and type ‘device manager’. Accordingly, the ‘Device Manager’ control panel preface will appear on the interface. Click on it.

Step 2
Consequently, the ‘Device Manager’ window will appear. From here, find your targeted device. While finding it, you have to right-click on it. Then select the ‘Properties’ option from the appeared list.

Step 3
After that, the ‘Properties’ window will appear. You have to tap the ‘Driver’ tab from the top menu bar. Here you will find a couple of options. The ‘Roll back Driver’ will be one of them. You have to click on it to revert the driver update.

In the end, you need to check the existence of the issue. If the fix doesn’t work for you, you will need to follow the other fixes as well.
Fix 5: Restore Firewalls to Default
If none of the upper fixes are able to solve the issue, you will need to reset the firewall into default condition. I will include the restoration process below.
Step 1
Press the Windows and ‘I’ keys together. Consequently, the ‘Settings’ window will appear on the screen. You have to choose the ‘Update & Security’ category from here.

Step 2
Then select the ‘Windows Security’ tab from the left side menu.

Step 3
After that, look at the right portion of the interface. Here you will see the ‘Open Windows Security’ option. Click on it.

Step 4
Accordingly, an individual interface of Windows Security will become evident. You have to choose the ‘Firewall & network protection’ from the left menu bar.

Step 5
Then you have to give your attention to the right portion. Here you will find a ‘Restore firewalls to default’ named option. Click on it and follow the on-screen direction to complete restoration.

Step 6
After that, tap the ‘Virus & threat protection’ tab from the left side menu.

Step 7
Next, click on the blue-colored ‘Manage settings’ option from under the ‘Virus & threat protection settings’ section.

Step 8
Then you have to look for the ‘Exclusions’ section. From here, click on the ‘Add or remove exclusions’ option.

Step 9
After that, tap the ‘Add an exclusion’ tab and choose ‘Folder’ from the appeared list.

Step 10
In this step, you have to select the folder. To do so, copy the below direction and paste it into the Address Bar.
‘C:\ProgramData\Microsoft\Windows Defender\’

Then hit the ‘enter’ key and confirm the submission.
Step 11
In the end, you will see the ‘Folder’ location under the ‘Exclusions’ section. Then close the ‘Windows Security’ window and restart the computer.

Finally, check the issue again.
Fix 6: Delete the Firewall Policy
In rare cases, firewall rules and policies may create the issue. It can happen to you too. So, deleting some of the rules and policies can solve the discussed issue. I will include the deleting process below.
Step 1
Tap the Windows key and type ‘windows defender firewall with advanced security’. Consequently, a related app preface will appear on the interface. You have to click on the ‘Run as administrator’ option.

Step 2
As a result, the ‘Windows Defender Firewall with Advanced Security’ window will appear. For your safety, you may export the existing policy. To do so, look at the right pane of the appeared window and click on the ‘Export Policy’.

Step 3
After exporting the policy, select the ‘Inbound Rules’ and delete the rules one by one that you want to delete. You need to do it for the ‘Outbound Rules’ section also.

In this step, I would like to aware you are careful about deleting the rules. Take time and don’t delete any important files.
Step 4
Alternatively, you may restore of default policy directly. To do so, click on the ‘Action’ tab. It will stand on the left top menu bar. Here you will find the ‘Restore Default Policy’ option. Click on it to execute the restoration.

To execute the fix, you need the system’s administrative power. Even you may need to enable Safe Mode too.
Fix 7: Reinstall Third-party Security App
If you use a third-party security app and the issue has not been solved yet, you can try this fix. The process will be easy to apply by yourself.
Step 1
Right-click on the Start menu. Then choose the ‘Apps and Features’ from the appeared list.

Step 2
Then look at the app list. From here, you have to find out the third-party security app that you have installed before. While finding the app, click on it. Consequently, you will get the ‘Uninstall’ option. You have to press it. The process may take several times, and you need to follow the on-screen direction to uninstall the app.

Step 3
After that, go to the app website or insert the related disk. Then execute a clean installation.
Hopefully, the issue won’t appear anymore.
Final Words
To sum up, I would notify you that the LocalServiceNoNetworkFirewall service consumes high CPU and Memory power for the conflict between the Windows and third-party security firewalls in most cases. So, fix no. 1 will have the probable high-rated success percentage to resolve the issue. Somehow, if it fails to fix the issue, you may follow the other fixes as well.