Как установить Android SDK на Windows, Mac и Linux
22 октября 2008 года в Android появился магазин приложений Play Market. С тех пор прошло больше 10 лет и сегодня Google Play насчитывает почти 3 миллиона приложений в их числе Telegram с каналом AndroidInsider. Как же разработчикам со всего мира удается создавать качественные продукты? Они используют Android SDK. Чтобы получить все инструменты и средства разработки приложений, необходимо скачать среду разработки Android Studio. Но что, если вы хотите воспользоваться Android SDK с командной строкой без Android Studio и ненужных средств? В этом материале мы подскажем, как правильно установить и настроить Software Development Kit.

Ручная установка
Переходим по этой ссылке, находим раздел «Command line tools only» и скачиваем нужную версию в зависимости от вашей системы.
Создайте папку Android в корневой папке системы. В случае с Windows это локальный диск «С», а в OS X и Linux — домашняя папка пользователя. Распакуйте скачанный архив в папку Android. Для дальнейшей работы необходим установленный пакет Java на компьютере. OS X из коробки его поддерживает, чтобы проверить это, в терминале вбейте «which java», система должна выдать расположение пакета. На Windows и Linux устанавливаем JDK по этой ссылке.
Если вы используете Linux, вам понадобится установить еще несколько пакетов с помощью этой команды «sudo apt-get install lib32ncurses5 lib32stdc++6». Для других версий Linux необходимо найти подходящие пакеты ncurses5 и stdc++6.
Установка компонентов
Переходим в папку «Android/bin», находим исполняемый файл sdkmanager и запускаем, откроется следующее окно:
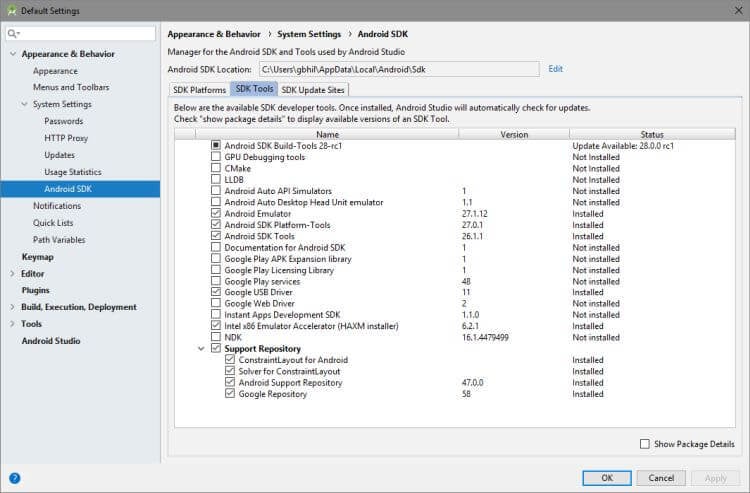
Выбираем «Android SDK Tools» и «Android SDK Platform-Tools», на Windows необходимо выбрать еще и «Google USB Driver». После этого подтвердите условия лицензионного соглашения, и начнется установка инструментов. В Windows они расположатся в папке «Windows\users\Имя пользователя\AppData\Local\Android», а на Linux и Mac в папке «.Android».
Ссылки
Теперь давайте создадим символическую ссылку на эти папки, чтобы можно было быстро запустить инструменты через командную строку.
В Windows переходим в «Этот компьютер → Свойства → Дополнительные параметры системы → Дополнительно → Переменные среды». В «Переменные среды для пользователя» находим строку «Path» и кликаем по ней 2 раза. Откроется окно, в нём нажимаем «Создать» и вставляем полный путь к инструментам через точку с запятой. Должно выглядеть примерно так «C:\Android\tools;C:\Android\platform-tools».
На Mac в домашней папке находим скрытый файл «.bash_profile» или просто «.profile». Открываем его командой «nano
/.profile» и добавляем путь до инструментов:
export PATH=»$HOME/Android/tools:$PATH»
export PATH=»$HOME/Android/platform-tools:$PATH»
Сохраняем файл комбинацией «CMD+X» и далее жмём «Y». На Linux процесс аналогичен, но нужно запускать файл .bashrc.
Вот и всё. Теперь команды Android SDK доступны через консоль. Вы сможете, например, устанавливать образы и вручную обновлять смартфон.
Как скачать sdk для android studio
Все, что мы делаем на Android с помоью Java, зависит от Android SDK — если мы создаем приложение под определенную версию, например, для Android Nougat, то у нас должны быть установлены соответствующие иструменты SDK. Это надо учитывать при разработке.
Откроем Android Studio. По умолчанию, если мы запускаем программу в первый раз, то нам открывается некоторое начальное меню. В самом низу стартового экрана программы найдем кнопку «Configure» и нажмем на нее:
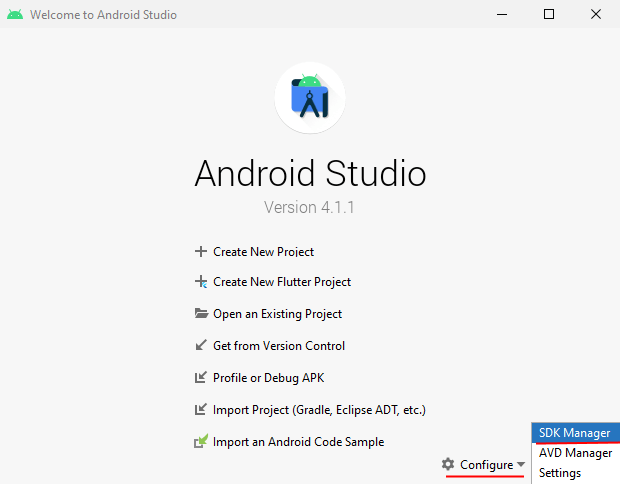
Далее в выпадающем меню нажмем на пункт «SDK Manager». После этого откроется окно с настройками для Android SDK Manager:
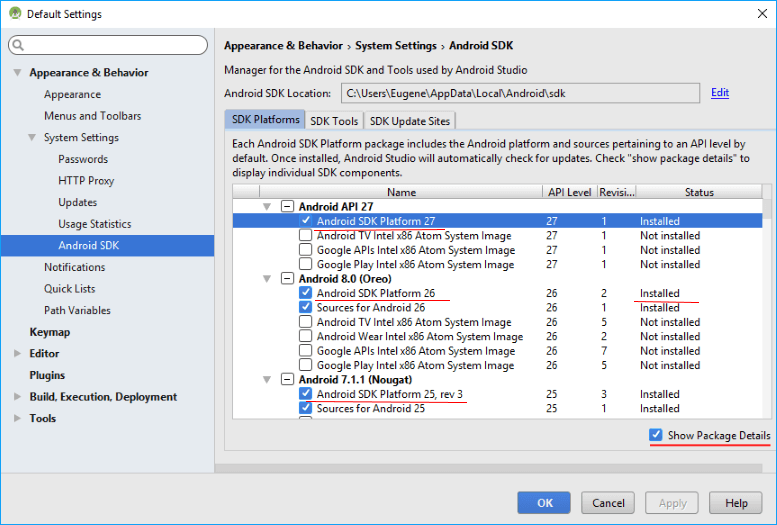
Для более детального просмотра всех компонентов по каждой платформе нажмем внизу окна на ссылку Show Package Details .
Здесь мы детально можем посмотреть, какие пакеты для каждой платформы установлены. Все компоненты сгруппированы по определенной версии SDK, например, Android API 27, Android 8.0 (Oreo), Android 7.1.1 (Nougat) и так далее. Каждая версия SDK фактически представляет определенную версию или подверсию ОС Android. Но каждая версия SDK предполагает широкий круг компонентов, это в том числе и инструменты для разработки под телевизоры, под смарт-часы и т.д. Не все эти инструменты могут понадобиться, поэтому нет смысла все версии SDK абсолютно полностью устанавливать.
В данном случае нас прежде всего будет интересовать пункт Android SDK Platform . Android SDK Platform содержит весь основной функционал, который используется при разработке. Данный пункт можно выделить для всех тех платформ, под которые мы собираемся компилировать приложение. В частности, рекомендую выбрать последние платформы — Android 8.0/7.1, а также те, которые будут использоваться в качестве минимальных платформ, например, Android 5.0 / 5.1.
Кроме SDK Platform каждая платформы, как правило, содержит еще ряд компонентов, которые предназначены для тестирования приложения на эмуляторе:
Android TV Intel x86 Atom System Image
Android Wear Intel x86 Atom System Image
Google APIs Intel x86 Atom System Image
Google Play Intel x86 Atom System Image
Для более ранних платформ список компонентов может отличаться.
Если не планируется использование эмулятора, то данные компоненты не столь важны. И наоборот, если тестирование будет происходить на эмуляторе, то следует установить для этого образ системы Google APIs Intel x86 Atom System Image или Google Play Intel x86 Atom System Image .
Далее в этом же окне перейдем на вкладку SDK Tools . Здесь перечислены дополнительные пакеты:
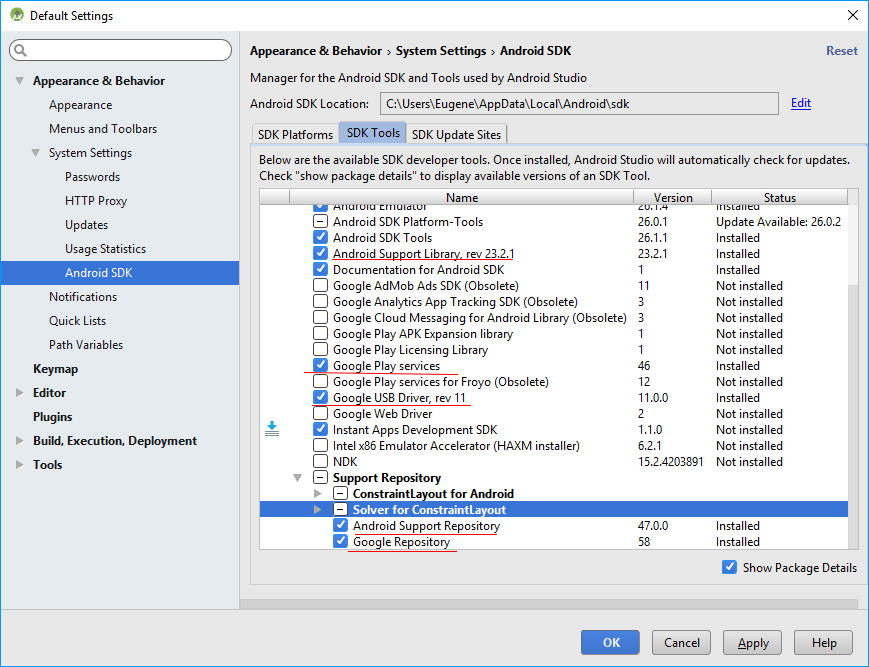
Здесь для нас прежде всего важны такие пакеты как:
Android Support Repository
Android Support Library
Google Play Services
Google Usb Driver
Эти пакеты устанавливают репозитории android и сервисы google play. Кроме того, если вы хотите использовать для тестирования приложений смартфон от Google — Nexus 5/5X и 6/6P или Google Pixel, то обязательно надо установить пакет Google Usb Driver , который представляет драйвер для работы с данными смартфонами. Если же предполагается использовать смартфон другого производителя, то в этом случае надо будет установить USB-драйвер непосредственно от этого производителя. Как правило, при подключении смартфона система сама пытается установить драйвер.
Если планируется использование эмулятора, то также следует установить пакет Intel x86 Emulator Accelerator (HAXM installer) .
И если в процессе разработки или тестирования будут возникать проблемы с какими-то версиями ОС Android, то вполне вероятно корень проблем заключается в отсутствии нужных компонентов для определенных платформ. В этом случае можно будет из Android Studio запустить SDK Manager и вручную установить недостающие компоненты.
Впоследствии при каждом запуске Android Studio будут появляться всплывающие уведомления о доступности обновлений по платформам, что довольно удобно и что позволит проектам не отставать от последних обновлений от Google.
Если впоследствии нам потребуется вызвать SDK Manager, то мы можем сделать это из самой Android Sudio через панель инструментов:
 Install Android Development Tools
 Before You Begin
This 15-minute tutorial shows you how to install Android Studio, which includes the Android SDK, and create an Android Virtual Device (AVD) on which you install an Oracle JavaScript Extension Toolkit (Oracle JET) hybrid mobile application during a later tutorial. The time to complete doesn’t include processing time as a result of your activities.
Background
The Oracle JET command-line interface invokes the Android SDK that you install with Android Studio to build an Android application package (APK) file from the source files of your hybrid mobile application. This APK file is installed on an AVD to enable you to test the hybrid mobile application.
What Do You Need?
- A computer that meets the system requirements to install Android Studio. See System requirements at https://developer.android.com/studio/
 Install and Set Up Android Studio
Depending on the operating system of your computer, the Android Studio installation wizard prompts you with dialogs where you choose between standard or custom install types. Choose the options recommended by the Android Studio installation wizard as these options include the components that you require to create and install a hybrid mobile application on an AVD. They also include an Android emulator and an emulator accelerator appropriate for your computer, be that Windows, Mac, or Linux.
- Go to the Download page for Android Studio on the Android Developer’s website at https://developer.android.com/studio/ and click DOWNLOAD ANDROID STUDIO.
- Review and accept the terms and conditions in the Download Android Studio dialog that appears and click DOWNLOAD ANDROID STUDIO FOR PLATFORM where PLATFORM refers to the operating system of your machine, such as Windows, Mac, or Linux.
- Go to the Install Android Studio guide at https://developer.android.com/studio/install and follow the instructions for your operating system to install and start Android Studio.
- If you run Android Studio behind a firewall or secure network, an Android Studio First Run dialog appears which displays a button (Setup Proxy) that you click to enter the proxy server settings for your environment. This allows Android Studio to complete the download of the components for a standard install.
- In the Welcome to Android Studio dialog, select Start a new Android Studio project, and then, in the Create New Project wizard, accept the default options to progress to the final screen in the wizard and click Finish.
This enables the Android Studio toolbar with the options that you need to create an AVD. It also downloads and configures the Gradle build tool that the Android SDK invokes to build the APK file when you complete the creation of your Oracle JET hybrid mobile application.
If you run Android Studio behind a firewall or secure network, a Proxy Settings dialog appears that enables you to configure proxy settings for the Gradle build tool that Android Studio downloads and configures. Provide the proxy settings for your environment to ensure that the Gradle build tool functions correctly.
 Install an Android SDK Platform Package
- In the Android Studio toolbar, click the SDK Manager icon (
 ) to open the Android SDK page in the Default Settings dialog.
 - In the SDK Platforms tab, select Android 8.0 (Oreo) with an API Level value of 26, and click Apply.
 Description of the illustration sdkmgrdialog.png
 - Click OK in the confirmation dialog that appears and accept the license agreement to proceed with the installation.
- Once the installation completes, click Finish and then click OK to close the Default Settings dialog.
 Create and Start an Android Virtual Device
- In the Android Studio toolbar, click the AVD Manager icon ( ) and click Create Virtual Device in the Android Virtual Device Manager dialog that opens.
- In the Phone category of the Choose a device definition page of the Virtual Device Configuration dialog, select Nexus 5X and click Next.
- In the Recommended tab of the Select a system image page, click Download for the Oreo entry with an API Level of 26.
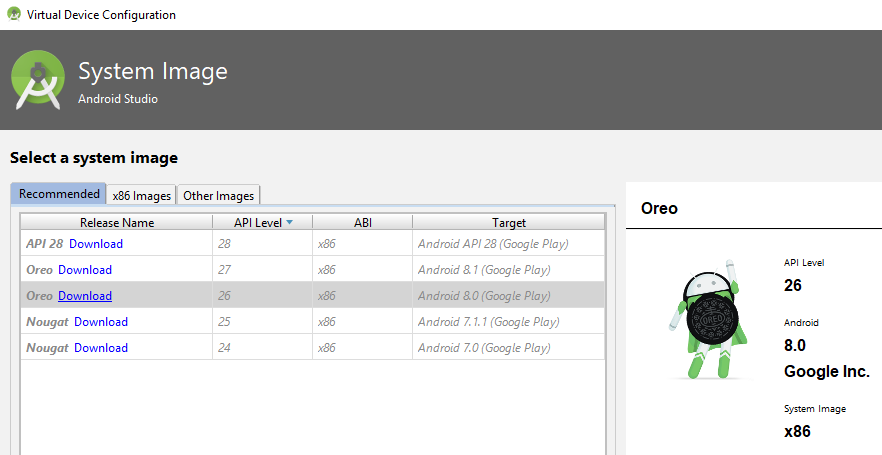 Description of the illustration downloadoreo.png The SDK Quickfix Installation wizard opens.
 - Accept the license agreement to proceed with the download of the system image for Android 8.0 with API Level 26. Once the installation completes, click Finish and then click Next in the Select a system page.
- In the Verify Configuration page, review and accept the default settings such as the AVD Name value of Nexus 5X API 26, then click Finish.
- In the Android Virtual Device Manager dialog, click the Launch this AVD in the emulator icon (
 ) under the Actions column for the newly-created Nexus 5X API 26 AVD.
The Android emulator starts and loads the Nexus 5X API 26 AVD. A toolbar appears to the right of the AVD that provides UI controls to interact with the AVD.
 Install the Java SE Development Kit 8
- Go to the Java SE Development Kit 8 Downloads page at http://www.oracle.com/technetwork/java/javase/downloads/jdk8-downloads-2133151.html, accept the license agreement, and download the Java SE Development Kit installation file for your platform.
- Follow the JDK installation instructions for your platform at https://docs.oracle.com/javase/8/docs/technotes/guides/install/toc.html.
 Create Environment Variables
To function correctly, the Apache Cordova command-line interface that the Oracle JET command-line interface communicates with requires that you configure environment variables. These environment variables reference the installation location of the Android SDK that is installed by Android Studio and the Java SE Development Kit 8.
- For Windows.
- Open the Environment Variables dialog from the System Properties dialog by navigating Control Panel > System and Security > System > Advanced System Settings > Environment Variables.
- Click New in the Environment Variables dialog and set the values of the variables to the location of the JDK and Android SDK locations, as shown in the following image. You can obtain the Android SDK location from the Android SDK page of the Default Settings dialog that you access in Android Studio by clicking Tools > SDK Manager.
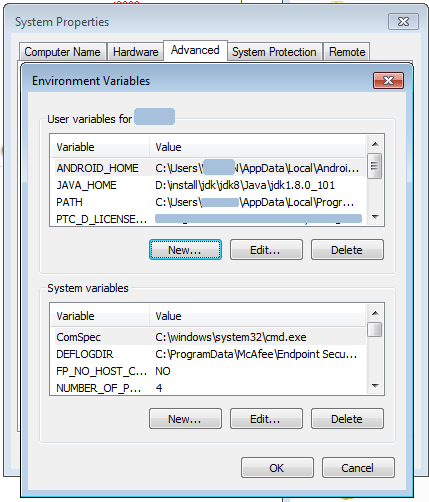 Description of the illustration envvar.png
- For Mac and Linux-type systems, the settings depend upon your default shell. For example, on a Mac system using the Bash shell, add the following lines in