Установка OpenCV + CUDA на Windows
В данной статье речь пойдет о сборке и установке OpenCV 4 для C/C++, Python 2 и Python 3 из исходных файлов с дополнительными модулями CUDA 10 на ОС Windows.
Я постарался включить сюда все тонкости и нюансы, с которыми можно столкнуться в ходе установки, и про которые не написано в официальном мануале. 
Сборка тестировалась для:
- Windows 8.1 + Visual Studio 2017 + Python 2/3 + CUDA 10.0 + GeForce 840m
- Windows 10 + Visual Studio 2019 + Python 2/3 + CUDA 10.0 + GeForce GTX 1060
Что потребуется для установки
В моей сборке использовались следующие инструменты:
- CMake 3.15
- MS Visual Studio 2019 64-бит + средства CMake С++ для Windows
- Python 3.7.3 64-бит + NumPy 64-бит
- Python 2.7.16 64-бит + NumPy 64-бит
- CUDA 10.0
- CuDNN 7.6.2
- OpenCV 4.1.1 и OpenCV-contrib-4.1.1
Установка
Так как установка производится через консольные команды, то следует внимательно и аккуратно выполнять все шаги. Также, при необходимости, меняйте установочные пути на свои.
Для начала необходимо установить требуемое ПО, причем Visual Studio должна быть установлена до CUDA:
-
(версия >= 3.9.1) (дистрибутив Anaconda3)
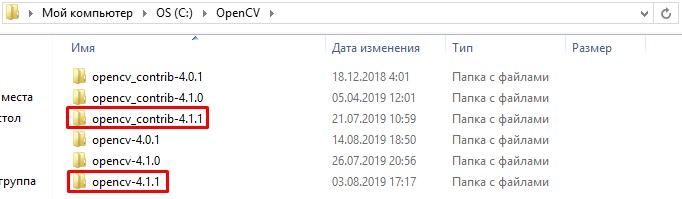
Далее загружаем архивы исходников opencv-4.1.1 и opencv-contrib-4.1.1 в желаемое место (в моем случае это C:\OpenCV\).
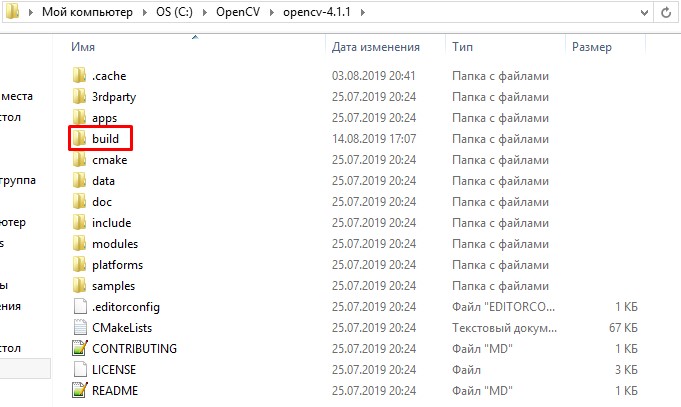
Создаем папку build/ внутри opencv-4.1.1.
Далее сгенерируем файлы сборки с помощью cmake. Мы будем использовать консольный вариант cmake, так как cmake-gui путает типы некоторых переменных (например, OPENCV_PYTHON3_VERSION) и, как следствие, неправильно генерирует файлы.
Открываем консоль по пути C:\OpenCV\ и прописываем переменные.
Примечание. Для Visual Studio 2017 генератор пишется как «Visual Studio 15 2017 Win64» и без флага -A.
Также можно явно указать питоновские библиотеки для python 2 и python 3 на случай, если сборщик не сможет найти их автоматически.
Примечание. Обратите внимание на то, что библиотека NumPy должна быть той же разрядности, что и OpenCV. Проверить это легко:
Выполняем генерацию файлов сборки с помощью длинной команды ниже. При неудачной генерации или наличии ошибок после выполнения команды, повторную генерацию следует производить вычистив все файлы в build/ и .cache/.
- BUILD_opencv_world – необязательный модуль, содержащий копии всех выбранных в ходе установки библиотек. Удобен при разработке на C++, так как вместо подключения кучи зависимостей opencv можно подключить одну зависимость opencv_world411.lib в проект
- INSTALL_EXAMPLES/INSTALL_TESTS – установка примеров/тестов кода opencv
- CUDA_FAST_MATH, WITH_CUBLAS – дополнительные модули для CUDA, призванные ускорить вычисления
- CUDA_ARCH_PTX – версия PTX инструкций для улучшения производительности вычислений
- OPENCV_EXTRA_MODULES_PATH – путь до дополнительных модулей из opencv-contrib (обязательно для CUDA)
- BUILD_PROTOBUF – для работы некоторых модулей opencv необходим Protobuf (сборщик opencv в любом случае поставит BUILD_PROTOBUF=ON)
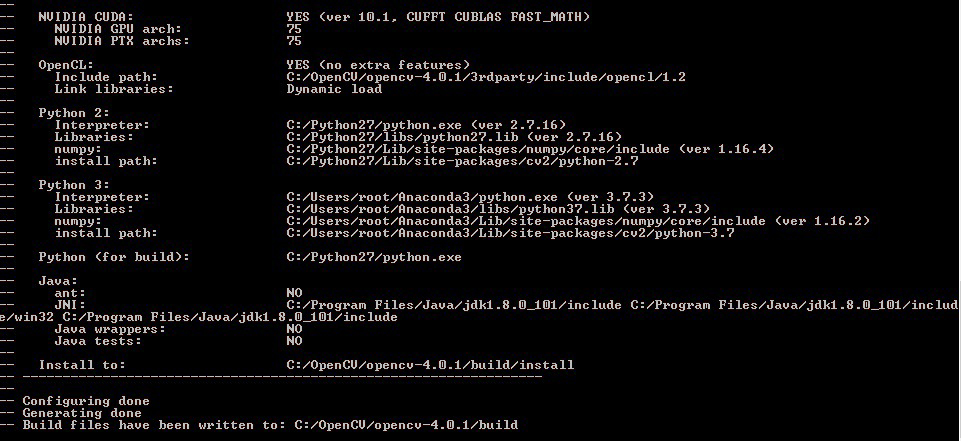
Спустя примерно 10 минут в консоле должна появиться информация о сборке и завершающие строки «Configuring done» и «Generating done». Проверяем всю информацию, особенно разделы NVIDIA CUDA, Python 2, Python 3.
Далее собираем решение. На сборку может уйти несколько часов в зависимости от вашего процессора и версии Visual Studio.
После успешной установки создаем системную переменную OPENCV_DIR со значением C:\OpenCV\opencv-4.1.1\build\install\x64\vc15\bin и также добавляем ее в PATH.
Проверим работоспособность OpenCV с модулем CUDA на простом примере умножения матриц.
- Установить тип сборки Release/x64 (для Debug следует собрать OpenCV с флагом Debug)
- Project Properties → C/C++ → General → Добавить строку «C:\OpenCV\opencv-4.1.1\build\install\include» в Additional Include Directories
- Project Properties → Linker → General → Добавить строку « C:\OpenCV\opencv-4.1.1\build\install\x64\vc16\lib» в Additional Library Directories
- Project Properties → Linker → General → Добавить «;opencv_world411.lib» («;opencv_world411d.lib» для Debug) в конец Additional Dependencies
Пример на Python 3
Вывод в консоли
Пример на C++
Вывод в консоли
Удаление
Чтобы удалить OpenCV, нужно выполнить команду.
и удалить системную переменную OPENCV_DIR и убрать путь до OpenCV из PATH.
Заключение
В статье мы рассмотрели установку OpenCV 4 для ОС Windows 10. Данный алгоритм тестировался на Windows 8.1 и Windows 10, но, в теории, может собираться и на Windows 7. За дополнительной информацией можно обратиться к списку источников ниже.
Шпаргалка по установке CUDA, cuDNN, Tensorflow и PyTorch на Windows 10
В очередной раз после переустановки Windows осознал, что надо накатить драйвера, CUDA, cuDNN, Tensorflow/Keras для обучения нейронных сетей.
Каждый раз для меня это оказывается несложной, но времязатратной операцией: найти подходящую комбинацию Tensorflow/Keras, CUDA, cuDNN и Python несложно, но вспоминаю про эти зависимости только в тот момент, когда при импорте Tensorflow вижу, что видеокарта не обнаружена и начинаю поиск нужной страницы в документации Tensorflow.
В этот раз ситуация немного усложнилась. Помимо установки Tensorflow мне потребовалось установить PyTorch. Со своими зависимостями и поддерживаемыми версиями Python, CUDA и cuDNN.
По итогам нескольких часов экспериментов решил, что надо зафиксировать все полезные ссылки в одном посте для будущего меня.
Краткий алгоритм установки Tensorflow и PyTorch
Примечание: Установить Tensorflow и PyTorch можно в одном виртуальном окружении, но в статье этого алгоритма нет.
Подготовка к установке
- Определить какая версия Python поддерживается Tensorflow и PyTorch (на момент написания статьи мне не удалось установить PyTorch в виртуальном окружении с Python 3.9.5)
- Для выбранной версии Python найти подходящие версии Tensorflow и PyTorch
- Определить, какие версии CUDA поддерживают выбранные ранее версии Tensorflow и PyTorch
- Определить поддерживаемую версию cuDNN для Tensorflow – не все поддерживаемые CUDA версии cuDNN поддерживаются Tensorflow. Для PyTorch этой особенности не заметил
Установка CUDA и cuDNN
-
и устанавливаем. Можно установить со всеми значениями по умолчанию , подходящую для выбранной версии Tensorflow (п.1.2). Для скачивания cuDNN потребуется регистрация на сайте NVidia. “Установка” cuDNN заключается в распакове архива и заменой существующих файлов CUDA на файлы из архива
Устанавливаем Tensorflow
- Создаём виртуальное окружение для Tensorflow c выбранной версией Python. Назовём его, например, py38tf
- Переключаемся в окружение py38tf и устанавливаем поддерживаемую версию Tensorflow pip install tensorflow==x.x.x
- Проверяем поддержку GPU командой
Устанавливаем PyTorch
- Создаём виртуальное окружение для PyTorch c выбранной версией Python. Назовём его, например, py38torch
- Переключаемся в окружение py38torch и устанавливаем поддерживаемую версию PyTorch
- Проверяем поддержку GPU командой
В моём случае заработала комбинация:
- Python 3.8.8
- Драйвер NVidia 441.22
- CUDA 10.1
- cuDNN 7.6
- Tensorflow 2.3.0
- PyTorch 1.7.1+cu101
Tensorflow и PyTorch установлены в разных виртуальных окружениях.
Итого
Польза этой статьи будет понятна не скоро: систему переустанавливаю я не часто.
Если воспользуетесь этим алгоритмом и найдёте какие-то ошибки – пишите в комментарии
Если вам понравилась статья, то можете зайти в мой telegram-канал. В канал попадают небольшие заметки о Python, .NET, Go.
Как установить cuda на windows 10
The installation instructions for the CUDA Toolkit on MS-Windows systems.
1. Introduction
CUDA ® is a parallel computing platform and programming model invented by NVIDIA. It enables dramatic increases in computing performance by harnessing the power of the graphics processing unit (GPU).
- Provide a small set of extensions to standard programming languages, like C, that enable a straightforward implementation of parallel algorithms. With CUDA C/C++, programmers can focus on the task of parallelization of the algorithms rather than spending time on their implementation.
- Support heterogeneous computation where applications use both the CPU and GPU. Serial portions of applications are run on the CPU, and parallel portions are offloaded to the GPU. As such, CUDA can be incrementally applied to existing applications. The CPU and GPU are treated as separate devices that have their own memory spaces. This configuration also allows simultaneous computation on the CPU and GPU without contention for memory resources.
This guide will show you how to install and check the correct operation of the CUDA development tools.
1.1. System Requirements
- A CUDA-capable GPU
- A supported version of Microsoft Windows
- A supported version of Microsoft Visual Studio
- The NVIDIA CUDA Toolkit (available at http://developer.nvidia.com/cuda-downloads)
The next two tables list the currently supported Windows operating systems and compilers.
| Operating System | Native x86_64 | Cross (x86_32 on x86_64) |
|---|---|---|
| Windows 11 | YES | NO |
| Windows 10 | YES | NO |
| Windows Server 2022 | YES | NO |
| Windows Server 2019 | YES | NO |
| Windows Server 2016 | YES | NO |
| Compiler* | IDE | Native x86_64 | Cross (x86_32 on x86_64) |
|---|---|---|---|
| MSVC Version 193x | Visual Studio 2022 17.0 | YES | YES |
| MSVC Version 192x | Visual Studio 2019 16.x | YES | YES |
| MSVC Version 191x | Visual Studio 2017 15.x (RTW and all updates) | YES | YES |
* Support for Visual Studio 2015 is deprecated in release 11.1.
x86_32 support is limited. See the x86 32-bit Support section for details.
For more information on MSVC versions, Visual Studio product versions, visit https://dev.to/yumetodo/list-of-mscver-and-mscfullver-8nd.
1.2. x86 32-bit Support
Native development using the CUDA Toolkit on x86_32 is unsupported. Deployment and execution of CUDA applications on x86_32 is still supported, but is limited to use with GeForce GPUs. To create 32-bit CUDA applications, use the cross-development capabilities of the CUDA Toolkit on x86_64.
- GeForce GPUs
- CUDA Driver
- CUDA Runtime (cudart)
- CUDA Math Library (math.h)
- CUDA C++ Compiler (nvcc)
- CUDA Development Tools
1.3. About This Document
This document is intended for readers familiar with Microsoft Windows operating systems and the Microsoft Visual Studio environment. You do not need previous experience with CUDA or experience with parallel computation.
2. Installing CUDA Development Tools
Basic instructions can be found in the Quick Start Guide. Read on for more detailed instructions.
- Verify the system has a CUDA-capable GPU.
- Download the NVIDIA CUDA Toolkit.
- Install the NVIDIA CUDA Toolkit.
- Test that the installed software runs correctly and communicates with the hardware.
2.1. Verify You Have a CUDA-Capable GPU
You can verify that you have a CUDA-capable GPU through the Display Adapters section in the Windows Device Manager. Here you will find the vendor name and model of your graphics card(s). If you have an NVIDIA card that is listed in http://developer.nvidia.com/cuda-gpus, that GPU is CUDA-capable. The Release Notes for the CUDA Toolkit also contain a list of supported products.
- Open a run window from the Start Menu
- Run:
2.2. Download the NVIDIA CUDA Toolkit
- Network Installer: A minimal installer which later downloads packages required for installation. Only the packages selected during the selection phase of the installer are downloaded. This installer is useful for users who want to minimize download time.
- Full Installer: An installer which contains all the components of the CUDA Toolkit and does not require any further download. This installer is useful for systems which lack network access and for enterprise deployment.
The CUDA Toolkit installs the CUDA driver and tools needed to create, build and run a CUDA application as well as libraries, header files, and other resources.
Download Verification
The download can be verified by comparing the MD5 checksum posted at https://developer.download.nvidia.com/compute/cuda/11.7.0/docs/sidebar/md5sum.txt with that of the downloaded file. If either of the checksums differ, the downloaded file is corrupt and needs to be downloaded again.
To calculate the MD5 checksum of the downloaded file, follow the instructions at https://support.microsoft.com/kb/889768.
2.3. Install the CUDA Software
Before installing the toolkit, you should read the Release Notes , as they provide details on installation and software functionality.
Graphical Installation
Install the CUDA Software by executing the CUDA installer and following the on-screen prompts.
Silent Installation
The installer can be executed in silent mode by executing the package with the -s flag. Additional parameters can be passed which will install specific subpackages instead of all packages. See the table below for a list of all the subpackage names.
| Subpackage Name | Subpackage Description |
|---|---|
| Toolkit Subpackages (defaults to C:\Program Files\NVIDIA GPU Computing Toolkit\CUDA\v 11.7 ) | |
| cudart_ 11.7 | CUDA Runtime libraries. |
| cuobjdump_ 11.7 | Extracts information from cubin files. |
| cupti_ 11.7 | The CUDA Profiling Tools Interface for creating profiling and tracing tools that target CUDA applications. |
| cuxxfilt_ 11.7 | The CUDA cu++ filt demangler tool. |
| demo_suite_ 11.7 | Prebuilt demo applications using CUDA. |
| documentation_ 11.7 | CUDA HTML and PDF documentation files including the CUDA C++ Programming Guide, CUDA C++ Best Practices Guide, CUDA library documentation, etc. |
| memcheck_ 11.7 | Functional correctness checking suite. |
| nvcc_ 11.7 | CUDA compiler. |
| nvdisasm_ 11.7 | Extracts information from standalone cubin files. |
| nvml_dev_ 11.7 | NVML development libraries and headers. |
| nvprof_ 11.7 | Tool for collecting and viewing CUDA application profiling data from the command-line. |
| nvprune_ 11.7 | Prunes host object files and libraries to only contain device code for the specified targets. |
| nvrtc_ 11.7 | |
Extracting and Inspecting the Files Manually
Sometimes it may be desirable to extract or inspect the installable files directly, such as in enterprise deployment, or to browse the files before installation. The full installation package can be extracted using a decompression tool which supports the LZMA compression method, such as 7-zip or WinZip.
Once extracted, the CUDA Toolkit files will be in the CUDAToolkit folder, and similarily for CUDA Visual Studio Integration. Within each directory is a .dll and .nvi file that can be ignored as they are not part of the installable files.
2.3.1. Uninstalling the CUDA Software
All subpackages can be uninstalled through the Windows Control Panel by using the Programs and Features widget.
2.4. Using Conda to Install the CUDA Software
This section describes the installation and configuration of CUDA when using the Conda installer. The Conda packages are available at https://anaconda.org/nvidia.
2.4.1. Conda Overview
2.4.2. Installation
To perform a basic install of all CUDA Toolkit components using Conda, run the following command:
2.4.3. Uninstallation
To uninstall the CUDA Toolkit using Conda, run the following command:
2.4.4. Installing Previous CUDA Releases
All Conda packages released under a specific CUDA version are labeled with that release version. To install a previous version, include that label in the install command such as:
Some CUDA releases do not move to new versions of all installable components. When this is the case these components will be moved to the new label, and you may need to modify the install command to include both labels such as:
This example will install all packages released as part of CUDA 11.3.0.
2.5. Use a Suitable Driver Model
On Windows 10 and later, the operating system provides two under which the NVIDIA Driver may operate:
- The driver model is used for display devices.
- The mode of the NVIDIA Driver is available for non-display devices such as NVIDIA Tesla GPUs and the GeForce GTX Titan GPUs; it uses the Windows driver model.
TCC is enabled by default on most recent NVIDIA Tesla GPUs. To check which driver mode is in use and/or to switch driver modes, use the nvidia-smi tool that is included with the NVIDIA Driver installation (see nvidia-smi -h for details).
2.6. Verify the Installation
Before continuing, it is important to verify that the CUDA toolkit can find and communicate correctly with the CUDA-capable hardware. To do this, you need to compile and run some of the included sample programs.
2.6.1. Running the Compiled Examples
The version of the CUDA Toolkit can be checked by running nvcc -V in a Command Prompt window. You can display a Command Prompt window by going to:
Start > All Programs > Accessories > Command Prompt
CUDA Samples are located in https://github.com/nvidia/cuda-samples. To use the samples, clone the project, build the samples, and run them using the instructions on the Github page.
To verify a correct configuration of the hardware and software, it is highly recommended that you build and run the deviceQuery sample program. The sample can be built using the provided VS solution files in the deviceQuery folder.
This assumes that you used the default installation directory structure. If CUDA is installed and configured correctly, the output should look similar to Figure 1.

The exact appearance and the output lines might be different on your system. The important outcomes are that a device was found, that the device(s) match what is installed in your system, and that the test passed.
If a CUDA-capable device and the CUDA Driver are installed but deviceQuery reports that no CUDA-capable devices are present, ensure the deivce and driver are properly installed.
Running the bandwidthTest program, located in the same directory as deviceQuery above, ensures that the system and the CUDA-capable device are able to communicate correctly. The output should resemble Figure 2.

The device name (second line) and the bandwidth numbers vary from system to system. The important items are the second line, which confirms a CUDA device was found, and the second-to-last line, which confirms that all necessary tests passed.
If the tests do not pass, make sure you do have a CUDA-capable NVIDIA GPU on your system and make sure it is properly installed.
3. Pip Wheels
NVIDIA provides Python Wheels for installing CUDA through pip, primarily for using CUDA with Python. These packages are intended for runtime use and do not currently include developer tools (these can be installed separately).
Please note that with this installation method, CUDA installation environment is managed via pip and additional care must be taken to set up your host environment to use CUDA outside the pip environment.
Prerequisites
Metapackages
- nvidia-cuda-runtime-cu11
- nvidia-cuda-cupti-cu11
- nvidia-cuda-nvcc-cu11
- nvidia-nvml-dev-cu11
- nvidia-cuda-nvrtc-cu11
- nvidia-nvtx-cu11
- nvidia-cuda-sanitizer-api-cu11
- nvidia-cublas-cu11
- nvidia-cufft-cu11
- nvidia-curand-cu11
- nvidia-cusolver-cu11
- nvidia-cusparse-cu11
- nvidia-npp-cu11
- nvidia-nvjpeg-cu11
- nvidia-nvml-dev-cu114
- nvidia-cuda-nvcc-cu114
- nvidia-cuda-runtime-cu114
- nvidia-cuda-cupti-cu114
- nvidia-cublas-cu114
- nvidia-cuda-sanitizer-api-cu114
- nvidia-nvtx-cu114
- nvidia-cuda-nvrtc-cu114
- nvidia-npp-cu114
- nvidia-cusparse-cu114
- nvidia-cusolver-cu114
- nvidia-curand-cu114
- nvidia-cufft-cu114
- nvidia-nvjpeg-cu114
4. Compiling CUDA Programs
4.1. Compiling Sample Projects
The bandwidthTest project is a good sample project to build and run. It is located in https://github.com/NVIDIA/cuda-samples/tree/master/Samples/bandwidthTest.
If you elected to use the default installation location, the output is placed in CUDA Samples\v 11.7 \bin\win64\Release . Build the program using the appropriate solution file and run the executable. If all works correctly, the output should be similar to Figure 2.
4.2. Sample Projects
The sample projects come in two configurations: debug and release (where release contains no debugging information) and different Visual Studio projects.
A few of the example projects require some additional setup.
These sample projects also make use of the $CUDA_PATH environment variable to locate where the CUDA Toolkit and the associated .props files are.
The environment variable is set automatically using the Build Customization CUDA 11.7 .props file, and is installed automatically as part of the CUDA Toolkit installation process.
| Visual Studio | CUDA 11.7 .props file Install Directory |
|---|---|
| Visual Studio 2015 (deprecated) | C:\Program Files (x86)\MSBuild\Microsoft.Cpp\v4.0\V140\BuildCustomizations |
| Visual Studio 2017 | <Visual Studio Install Dir>\Common7\IDE\VC\VCTargets\BuildCustomizations |
| Visual Studio 2019 | C:\Program Files (x86)\Microsoft Visual Studio\2019\Professional\MSBuild\Microsoft\VC\v160\BuildCustomizations |
| Visual Studio 2022 | C:\Program Files\Microsoft Visual Studio\2022\Professional\MSBuild\Microsoft\VC\v170\BuildCustomizations |
You can reference this CUDA 11.7 .props file when building your own CUDA applications.
4.3. Build Customizations for New Projects
When creating a new CUDA application, the Visual Studio project file must be configured to include CUDA build customizations. To accomplish this, click File-> New | Project. NVIDIA-> CUDA->, then select a template for your CUDA Toolkit version. For example, selecting the «CUDA 11.7 Runtime» template will configure your project for use with the CUDA 11.7 Toolkit. The new project is technically a C++ project (.vcxproj) that is preconfigured to use NVIDIA’s Build Customizations. All standard capabilities of Visual Studio C++ projects will be available.
4.4. Build Customizations for Existing Projects
- Open the Visual Studio project, right click on the project name, and select Build Dependencies-> Build Customizations. , then select the CUDA Toolkit version you would like to target.
- Alternatively, you can configure your project always to build with the most recently installed version of the CUDA Toolkit. First add a CUDA build customization to your project as above. Then, right click on the project name and select Properties . Under CUDA C/C++ , select Common , and set the CUDA Toolkit Custom Dir field to $(CUDA_PATH) . Note that the $(CUDA_PATH) environment variable is set by the installer.
While Option 2 will allow your project to automatically use any new CUDA Toolkit version you may install in the future, selecting the toolkit version explicitly as in Option 1 is often better in practice, because if there are new CUDA configuration options added to the build customization rules accompanying the newer toolkit, you would not see those new options using Option 2.
- Open a run window from the Start Menu
- Run:
- Select the «Advanced» tab at the top of the window
- Click «Environment Variables» at the bottom of the window
Files which contain CUDA code must be marked as a CUDA C/C++ file. This can done when adding the file by right clicking the project you wish to add the file to, selecting Add\New Item , selecting NVIDIA CUDA 11.7 \Code\CUDA C/C++ File , and then selecting the file you wish to add.
5. Additional Considerations
Now that you have CUDA-capable hardware and the NVIDIA CUDA Toolkit installed, you can examine and enjoy the numerous included programs. To begin using CUDA to accelerate the performance of your own applications, consult the CUDA C Programming Guide , located in the CUDA Toolkit documentation directory.
A number of helpful development tools are included in the CUDA Toolkit or are available for download from the NVIDIA Developer Zone to assist you as you develop your CUDA programs, such as NVIDIA ® Nsight™ Visual Studio Edition, NVIDIA Visual Profiler, and cuda-memcheck.
For technical support on programming questions, consult and participate in the developer forums at http://developer.nvidia.com/cuda/.
Notices
Notice
This document is provided for information purposes only and shall not be regarded as a warranty of a certain functionality, condition, or quality of a product. NVIDIA Corporation (“NVIDIA”) makes no representations or warranties, expressed or implied, as to the accuracy or completeness of the information contained in this document and assumes no responsibility for any errors contained herein. NVIDIA shall have no liability for the consequences or use of such information or for any infringement of patents or other rights of third parties that may result from its use. This document is not a commitment to develop, release, or deliver any Material (defined below), code, or functionality.
NVIDIA reserves the right to make corrections, modifications, enhancements, improvements, and any other changes to this document, at any time without notice.
Customer should obtain the latest relevant information before placing orders and should verify that such information is current and complete.
NVIDIA products are sold subject to the NVIDIA standard terms and conditions of sale supplied at the time of order acknowledgement, unless otherwise agreed in an individual sales agreement signed by authorized representatives of NVIDIA and customer (“Terms of Sale”). NVIDIA hereby expressly objects to applying any customer general terms and conditions with regards to the purchase of the NVIDIA product referenced in this document. No contractual obligations are formed either directly or indirectly by this document.
NVIDIA products are not designed, authorized, or warranted to be suitable for use in medical, military, aircraft, space, or life support equipment, nor in applications where failure or malfunction of the NVIDIA product can reasonably be expected to result in personal injury, death, or property or environmental damage. NVIDIA accepts no liability for inclusion and/or use of NVIDIA products in such equipment or applications and therefore such inclusion and/or use is at customer’s own risk.
NVIDIA makes no representation or warranty that products based on this document will be suitable for any specified use. Testing of all parameters of each product is not necessarily performed by NVIDIA. It is customer’s sole responsibility to evaluate and determine the applicability of any information contained in this document, ensure the product is suitable and fit for the application planned by customer, and perform the necessary testing for the application in order to avoid a default of the application or the product. Weaknesses in customer’s product designs may affect the quality and reliability of the NVIDIA product and may result in additional or different conditions and/or requirements beyond those contained in this document. NVIDIA accepts no liability related to any default, damage, costs, or problem which may be based on or attributable to: (i) the use of the NVIDIA product in any manner that is contrary to this document or (ii) customer product designs.
No license, either expressed or implied, is granted under any NVIDIA patent right, copyright, or other NVIDIA intellectual property right under this document. Information published by NVIDIA regarding third-party products or services does not constitute a license from NVIDIA to use such products or services or a warranty or endorsement thereof. Use of such information may require a license from a third party under the patents or other intellectual property rights of the third party, or a license from NVIDIA under the patents or other intellectual property rights of NVIDIA.
Reproduction of information in this document is permissible only if approved in advance by NVIDIA in writing, reproduced without alteration and in full compliance with all applicable export laws and regulations, and accompanied by all associated conditions, limitations, and notices.
THIS DOCUMENT AND ALL NVIDIA DESIGN SPECIFICATIONS, REFERENCE BOARDS, FILES, DRAWINGS, DIAGNOSTICS, LISTS, AND OTHER DOCUMENTS (TOGETHER AND SEPARATELY, “MATERIALS”) ARE BEING PROVIDED “AS IS.” NVIDIA MAKES NO WARRANTIES, EXPRESSED, IMPLIED, STATUTORY, OR OTHERWISE WITH RESPECT TO THE MATERIALS, AND EXPRESSLY DISCLAIMS ALL IMPLIED WARRANTIES OF NONINFRINGEMENT, MERCHANTABILITY, AND FITNESS FOR A PARTICULAR PURPOSE. TO THE EXTENT NOT PROHIBITED BY LAW, IN NO EVENT WILL NVIDIA BE LIABLE FOR ANY DAMAGES, INCLUDING WITHOUT LIMITATION ANY DIRECT, INDIRECT, SPECIAL, INCIDENTAL, PUNITIVE, OR CONSEQUENTIAL DAMAGES, HOWEVER CAUSED AND REGARDLESS OF THE THEORY OF LIABILITY, ARISING OUT OF ANY USE OF THIS DOCUMENT, EVEN IF NVIDIA HAS BEEN ADVISED OF THE POSSIBILITY OF SUCH DAMAGES. Notwithstanding any damages that customer might incur for any reason whatsoever, NVIDIA’s aggregate and cumulative liability towards customer for the products described herein shall be limited in accordance with the Terms of Sale for the product.