Создание виртуального сервера в VMWare ESXi
Прежде, чем устанавливать систему управления проектами определимся на какой платформе все это будет работать. Есть 2 варианта. Это — развернуть систему на Windows платформе и на *nix платформе. Мы же все будем делать в Linux, а точнее сказать в CentOS 7. Так как наш сервер будет виртуальный, то в этой статье мы рассмотрим процесс создания виртуальной машины на VMWare ESXi. Не будем описывать все преимущества этого гипервизора, но отметим 2 момента. Лицензия для сервера с одним процессором бесплатная и ее легко получить зарегистрировавшись на сайте вендора. А также быстро и удобно делать снэпшоты состояния сервера для возможности отката в случае, если что-то пойдет не так на этапах внедрения. Поехали.
Предположим, что ESXi у Вас уже развернут и Вы являетесь его администратором. В противном случае Вам придется обратиться к администратору с просьбой создать машину следующим образом.
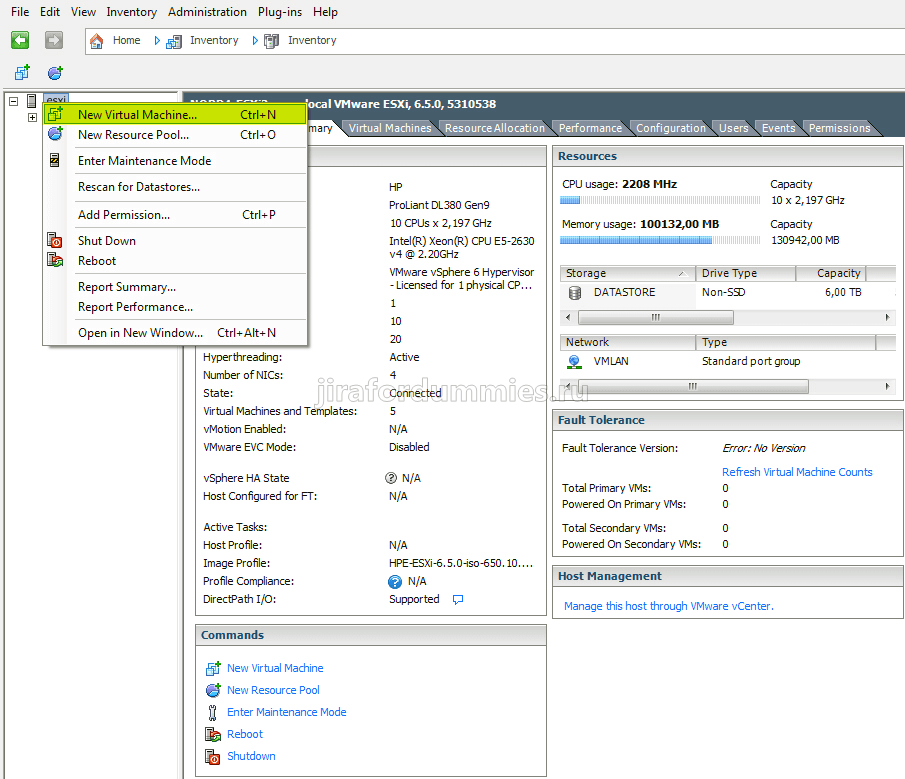
ПКМ (Правой кнопкой мыши) на хосте ESXi и из контекстного меню выбираем New Virtual Machine
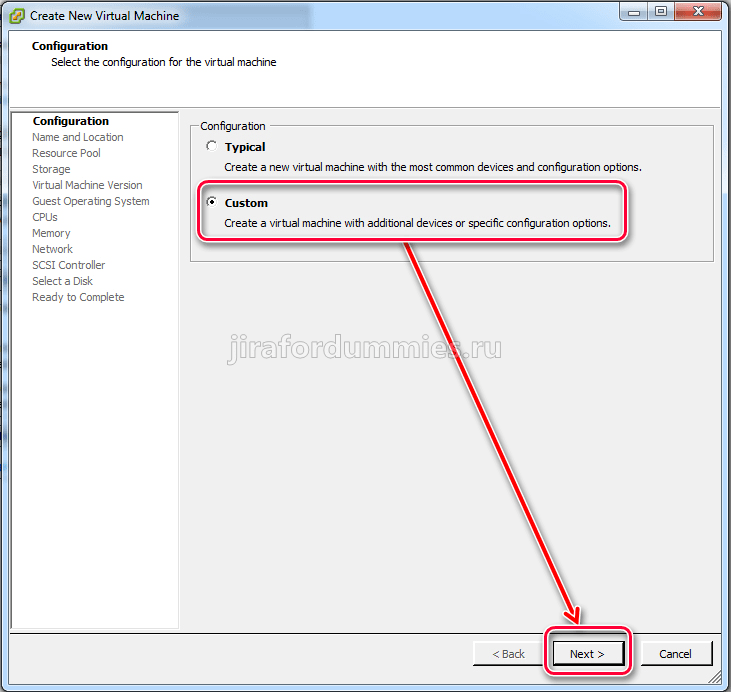
Переводим переключатель на Custom для возможности более детальной настройки нашего сервера.
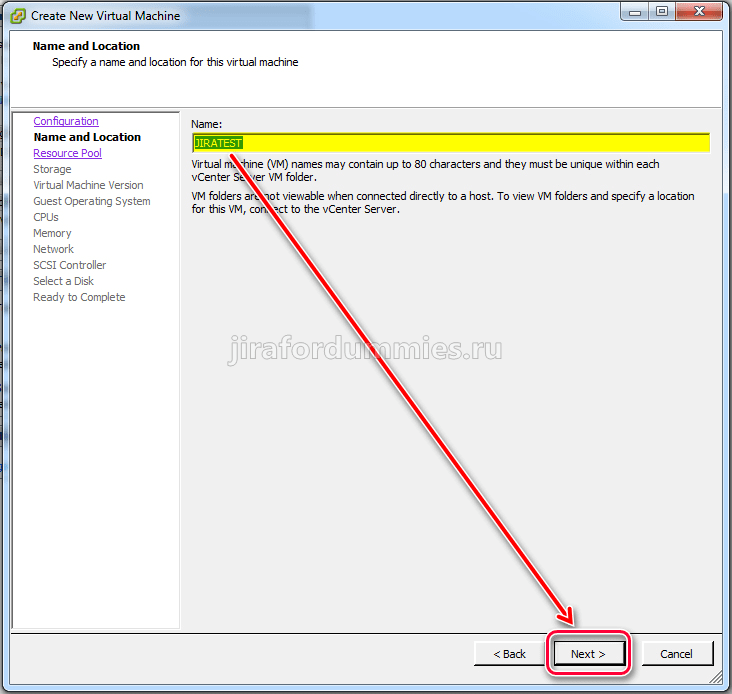
Задаем имя. Если есть стандарты и правила именования инфраструктуры в Вашей организации, то соответственно придерживаемся их.
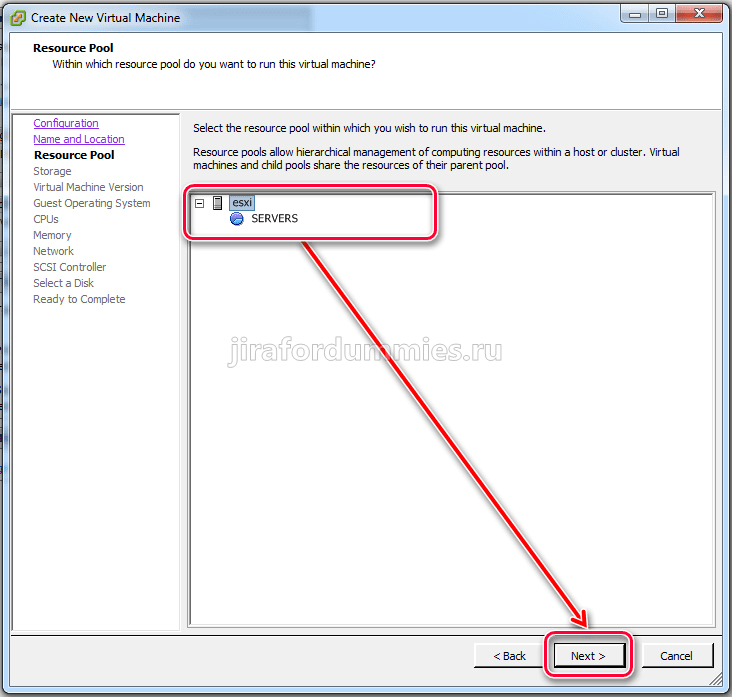
Выбираем пул распределения ресурсов, если такого нет, то все по умолчанию.
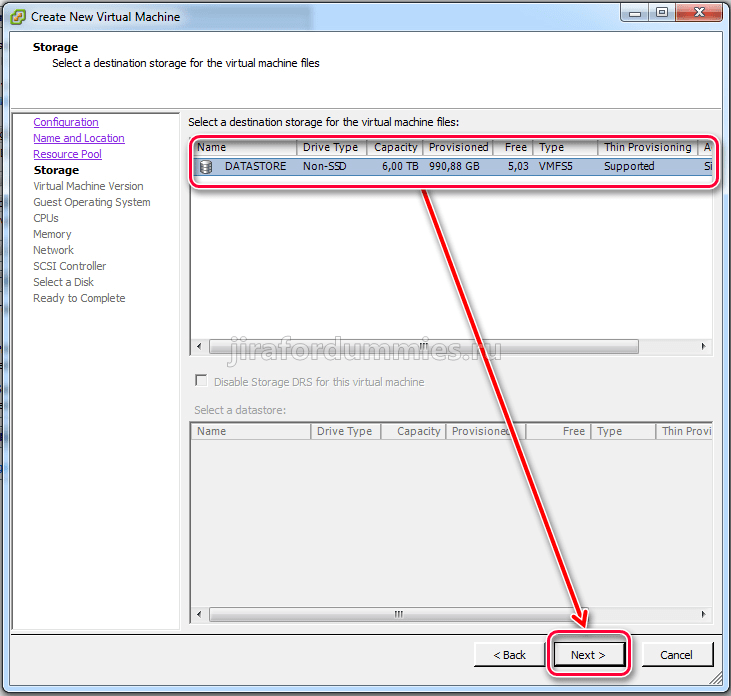
Выбираем место, где будет находится наш сервер. Это или хранилище на самом сервере на дисках или же подключенный LUN на дисковом массиве. В нашем случае все на сервере.
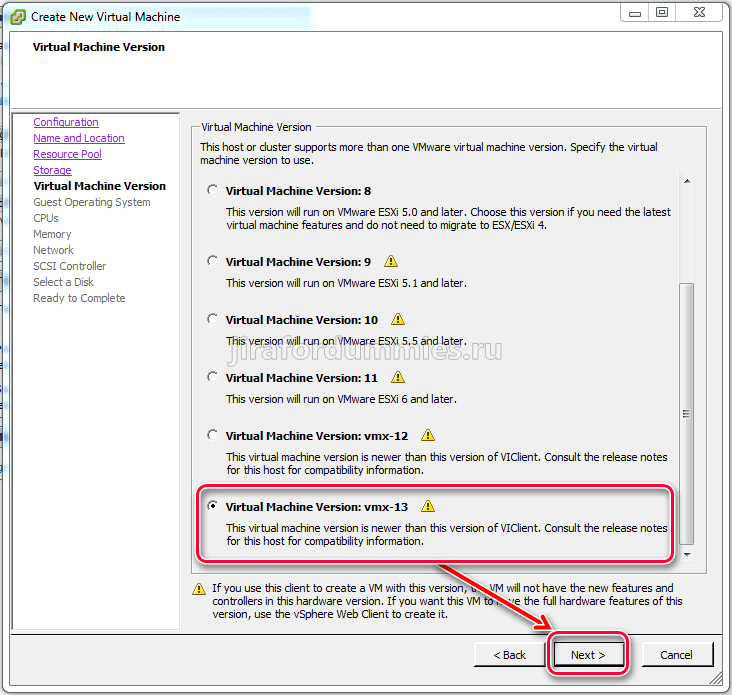
Выбираем версию виртуальной машины. Версии ниже имеют свои особенности. Мы же выберем самую последнюю 13 версию.
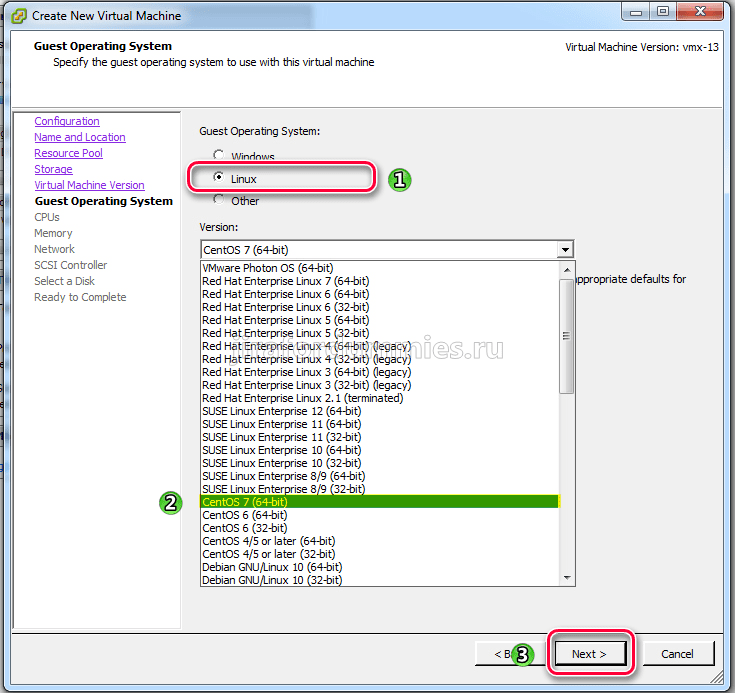
Так как мы определились на какой платформе будем разворачивать JIRA-у, то переключаемся на Linux и выбираем CentOS 7 (64-bit)
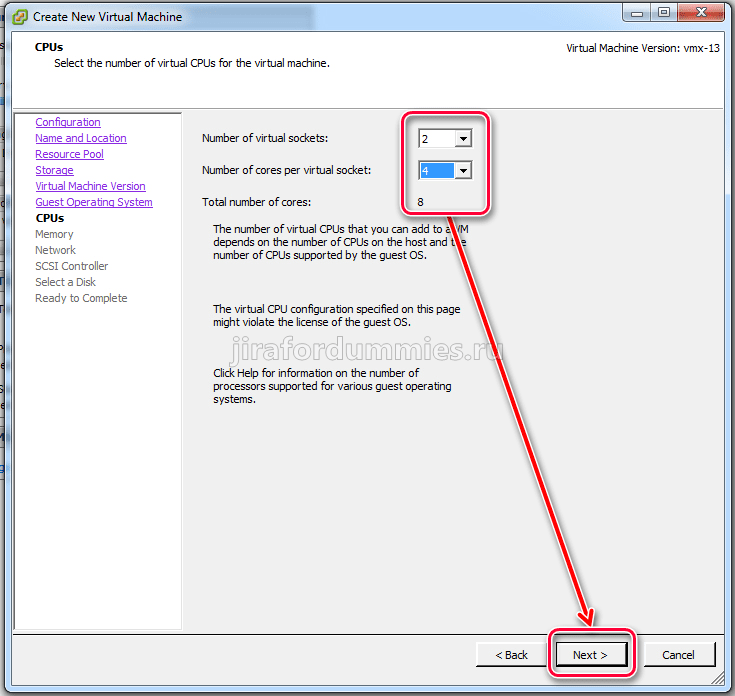
Указываем количество виртуальных процессоров и ядер.
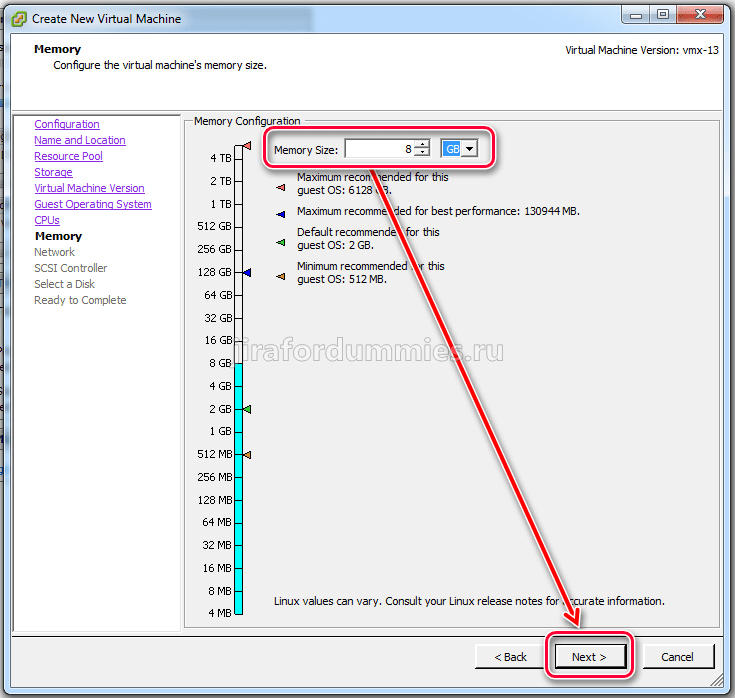
Указываем объем оперативной памяти. Для комфортной работы для 30-40 клиентов вполне достаточно 8 ГБ. Если не жалко и позволяют ресурсы хоста, то можно указать и 16 ГБ памяти.
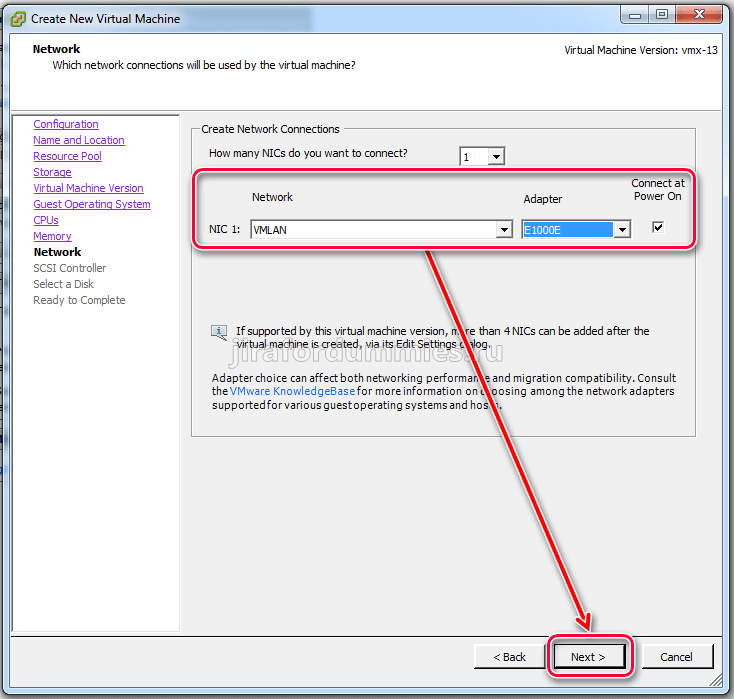
При выборе сетевого интерфейса обязательно указываем E1000E, т.е. физический интерфейс. Если выбрать другой, то для его работы потребуется установить VMWare Tools, т.е. гостевую ОС. А для установки гостевой ОС потребуется установить ряд пакетов, которые скачиваются из интернета, а выхода в сеть не будет пока не установим гостевую ОС. Короче замкнутый круг. Поэтому советую выбрать физический интерфейс. Так вы сэкономите свое время.
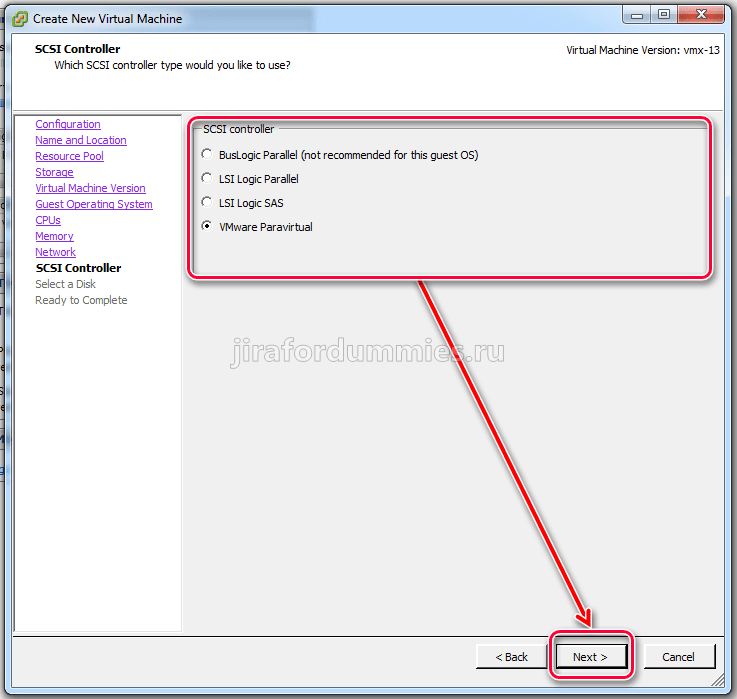
Далее выбираем тип контроллера для HDD. VMWare знает, что предлагает. Поэтому ждем сразу Next.
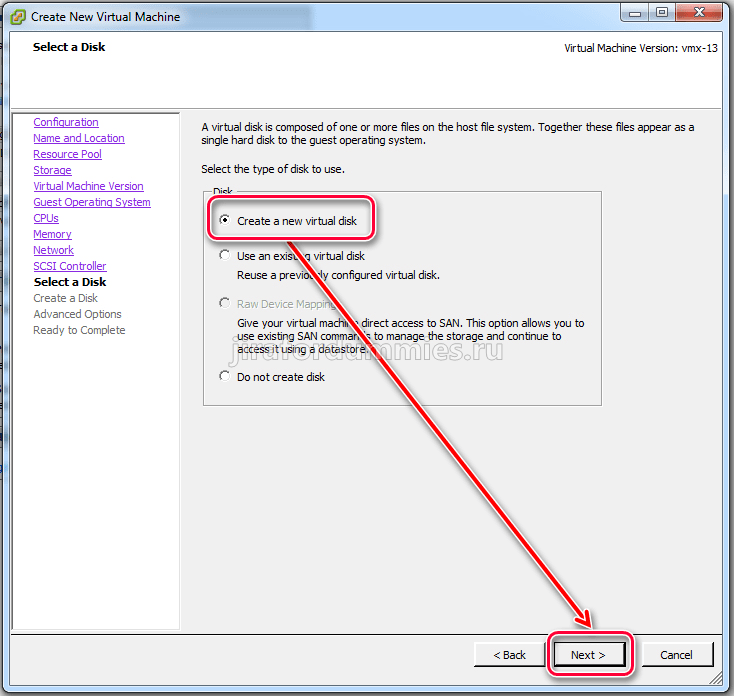
Создаем естественно новый HDD, т.е. Create a new virtual disk.
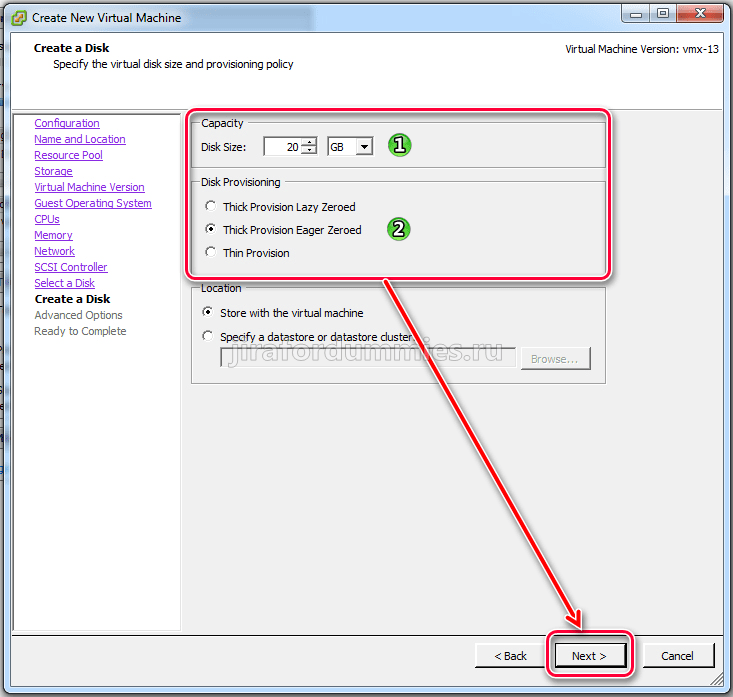
Указываем объем диска в 20 ГБ. Этого пока вполне достаточно на этапе внедрения. Если укажем больше, то процесс создания снэпшотов и последующего отката системы может занять приличное время. В будущем можно в любой момент увеличить. По подробнее остановлюсь на Disk Provisionin. Первые 2 отличаются от 3-го тем, что место в хранилище резервируется сразу под тот объем, который мы укажем. Это помогает снизить дополнительные операции записи на диск и снижает в целом нагрузку на дисковую подсистему сервера или массива. Если же выбрать 3 пункт, то место на физическом диске/разделе/LUN будет заполнятся по мере увеличения данных на виртуальном диске. Это двойная нагрузка на дисковую подсистему. В общем не рекомендую. 3 Пункт можно выбирать к примеру при миграции с LUN на LUN при наличии vCenter сервера, для дефрагментации файлов виртуальных машин в хранилище или же временном хранении для экономии места. Разница между первыми 2 вариантами создания виртуального диска в том. что при первом варианте место резервируется полностью на физическом диске и блоки данных заполненные 0-ми очищаются в момент обращения к ним. Во втором случае блоки очищаются сразу. Преимущество 2-го варианта в том, что диск будет создаваться чуть медленнее, но он будет производительным, а также к примеру при копировании с одного хоста на другой, скорость копирования в зависимости от типа дисков и скорости будет составлять примерно 70-100 МБ/с, в то время как при первом варианте примерно 10-15 МБ/с.
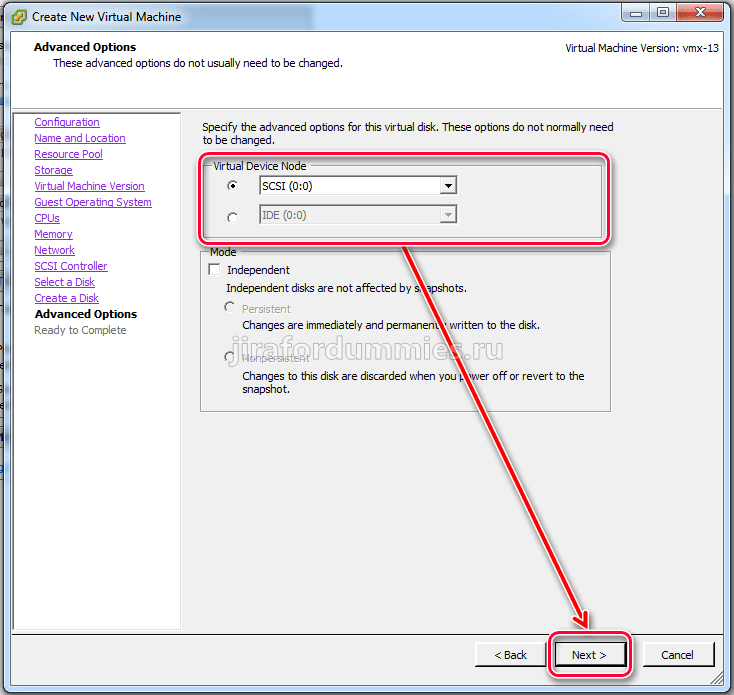
Выбираем устройство к которому будет подключен ранее созданный диск
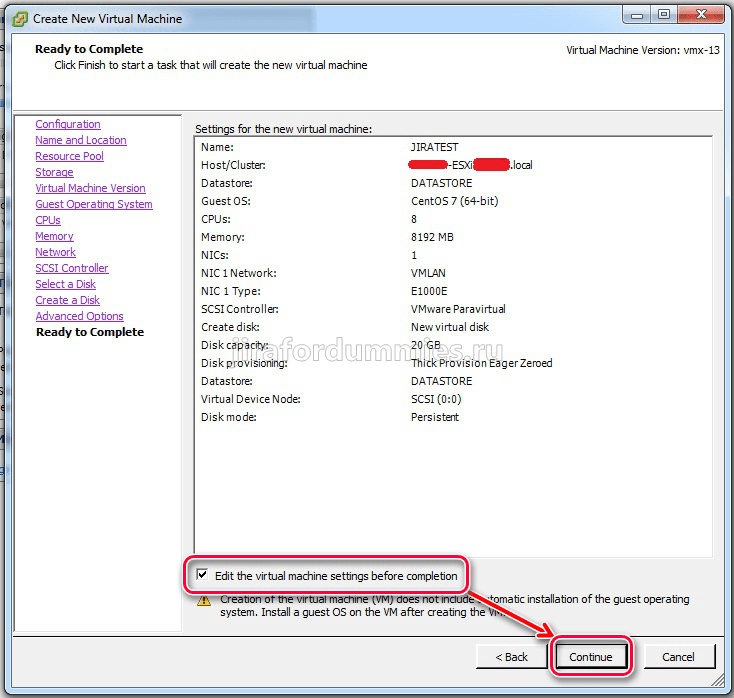
Далее смотрим итоговую информацию и ставим галочку на Edit the virtual machine settings before completion. Если что-то не так можно вернуться назад нажав на кнопку Back.
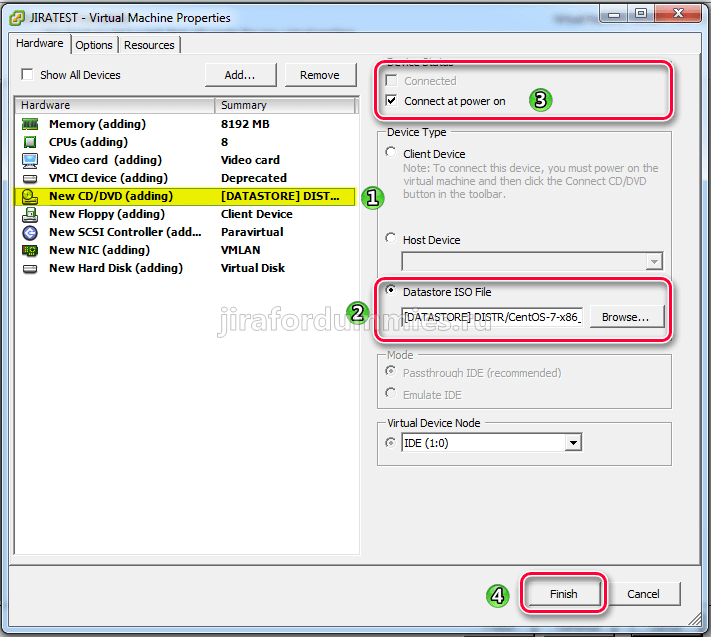
В следующем окошке ставим галочку Connect at power on и Datastore ISO Files через Browse указываем дистрибутив нашего CentOS 7. И жмем Finish.
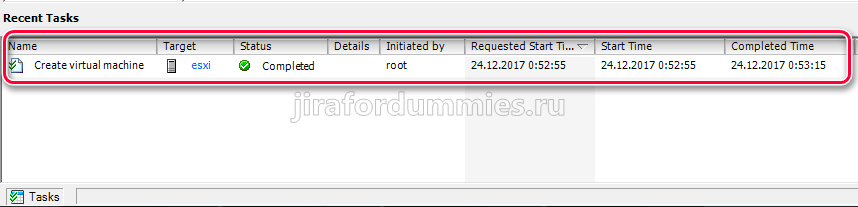
Дожидаемся окончания создания виртуальной машины просматривая статус через Recent Task
После чего в консоли ESXi появится наш сервер. ПКМ по нему и выбираем Power — Power On. Повторно ПКМ на сервер и выбираем Open Console.
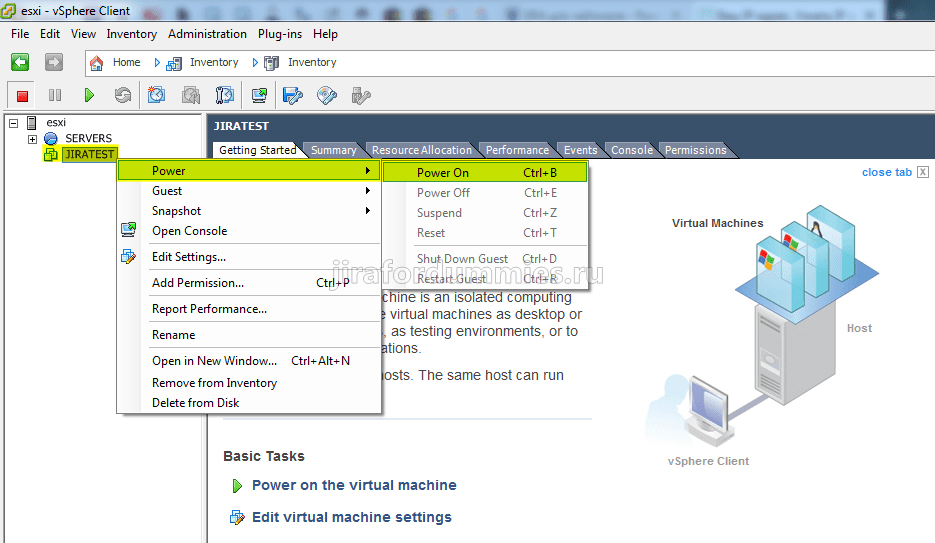
На этом процесс создания виртуальной машины завершен. Переходим к следующему шагу. Установка самой ОС CentOS 7.
Downloading CentOS 8 ISO Installation Image:
First, visit the official website of CentOS and click on CentOS Linux DVD ISO as marked in the screenshot below.

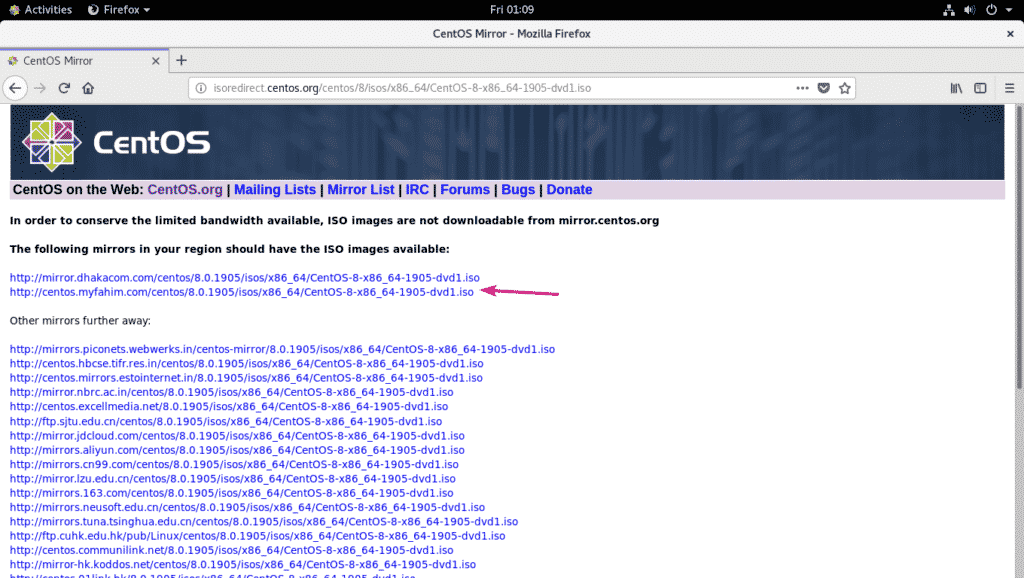
Now, click on a mirror link that is geographically closer to you.
Now, select Save File and click on OK.
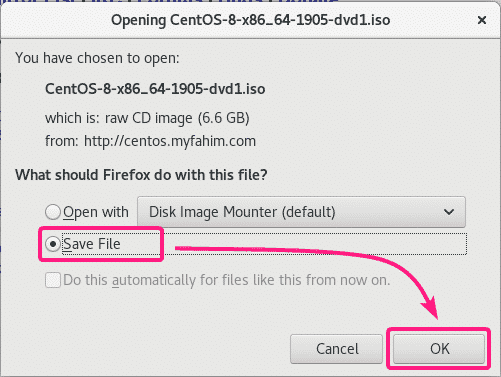
Your browser should start downloading CentOS 8 ISO installation image. It may take a while to complete.

Uploading CentOS 8 Installation ISO Image to VMware ESXi Datastore:
Once the CentOS 8 ISO installation image is downloaded, you have to upload it to your VMware ESXi server.
First, login to the ESXi web client and click on Datastore browser from the Storage section.
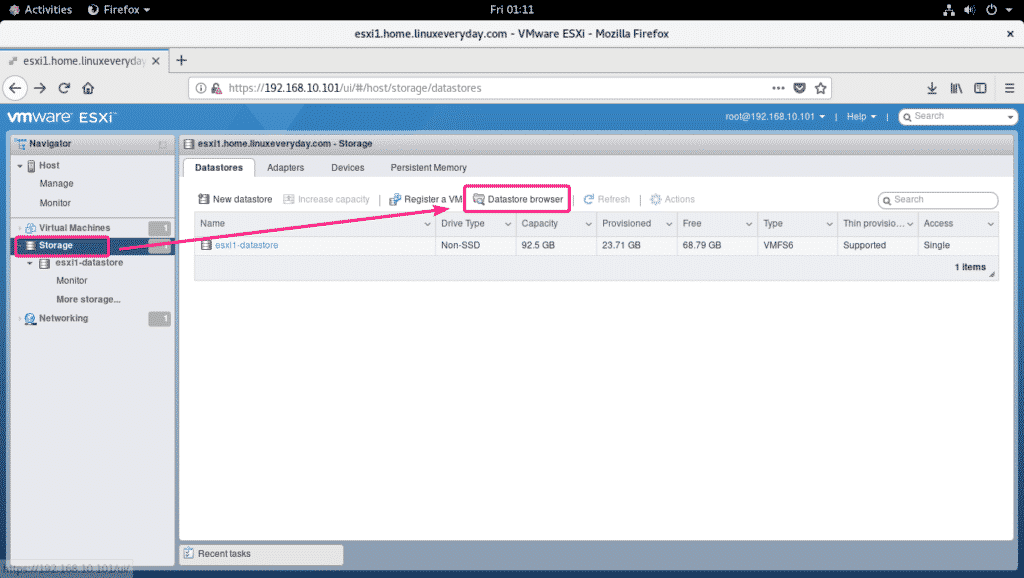
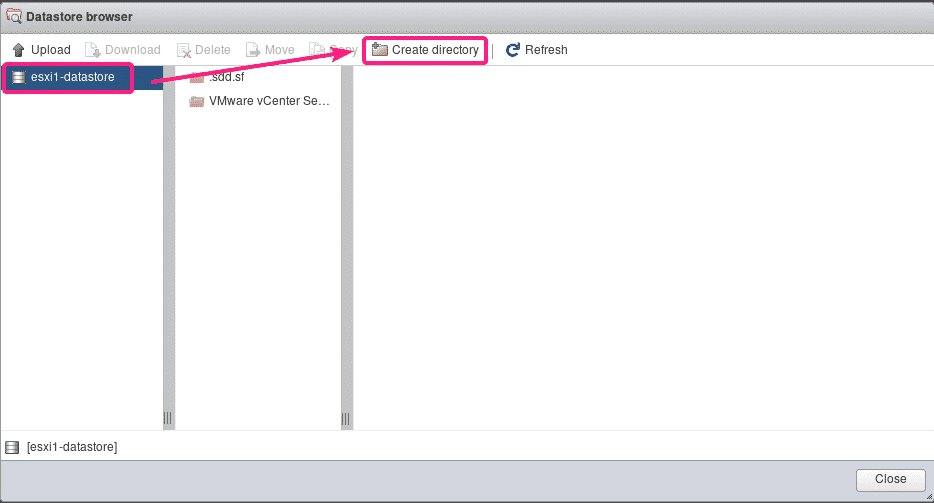
Now, select a datastore where you want to upload the CentOS 8 ISO image and click on Create directory.
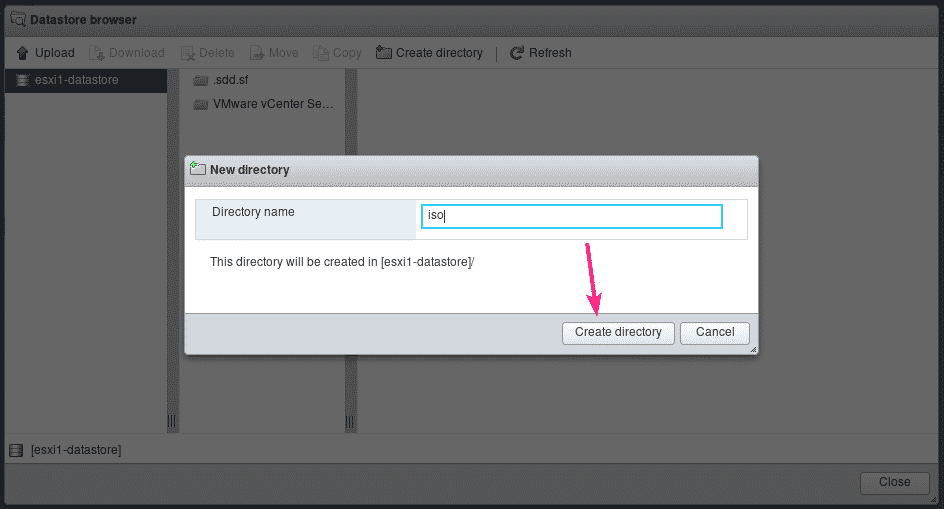
Now, type in iso in the Directory name field and click on Create directory.
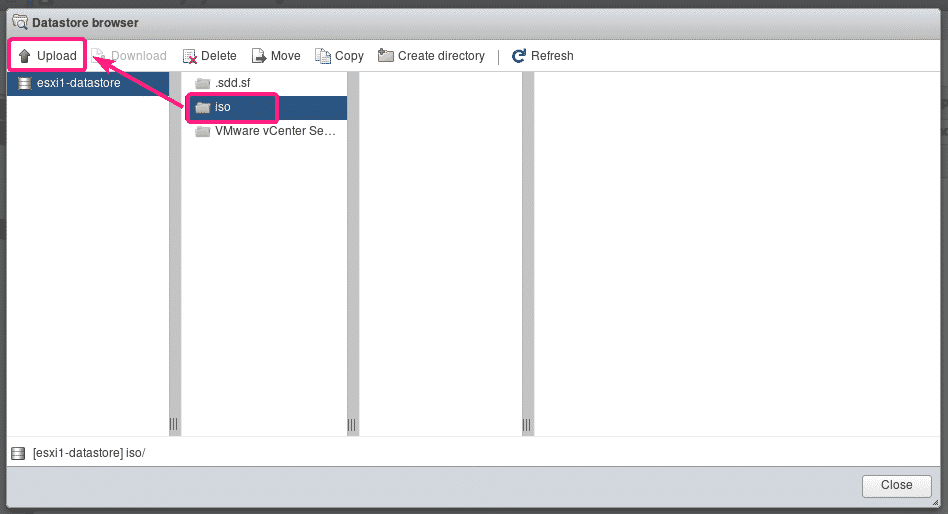
A new directory iso/ should be created. This is where I will upload the CentOS 8 ISO image.
To upload the CentOS 8 ISO image, select the iso/ directory and click on Upload.
Now, select the CentOS 8 ISO image from your computer and click on Open.

The CentOS 8 ISO image is being uploaded. It may take a while to complete.
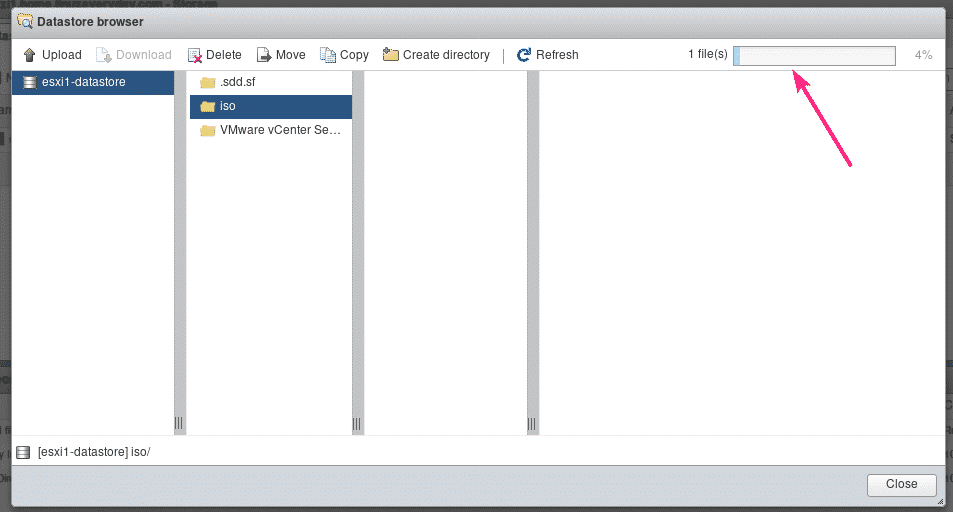
At this point, the CentOS 8 ISO image should be uploaded.
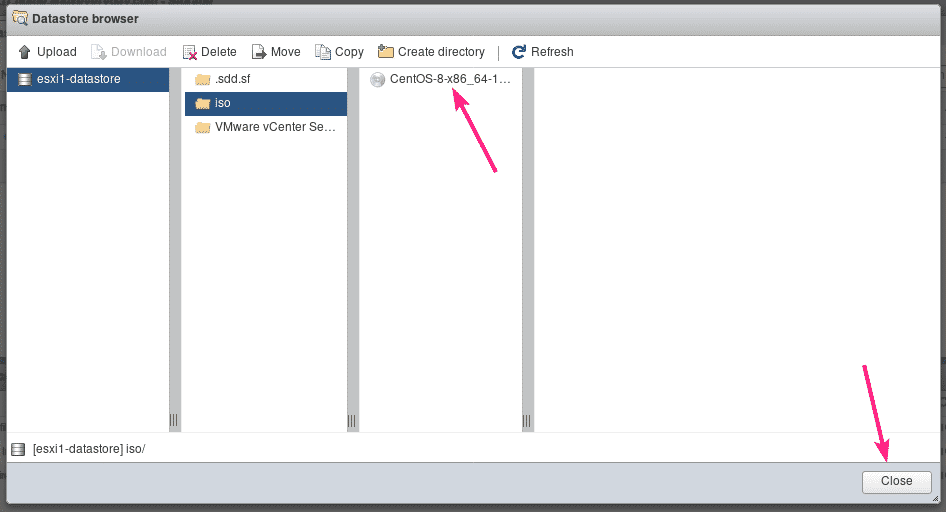
Creating a VMware ESXi Virtual Machine for CentOS 8 Installation:
Now, you have to create a new Virtual Machine (VM) where you can install CentOS 8.
First, go to the Virtual Machines section and click on Create / Register VM.
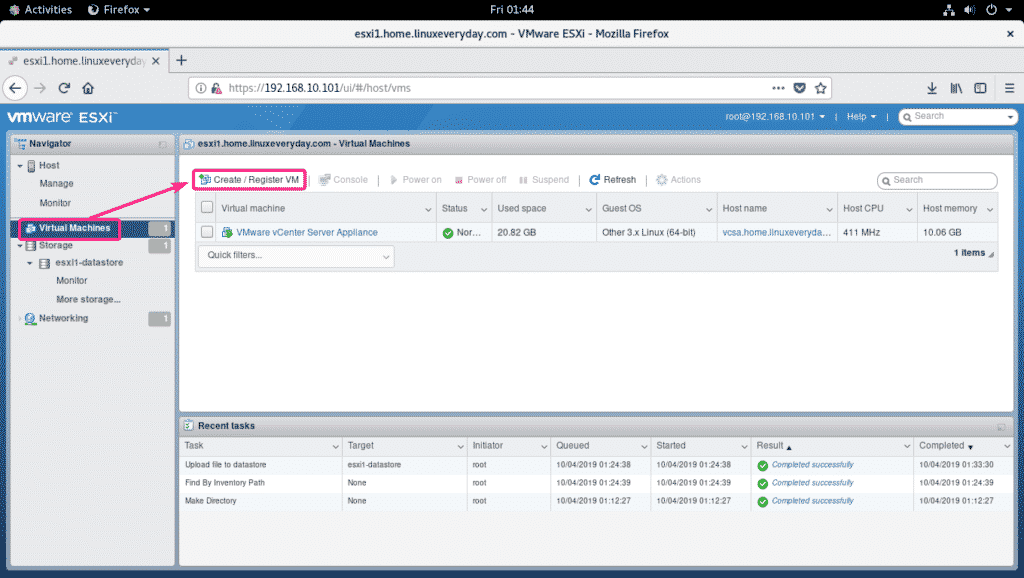
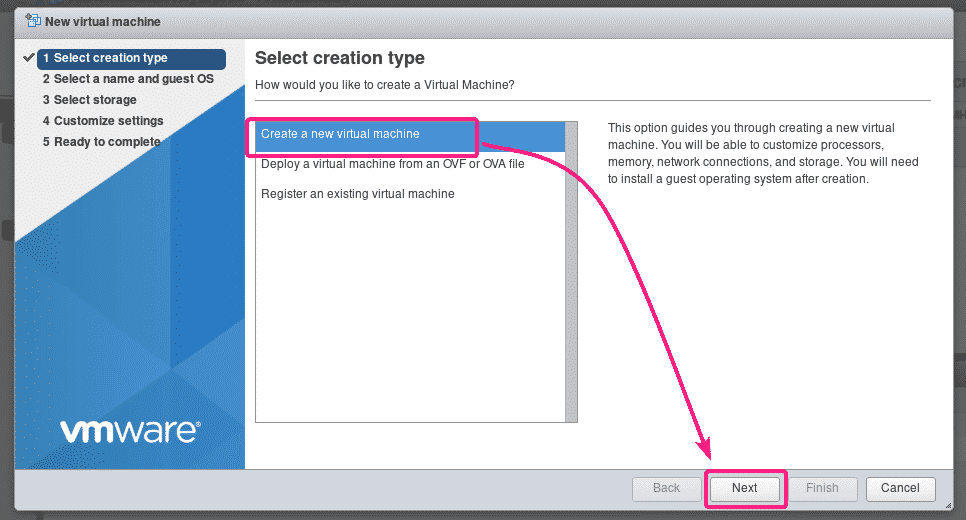
Now, select Create a new virtual machine and click on Next.
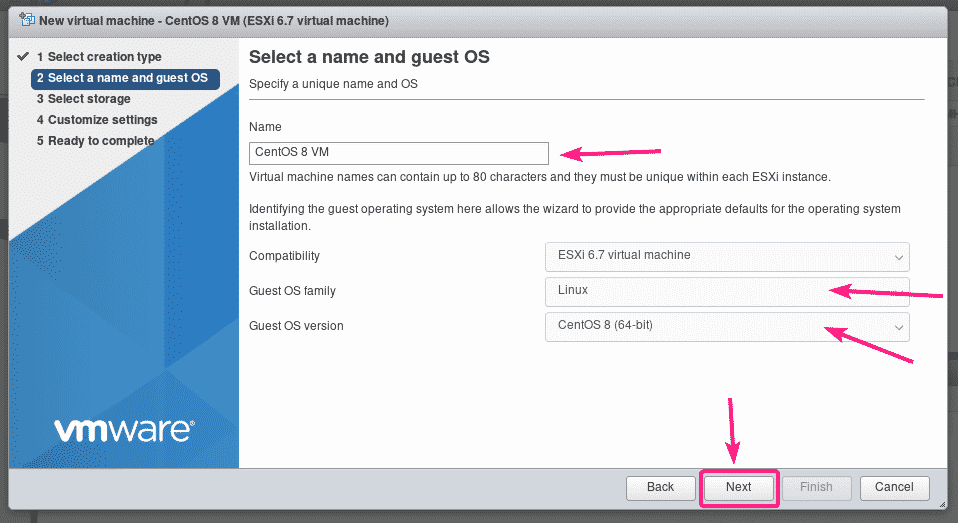
Now, type in a name for the VM, select Guest OS family to Linux and Guest OS version to CentOS 8 (64-bit). Then, click on Next.
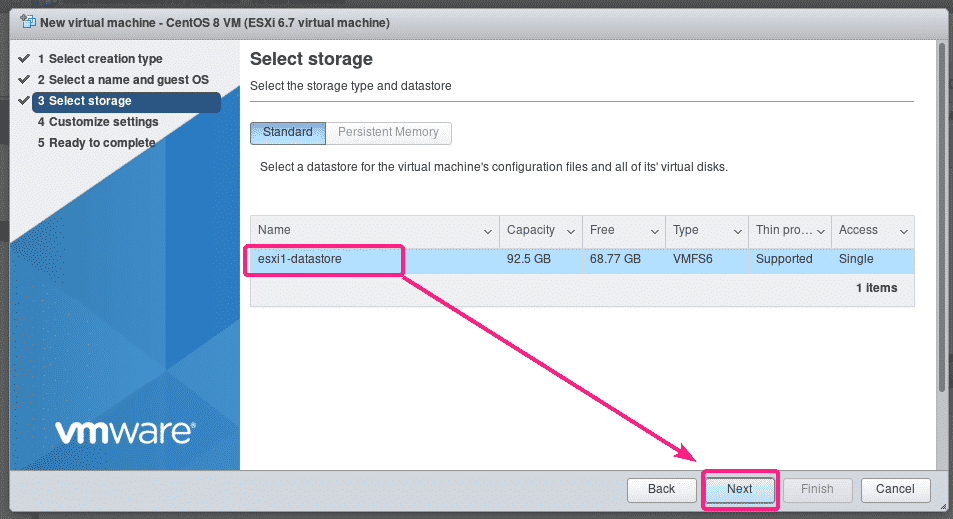
Now, select a datastore where you want to put the VM data and click on Next.
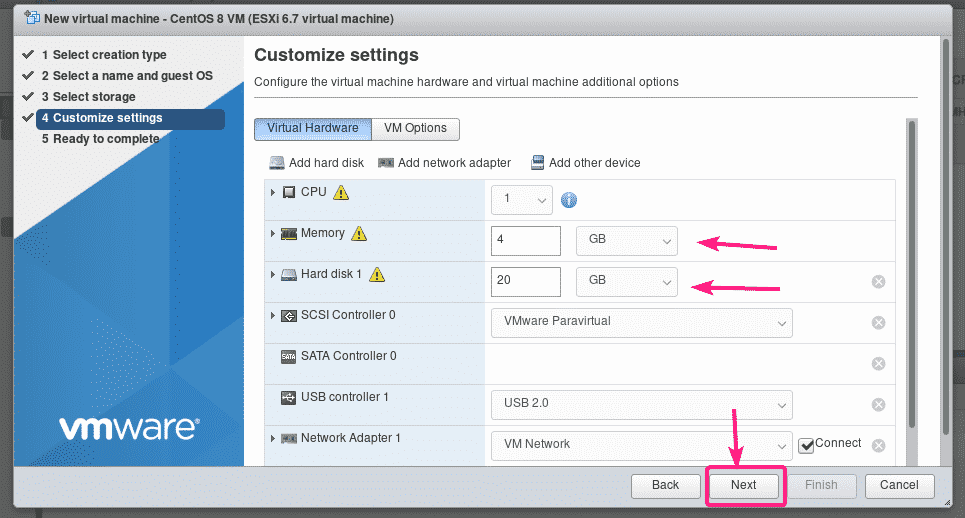
Now, select the number of CPU you want to assign to the VM. For more tasks, 1 CPU should be okay.
If you want to run CentOS 8 headless server on the VM, then 1-2 GB of memory should be okay. For CentOS 8 server with graphical user interface, you should assign at least 4 GB of memory.
Also, set the virtual hard disk size to at least 20 GB. It should be okay for both CentOS 8 headless server and CentOS 8 server with graphical user interface.
Once you’re done, click on Next.
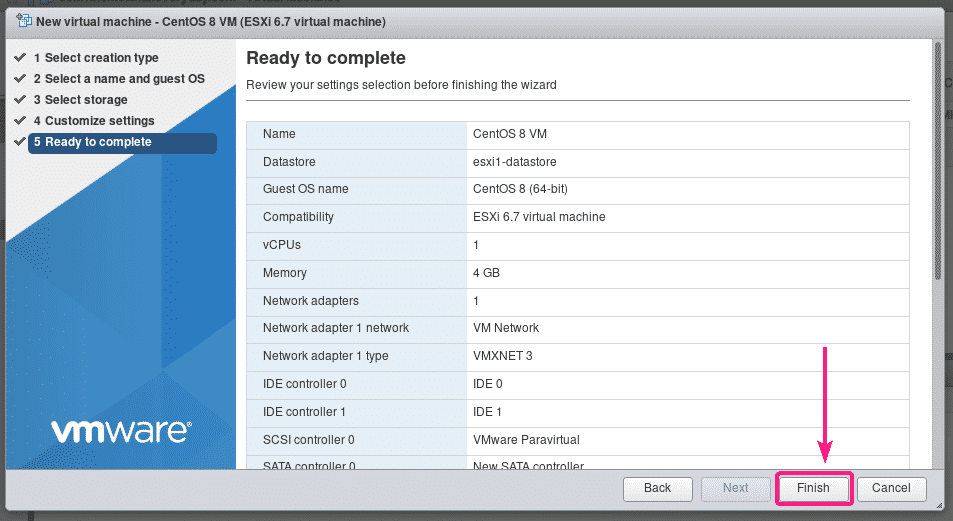
Now, click on Finish.
A new VM should be created. Click on the VM.

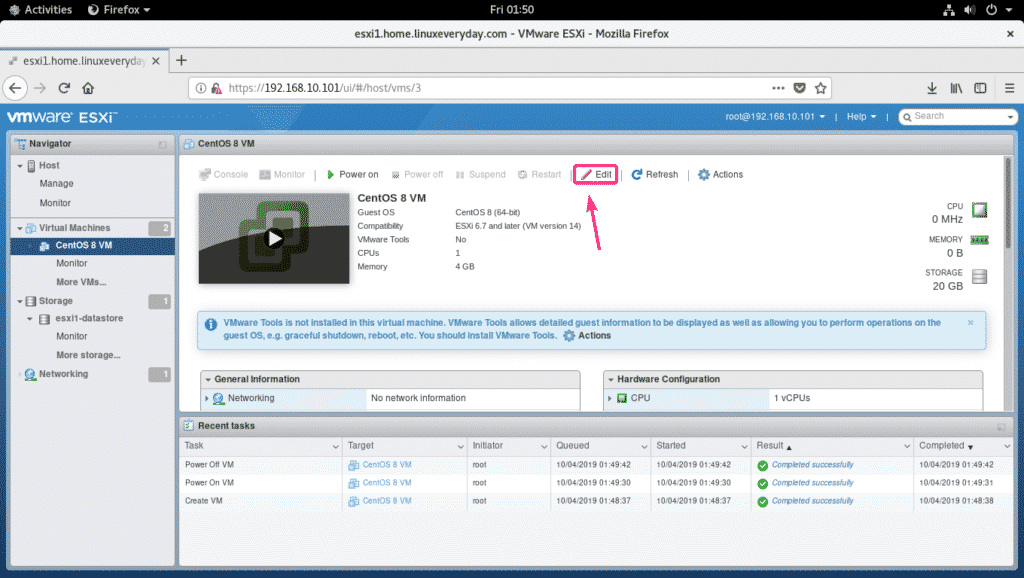
Now, click on Edit.
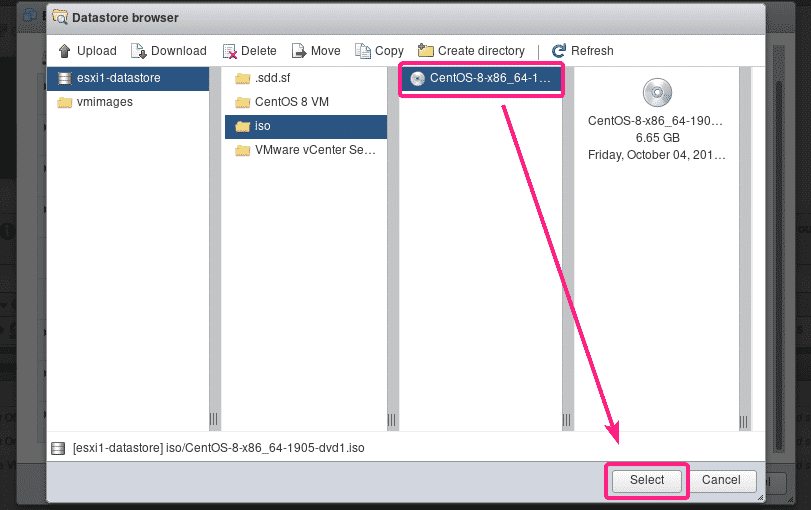
Now, select Datastore ISO file from CD/DVD Drive 1.

Now, select the CentOS 8 ISO image and click on Select.
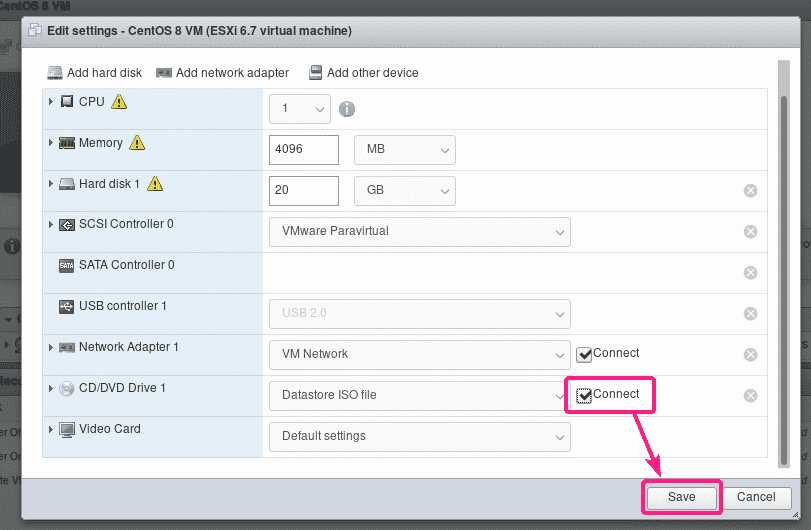
Now, check Connect from the CD/DVD Drive 1 section and click on Save.
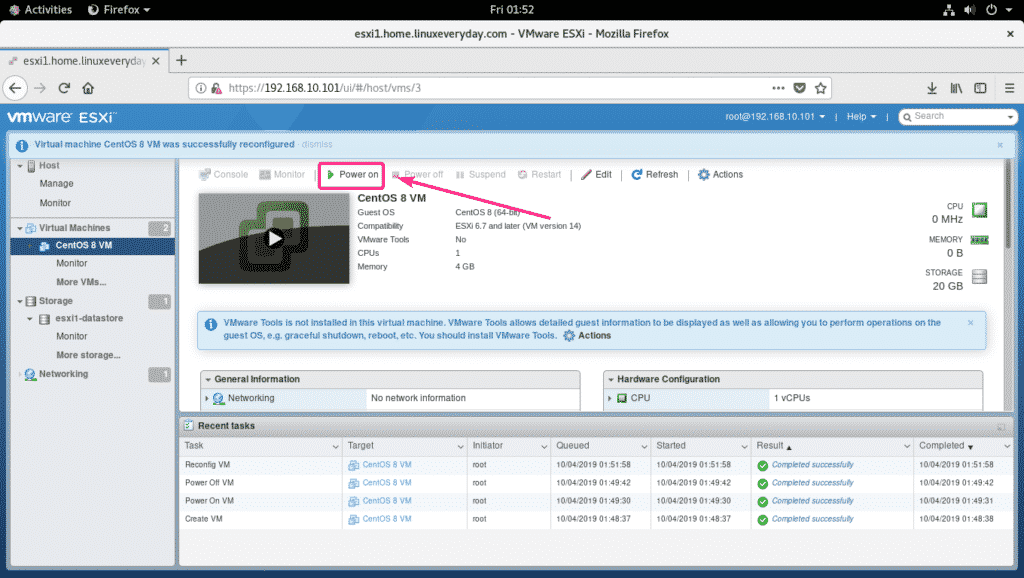
Now, click on Power on to turn on the VM.
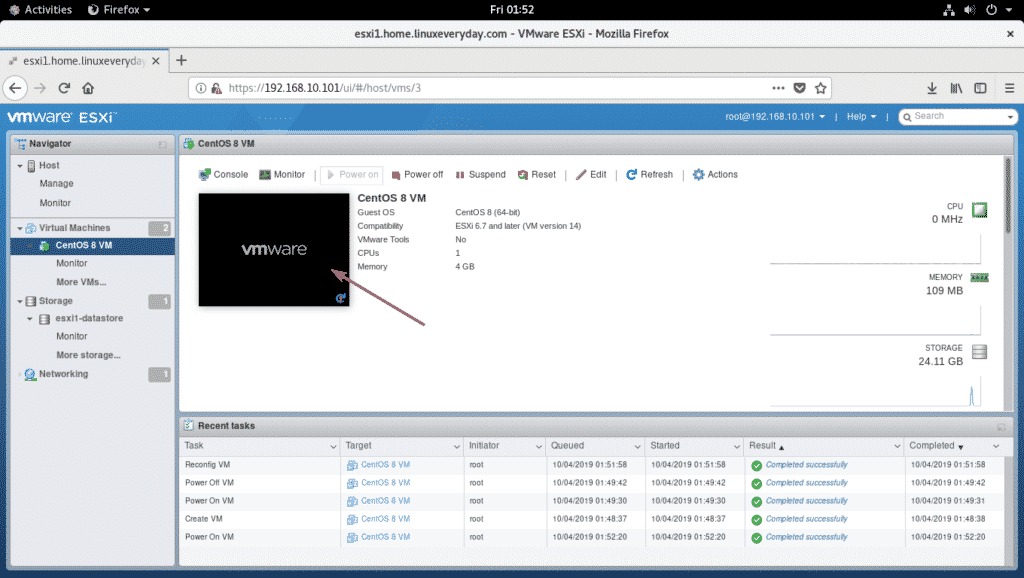
Now, click on the VM display as marked in the screenshot below.
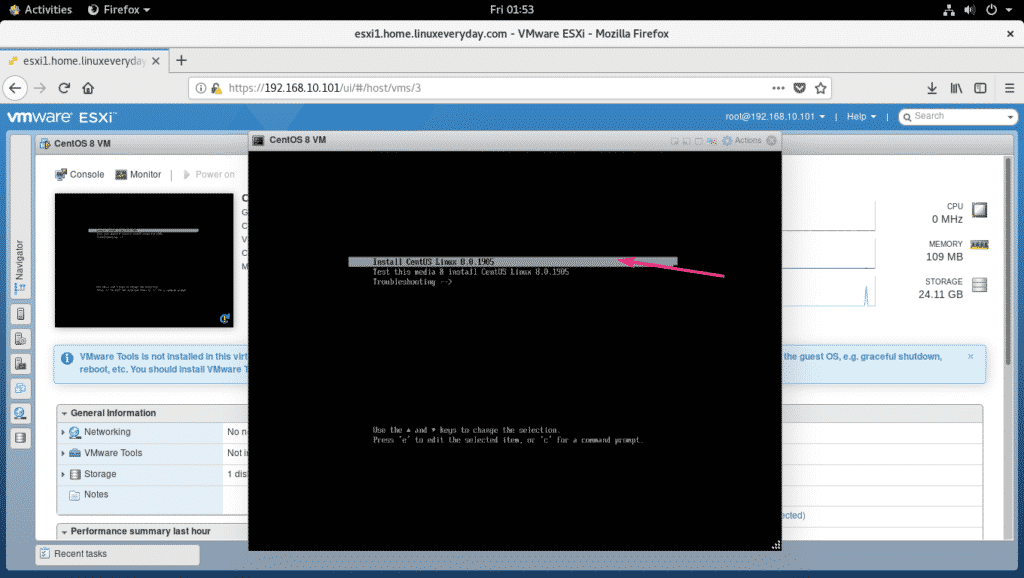
Now, select Install CentOS 8.0.1905 from the GRUB menu and press <Enter>.
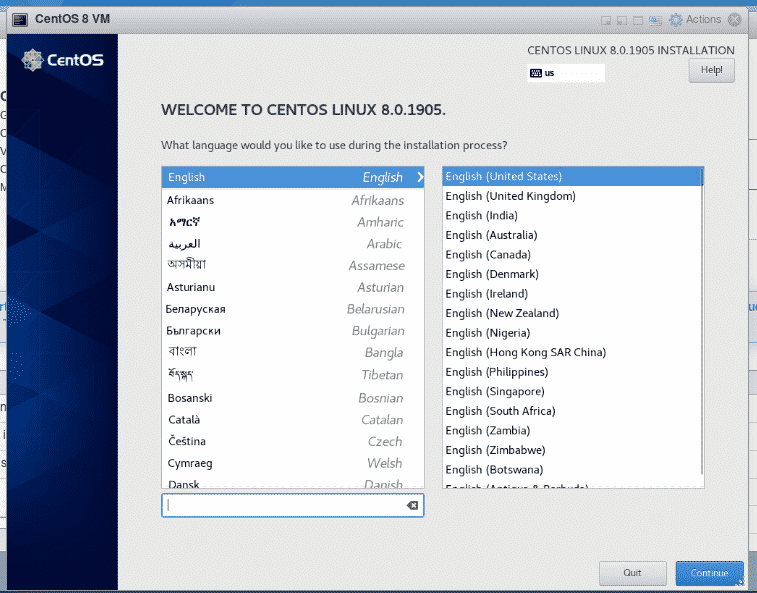
The CentOS 8 graphical installer should start. Now, you can install CentOS 8 as usual.
Installing CentOS 8 on VMware ESXi VM:
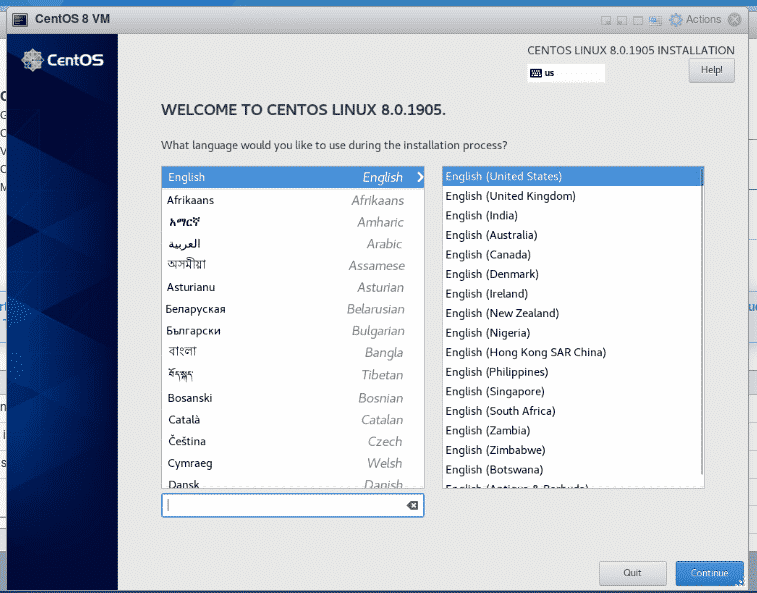
First, select the language and click on Continue.
Now, click on Installation Destination.
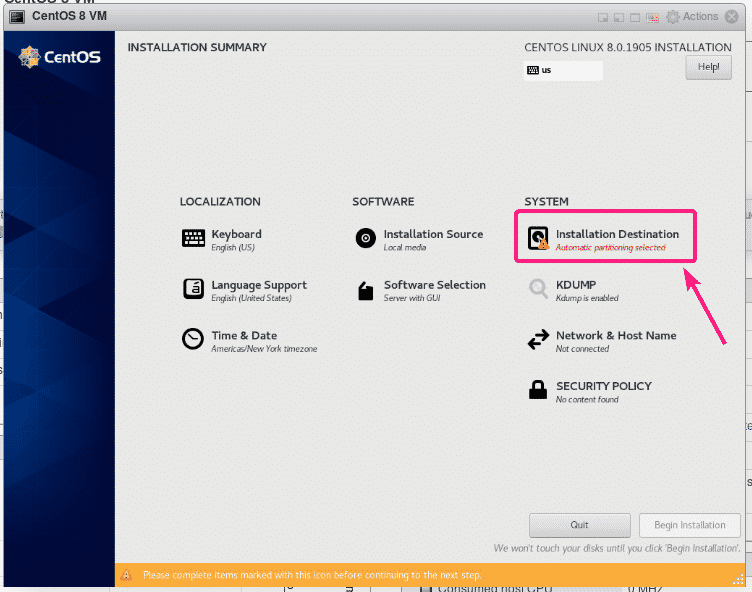
Now, select the virtual hard drive, select Automatic from Storage Configuration section and click on Done.

By default, CentOS 8 server with graphical user interface will be installed. But, if you want to install CentOS 8 headless server, then click on Software Selection.
NOTE: I will install CentOS 8 headless server in this article.
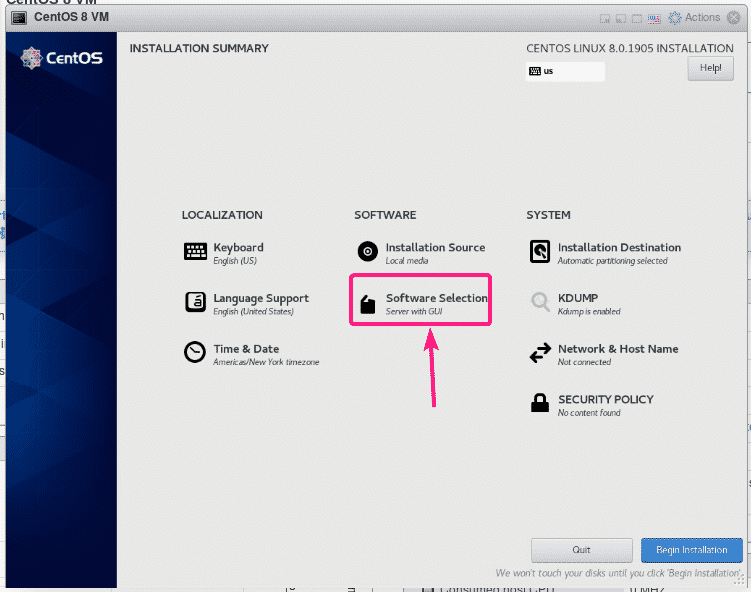
Now, select Server and click on Done.
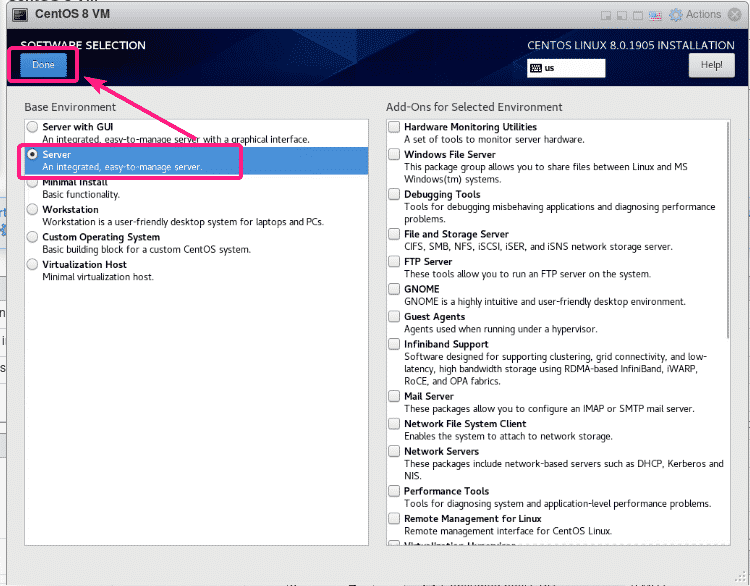
Now, click on Network & Host Name.
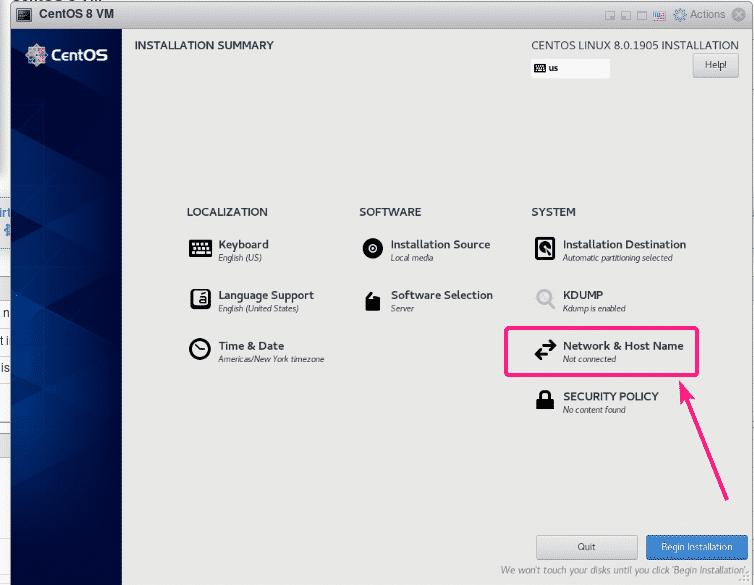
Type in a host name and click on Apply.
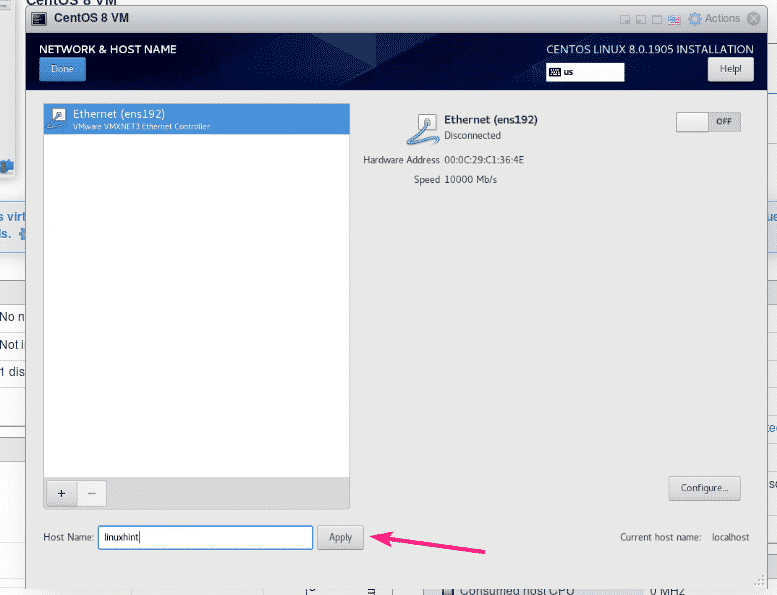
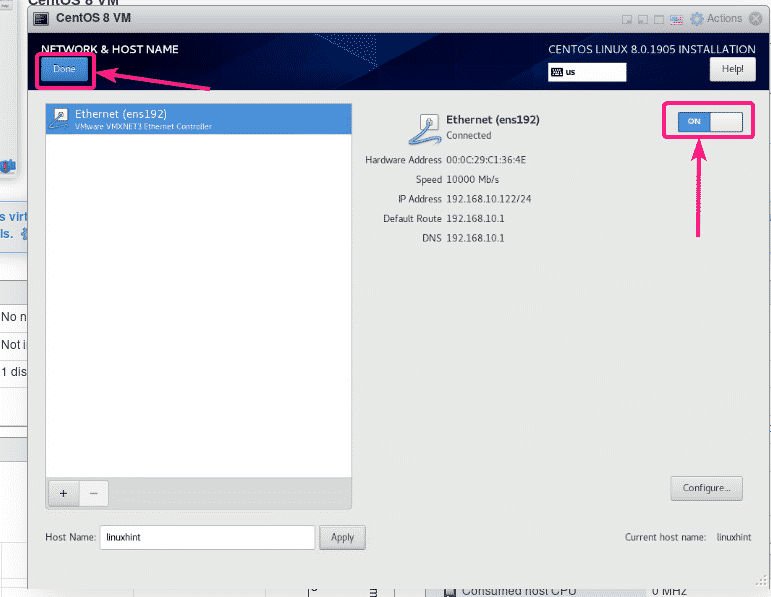
Now, click on the toggle button on the top right corner to activate the network adapter. Once the network is activated, click on Done.
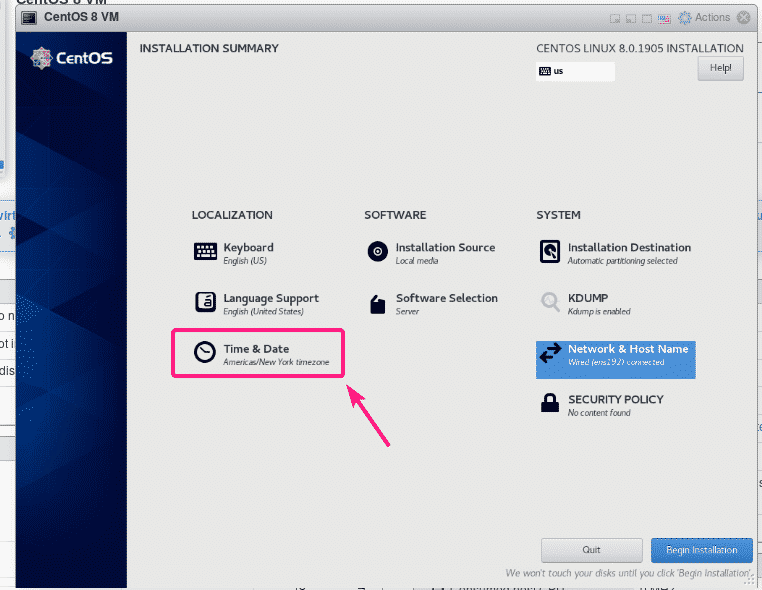
If you want to set up your time zone, click on Time & Date.
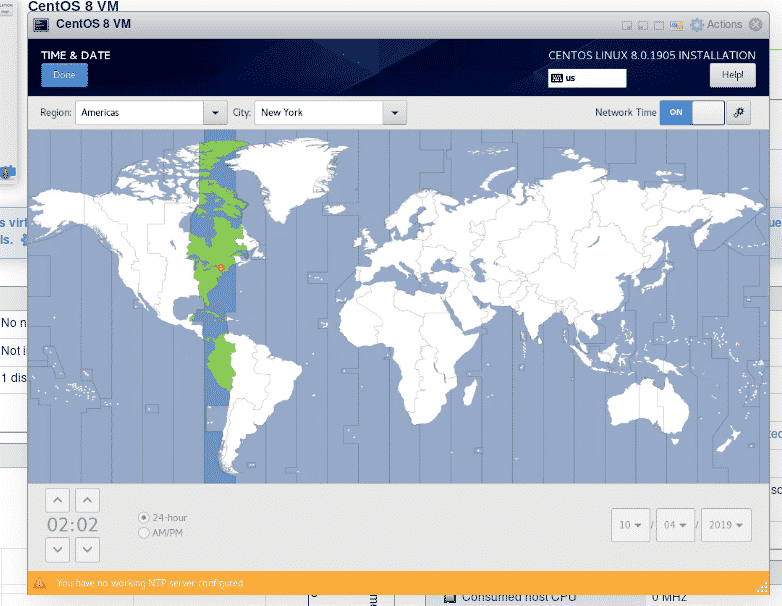
Now, select your Region and City and click on Done.
Once you’ve configured the installer the way you want, click on Begin Installation.
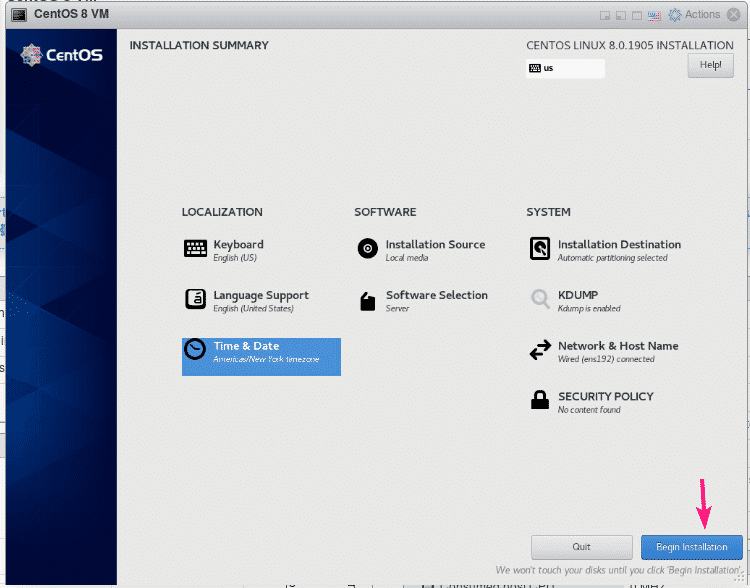
The installation should start.
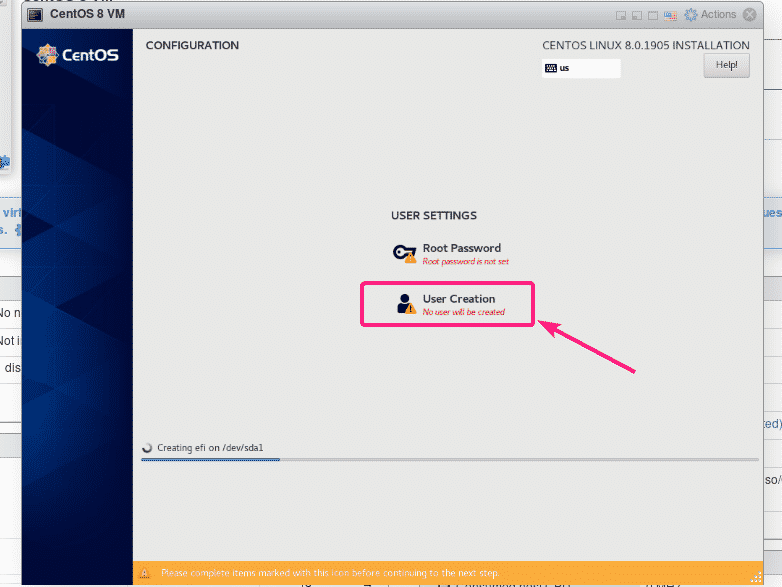
Now, you have to create a new login user. To do that, click on User Creation.
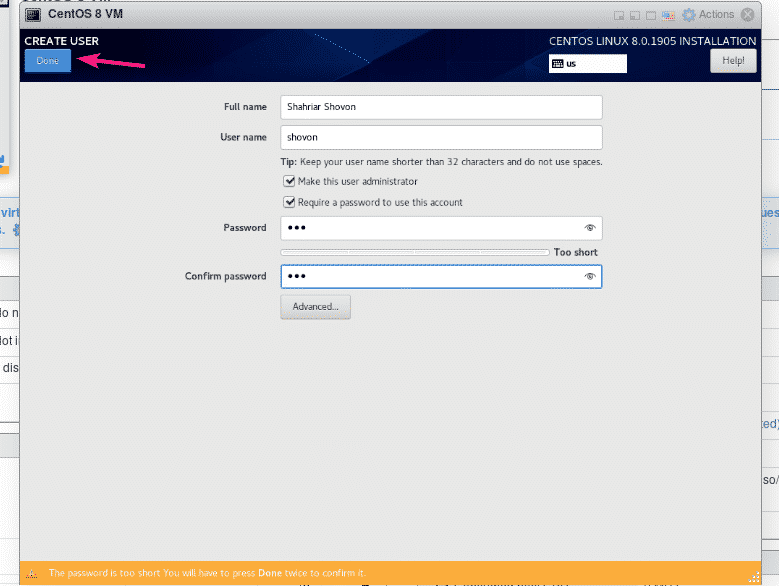
Type in your personal information, check Make this user administrator and click on Done.
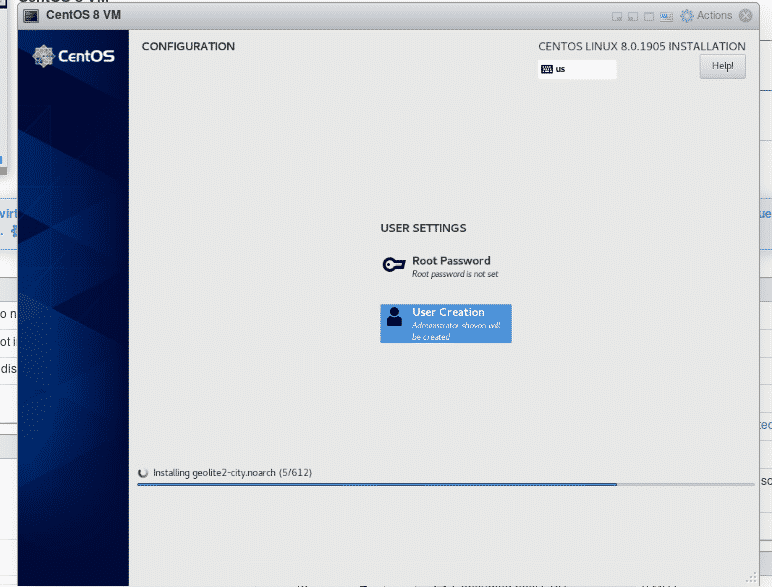
The installation should continue.
Once the installation is complete, click on Reboot.
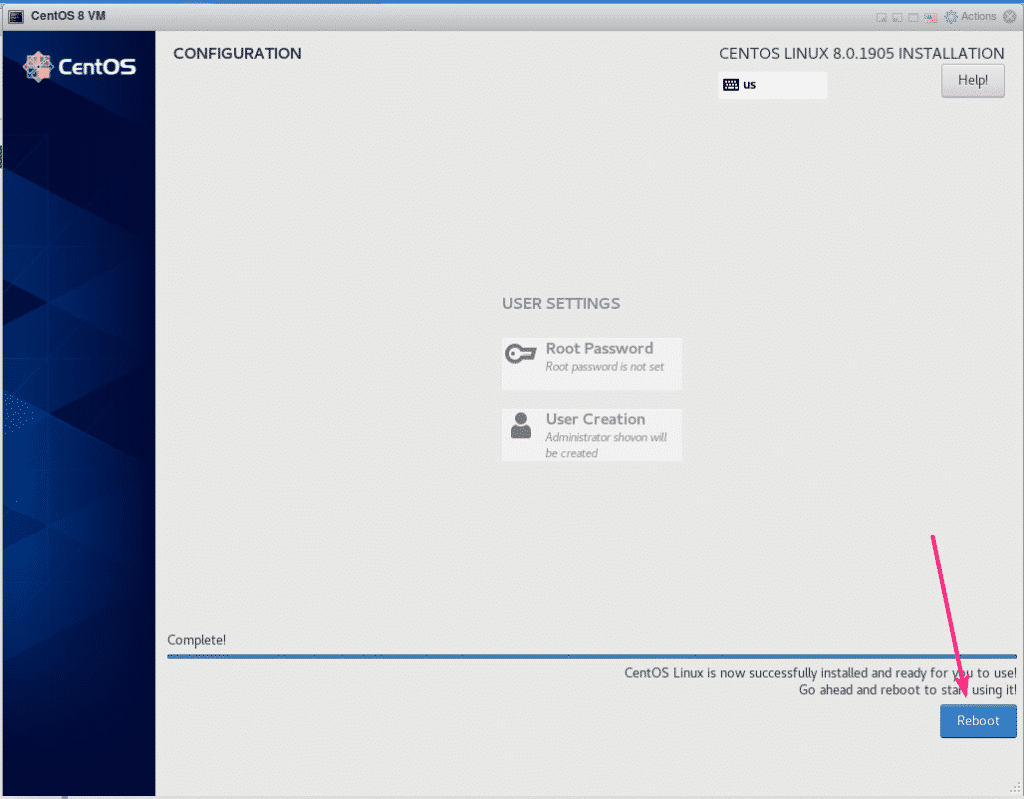
Now, the VM should boot CentOS 8 from the virtual hard drive.
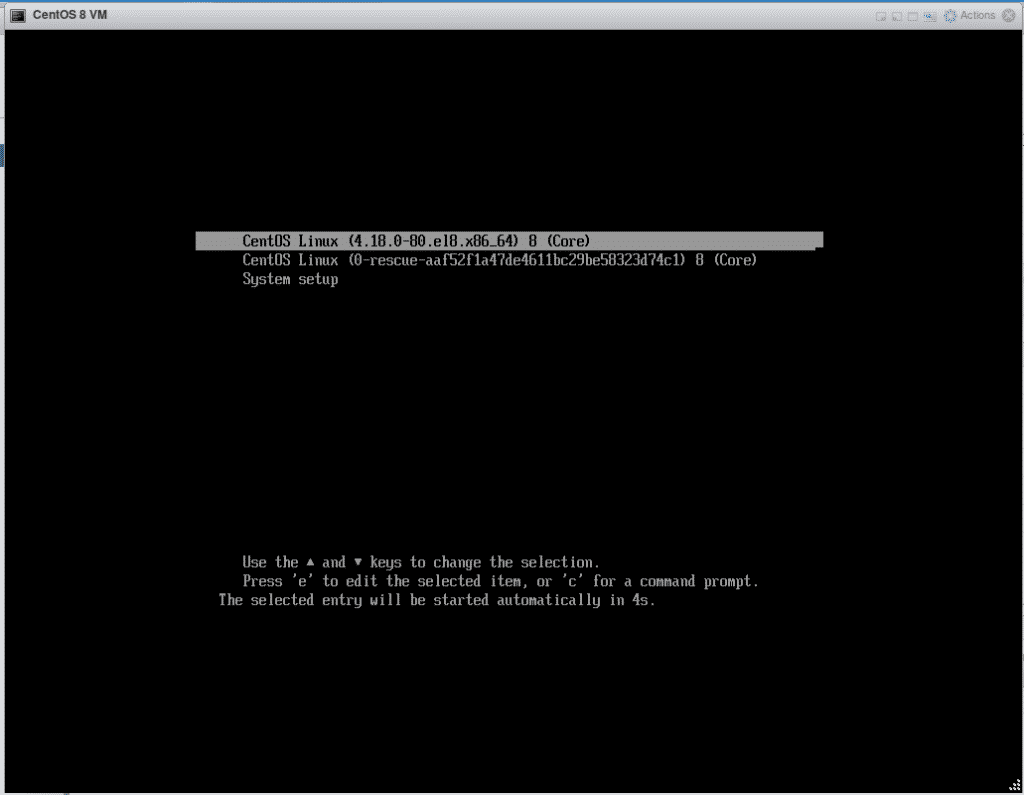
Shortly, you will see the login window. Now, you can login using the username and password that you’ve set during the installation.
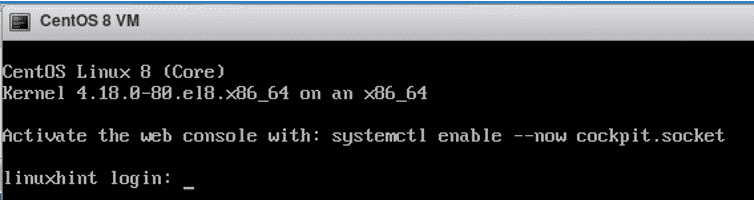
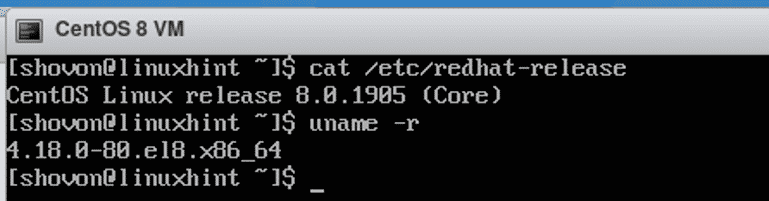
As you can see, I am using CentOS 8 and the Linux kernel version is 4.18.0.
So, that’s how you install CentOS 8 on VMware ESXi server. Thanks for reading this article.
How to install CentOS 8.2 in VMware Workstation 15 Pro
CentOS which stands for Community Enterprise Operating System is one of the most widely used Linux distribution available for free. It powers many web servers across the globe. It is based on Red Hat Enterprise Linux (RHEL). But please note that even though it is based on RedHat Linux, it is not RedHat Linux. It is an OS with its own identity and one of the most widely used OS in the world today. If you wish to run any of your applications on cloud such as Amazon AWS or Microsoft Azure etc., CentOS will be one of the OS you can choose from.
Since these days most of the personal computers are powerful enough to run virtual machines, I recommend people to use a virtual machine to experiment with various operating systems available in the market today. This avoids the need to clean install the new OS which is quite tedious and locks one down with one preference of the OS.
In this post, I wish to show you how to install CentOS on VMware workstation. To install VMware Workstation on windows please follow this post.
This is the link to the official CentOS website. You can download the installation media from here. There are official documentations here you can refer to.
CentOS Installation media download options:
On the official website home page, to get the installation media, you have to click Get CentOS Now. Here you will see 2 download options which are listed below:
- CentOS Linux– Download size around 7.7 GB. This is the desktop version with GUI and contains the standard linux packages which comes pre configured with any desktop version of the linux OS such as C, pyhon, ruby, php etc. Install this if you wish to work on CentOS for software development in desktop mode or for learning purposes. For additional packages not available by default, you will have to install them yourself using the package manager. I use this release for installation and personal work
- CentOS Stream– Download size around 7 GB. CentOS Stream is a rolling-release Linux distribution that exists as a midstream between the upstream development in Fedora Linux and the downstream development for Red Hat Enterprise Linux (RHEL). In practice, CentOS Stream will contain the code being developed for the next minor RHEL release. If you want to work with experimental features for future RHEL releases, you can use this release. I hardly use this release
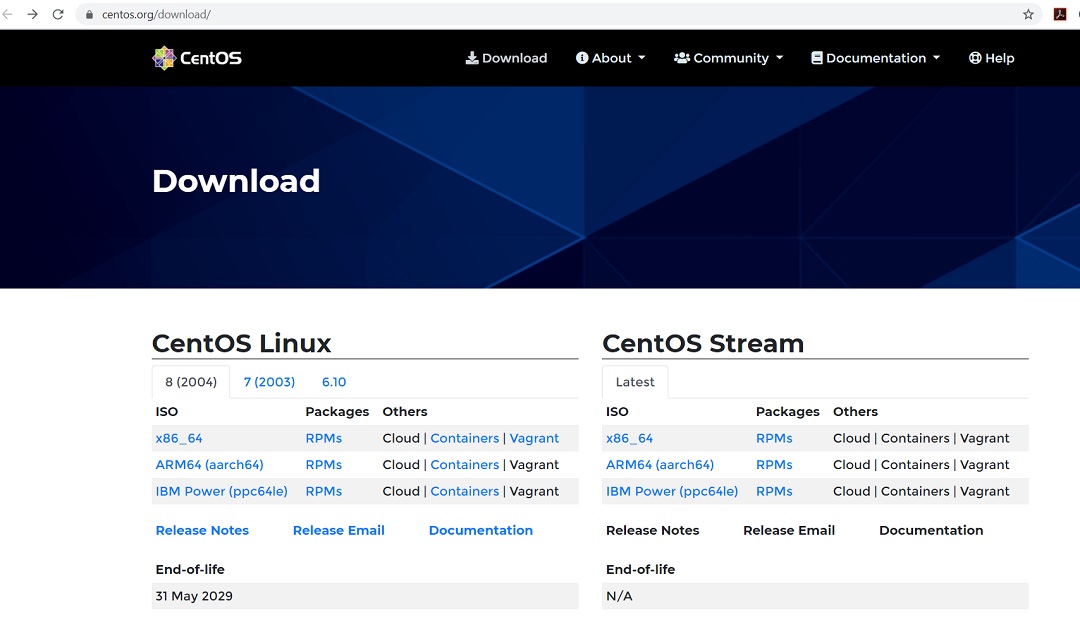
CentOS Download webpage Screenshot
In this Blog, I will show you how to install CentOS 8.2 in VMware Workstation 15.5
Step 1- Open VMWare Workstation
Open VMware Workstation from Windows Start menu or from you desktop if you have VMware Workstation icon there.
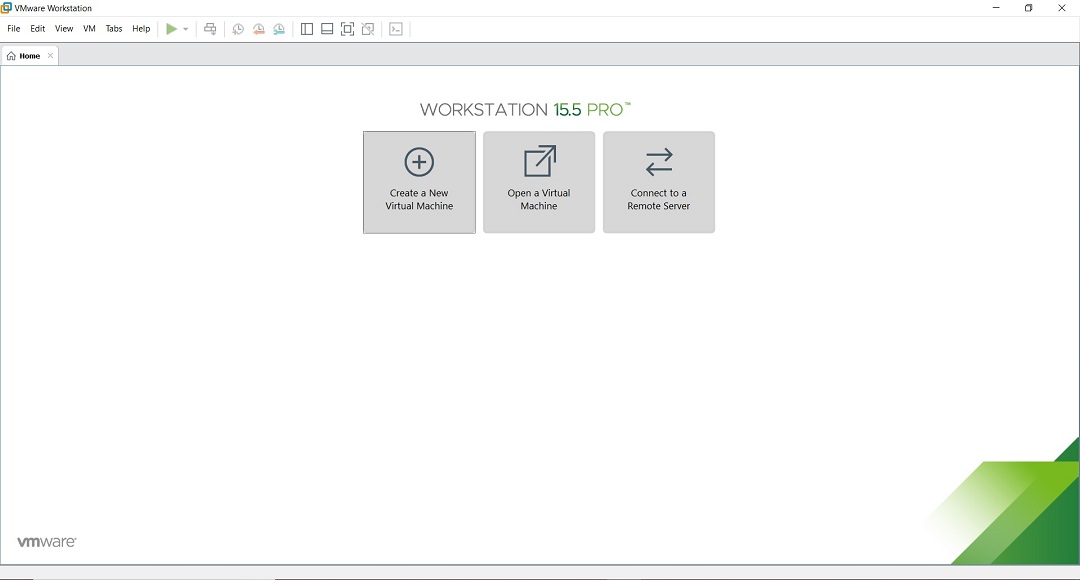
VMware Workstation 15.5 Pro Home Screen
Step 2- Click on Create a New Virtual Machine
To launch the wizard to create a new virtual machine, Click on Create a New Virtual Machine or File -> New Virtual Machine. Welcome to the new Virtual Machine Wizard dialog box will open. Select typical and click on next.

VMware workstation – create a new virtual machine screenshot
Step 3- Welcome to the new Virtual Machine Wizard dialog box appears
This is where you get a chance to select the way virtual machine will be created. Typical is predefined or mostly the defaults. Custom is where you get to set advanced options such as compatibility with older Virtual Machines, SCSI controller type, etc. We will go with the default options. Select Typical and click Next.
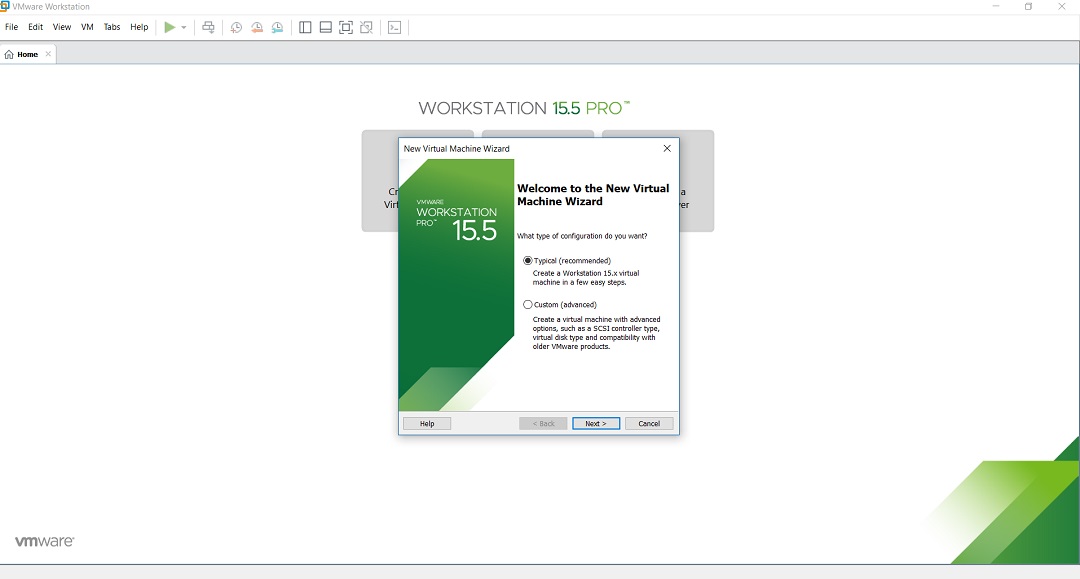
VMware workstation – create a new virtual machine screenshot
Step 4- Browse to the ISO Image
In this dialog box you will have to browse to the downloaded ISO file and click next. Generally, VMware Workstation detects the OS automatically and initiates what they call as the Easy Install. In the latest version of VMware Workstation 15, Red Hat Enterprise Linux 8 ISO will be detected and available for easy install.
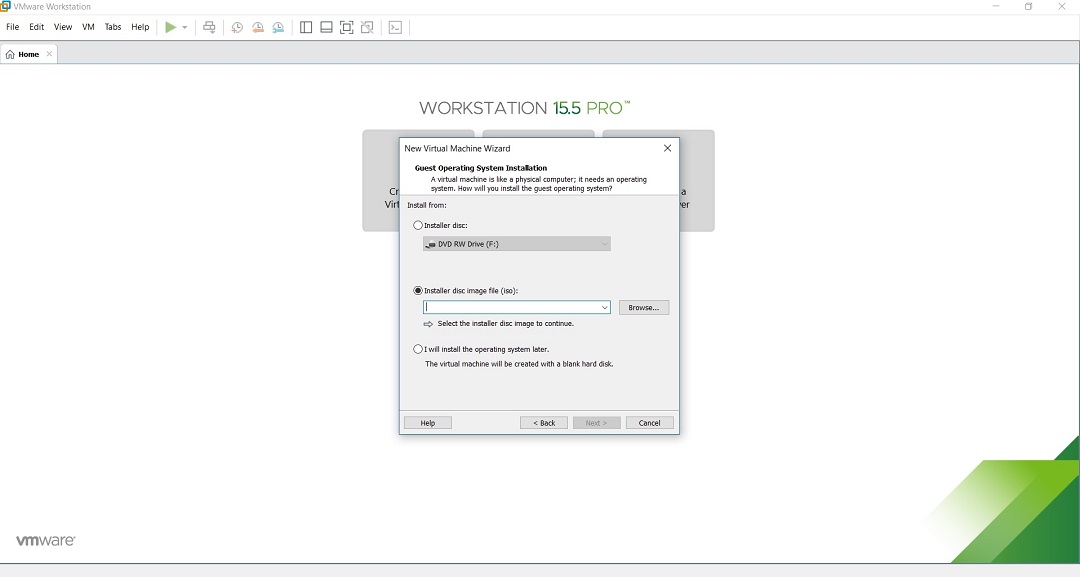
Kali Linux Installation – New Virtual machine Wizard – Browse Guest Operating System
Step 4- Enter virtual machine name
In this dialog box, enter the name of the virtual machine or accept the default. I normally accept the default. Location tells you where the Virtual machine files will be created. Click on Browse to select an new location. Normally, I leave it as it is.
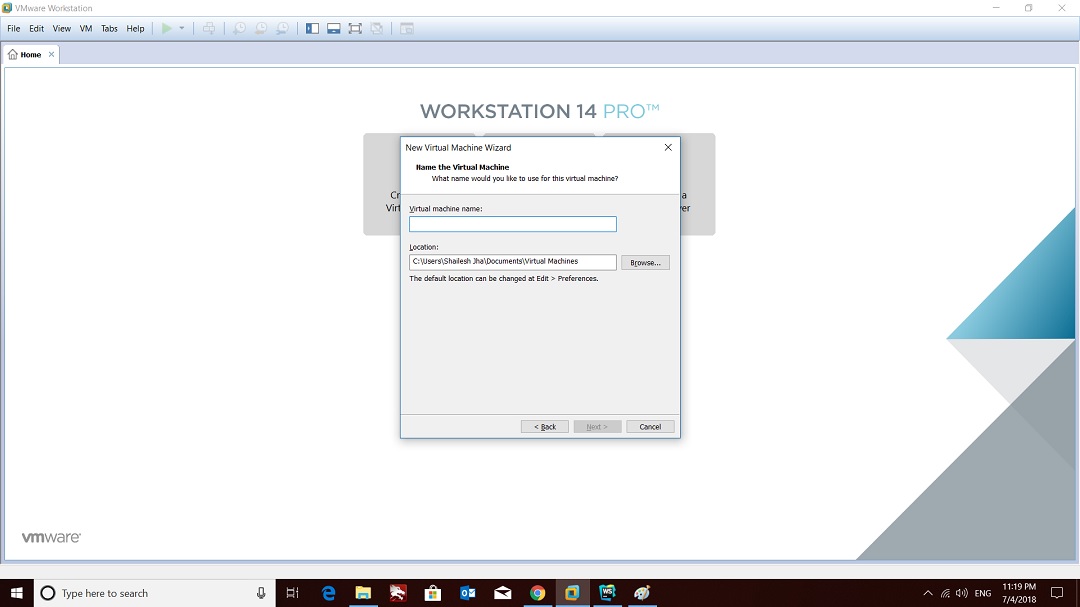
VMware workstation home create a new virtual machine wizard virtual machine name screenshot
Step 5 – Specify Disk Space
In this dialog box specify the disk space. Normally I go with the default. You can allocate more if you plan to install applications later on. Make sure that split virtual disk into multiple files check box is checked.
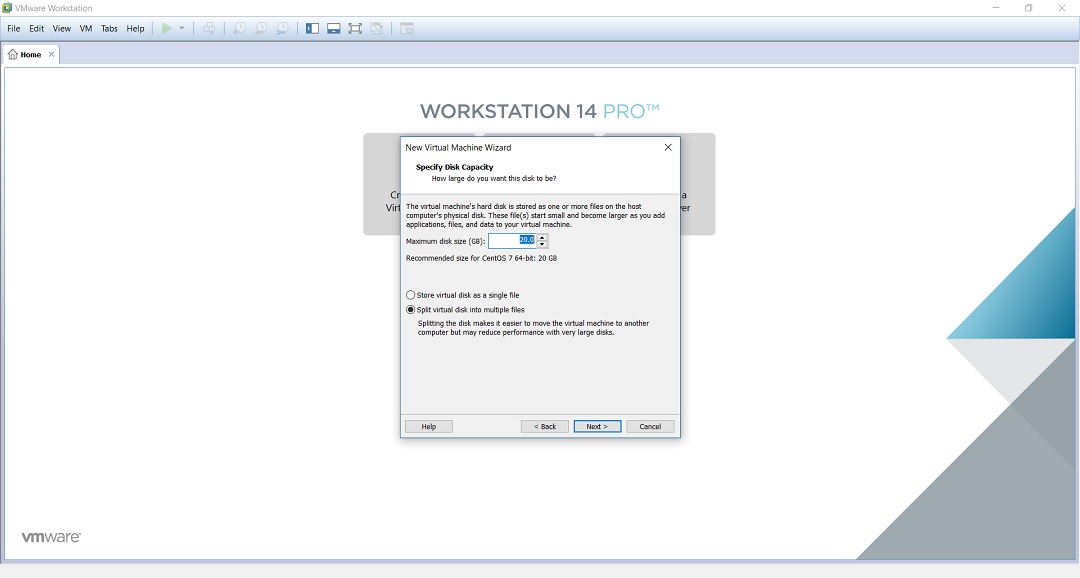
VMware workstation home create a new virtual machine wizard specify disk space screenshot
Step 6- Ready to create virtual machine
Now you will see ready to create virtual machine dialog box. With this the installation process will begin.
Click on Finish to start the process. At this stage, I normally provide the virtual machine more RAM and CPU. Default is 1 GB RAM and 1 CPU Core. Increase the RAM only if you have sufficient memory on your system.
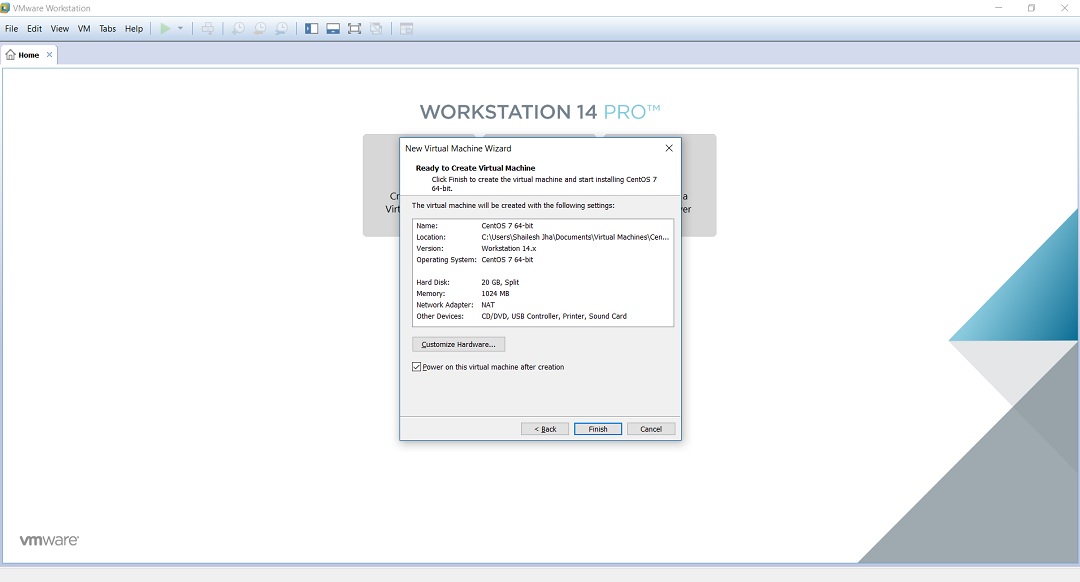
VMware workstation home create a new virtual machine wizard ready to create virtual machine dialog box screenshot
To increase the RAM, before clicking Finish, click on customize hardware. Increase the memory using the slider.
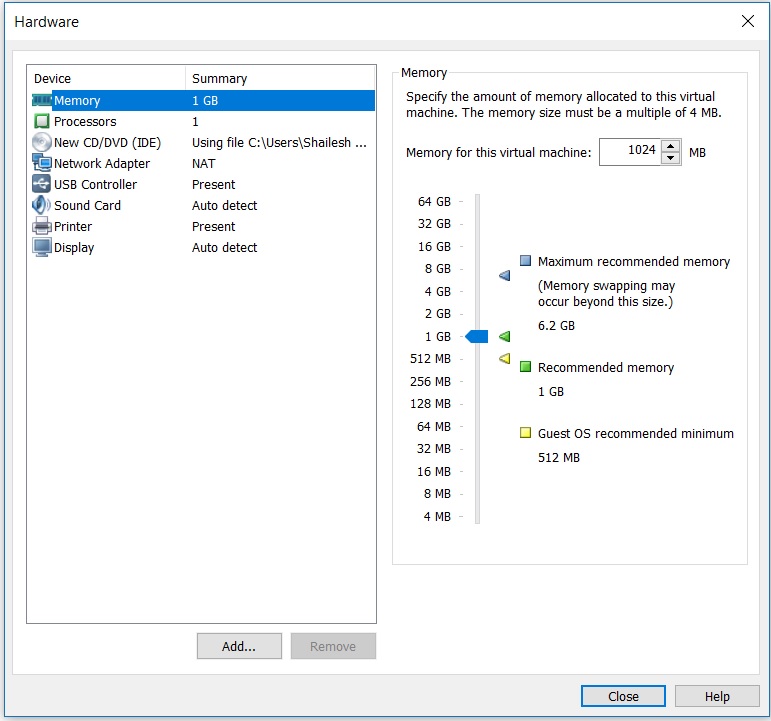
VMware workstation home create a new virtual machine wizard hardware memory setup screenshot
To increase the CPU, Enter the values number of processors and number of cores. Click on Finish to start the installation process.
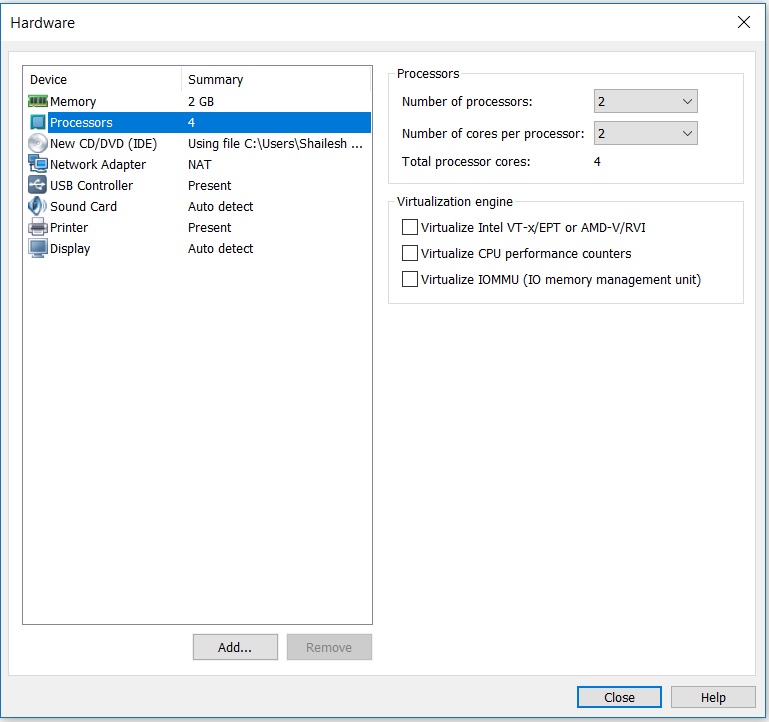
VMware workstation home create a new virtual machine wizard hardware processor setup screenshot
Click on Close and Finish to start the installation process
Step 7- Installation process should begin
You will see the below screen. Press “i” in your keyboard and press enter.
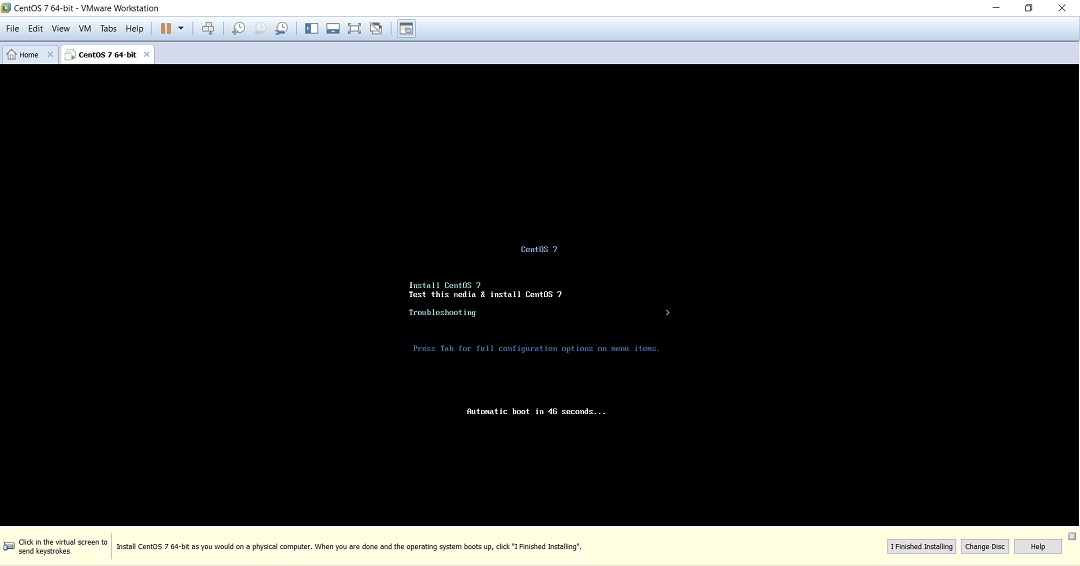
VMware workstation home create a new virtual machine centos installation start screenshot
Step 8- Welcome to CentOS setup wizard – select language
Once the installation starts, you should see a dialog box asking you to select your language. Select the language of your choice and click on continue.
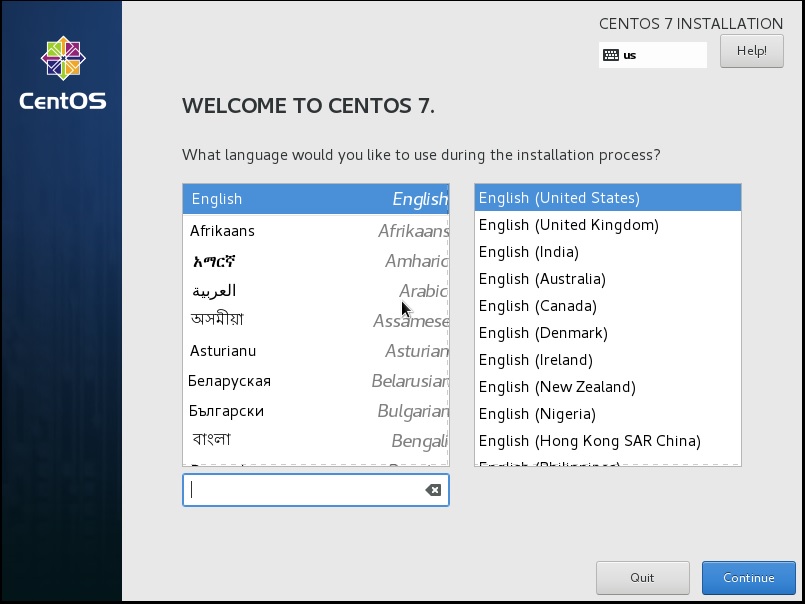
CentOS setup choose language
Step 9 – CentOS Setup – Installation summary
Now you should see the installation summary. If you see some grayed out area, please wait for a while until you see the below screen.
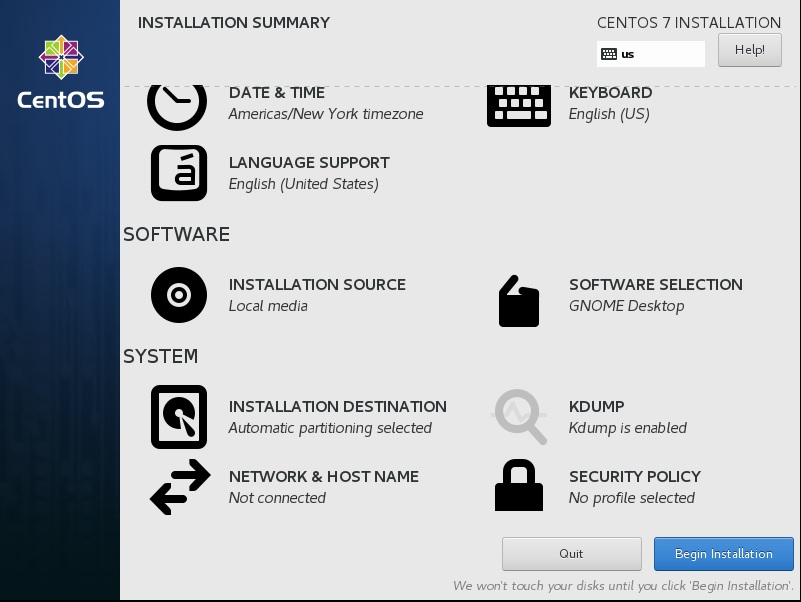
CentOS setup installation summary screenshot
Click On Software Selection and select Gnome Desktop as shown below and click on Done and then click on begin installation.

CentOS setup – software selection – base environment
Step 10- CentOS setup – setup root password and setup user
The installation process will begin and you will be presented with a screen to configure root password and create user as shown below.
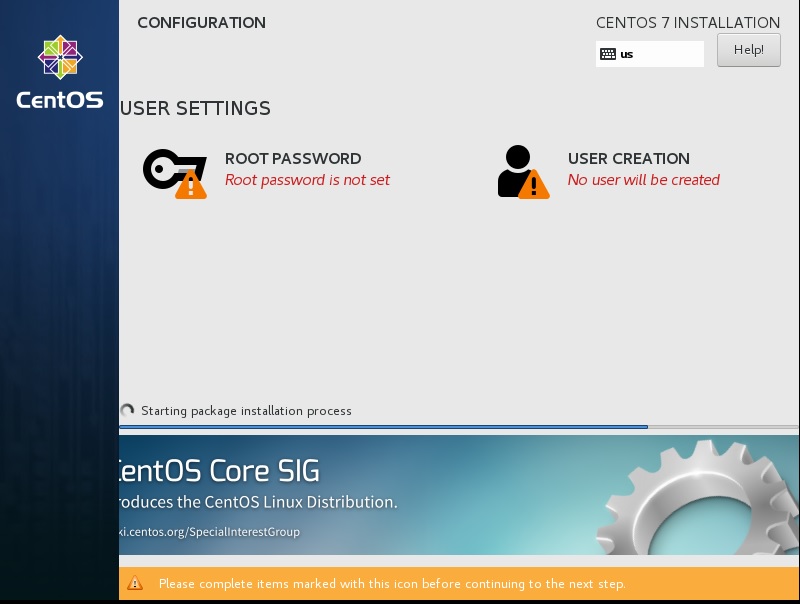
CentOS Setup – setup root password and create user
Click on Root Password, you should see a dialog box to enter your root password. Enter your root password and click on done. If you get weak password warning, click on Done Twice.
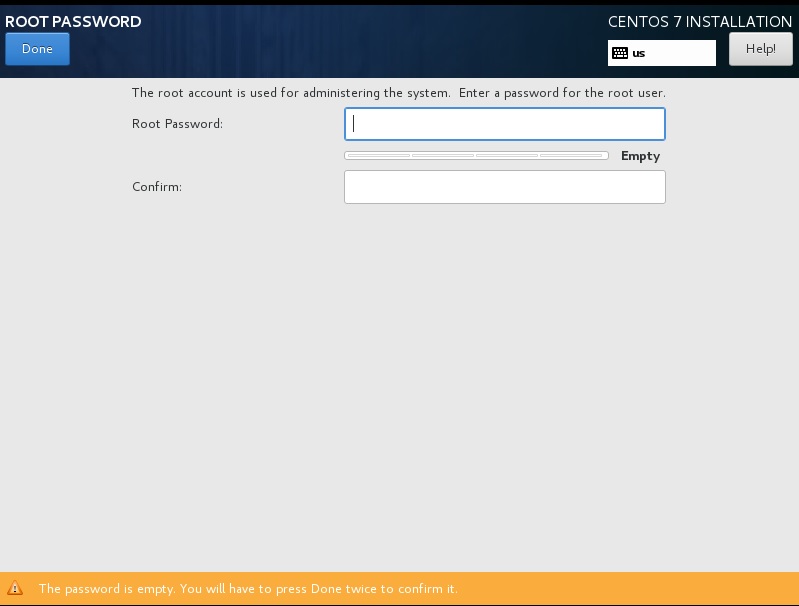
CentOS setup set root password dialog box screenshot
Once root password is setup, click on User Creation. In the dialog box will enter the name of the user, password, check the box if you want to make the user administrator. If you get weak password warning, click on Done Twice.
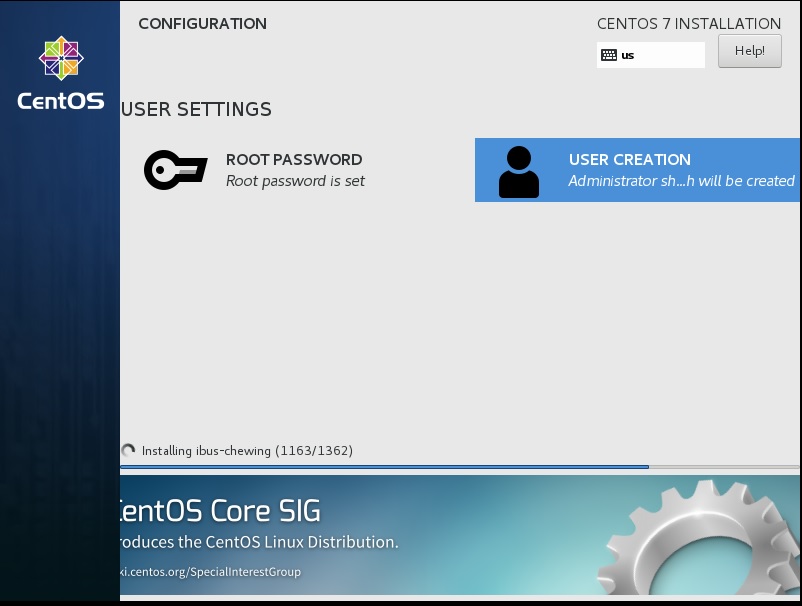
Centos setup – User creation
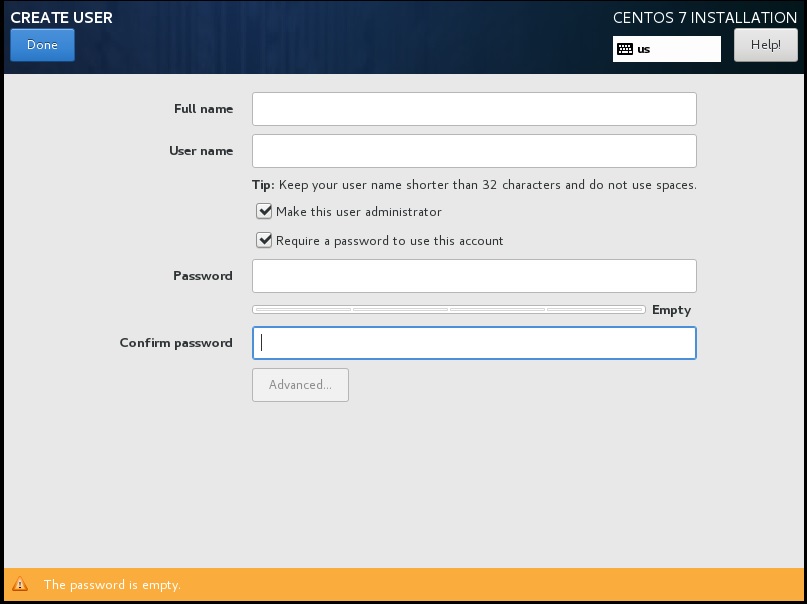
CentOS Setup – Create user dialog box screenshot
One the user and root password is created, you will see both the options grayed out. Let the installation complete at you will be asked to restart once done. Please go ahead and click on Reboot.
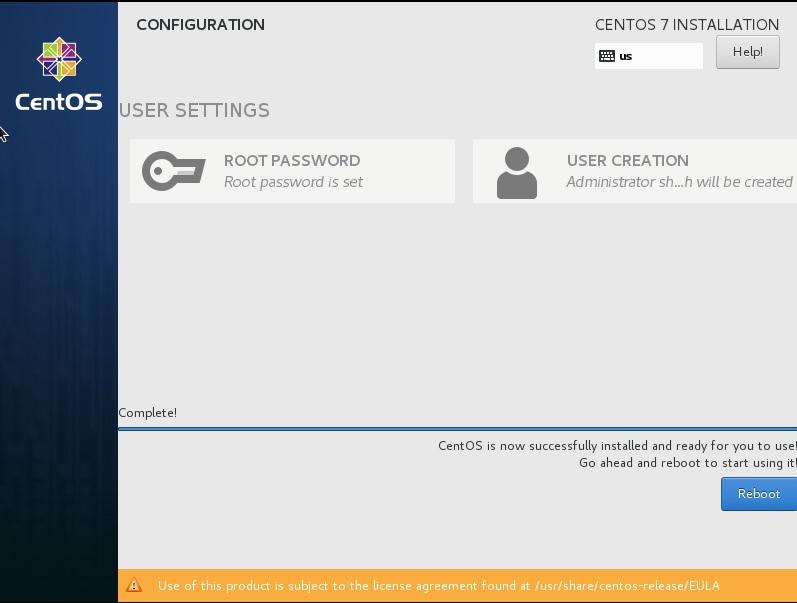
CentOS Setup – Installation complete – reboot
Step 11- CentOS setup – Initial Setup
Once the system restarts, you will be see the below initial setup screen.
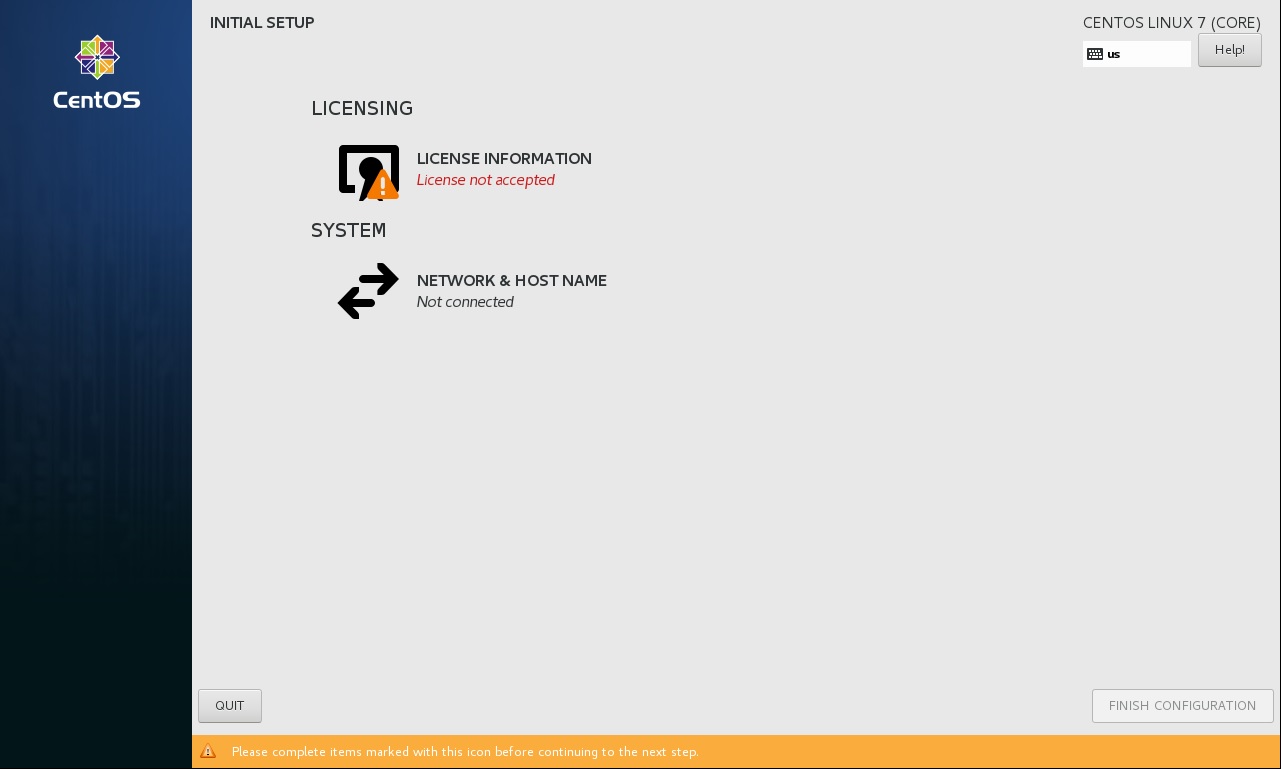
CentOS Installation – Initail setup
Click on Licence Agreement. In the dialog box that you see check the licence agreement at the bottom of the screen and click on done button at the top of the screen.
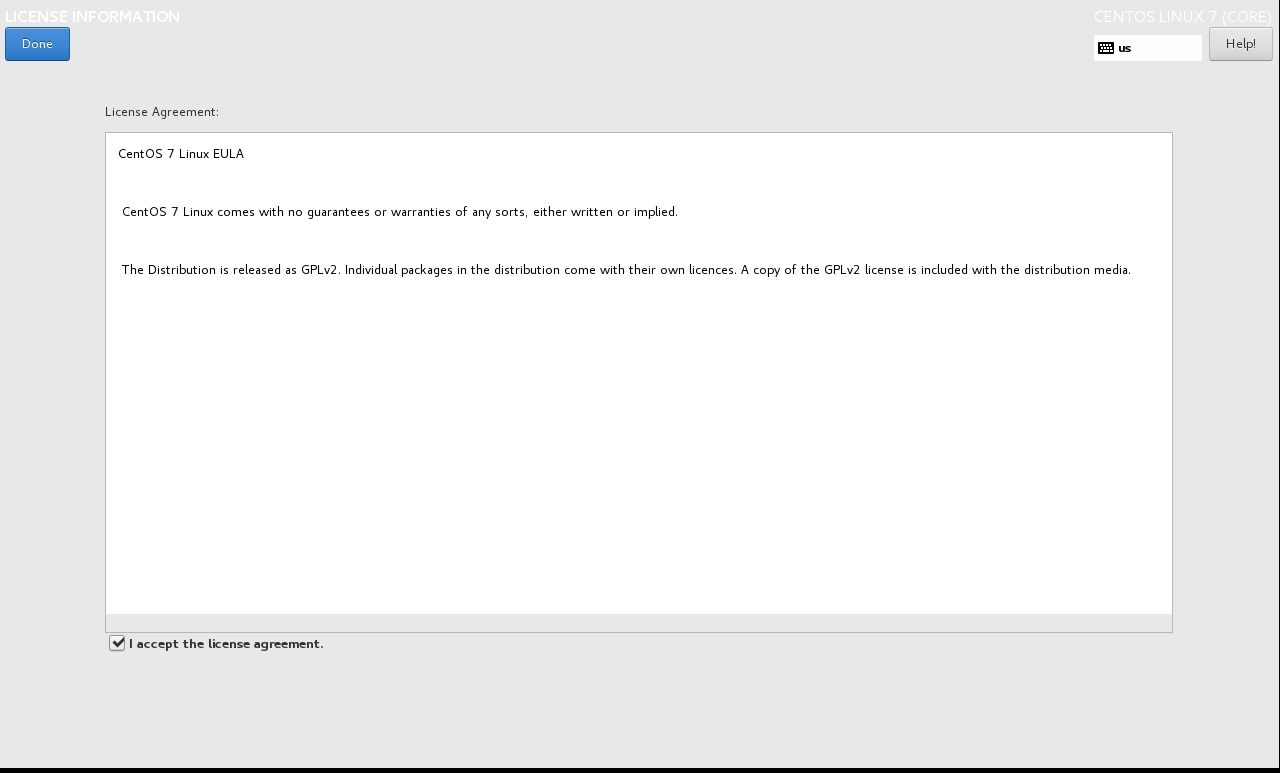
CentOS Installation – Licence Agreement
Step 12- CentOS – Login
Now you will see the login screen. You will see the user name you created earlier. Click on the user name and enter your password which was setup earlier.
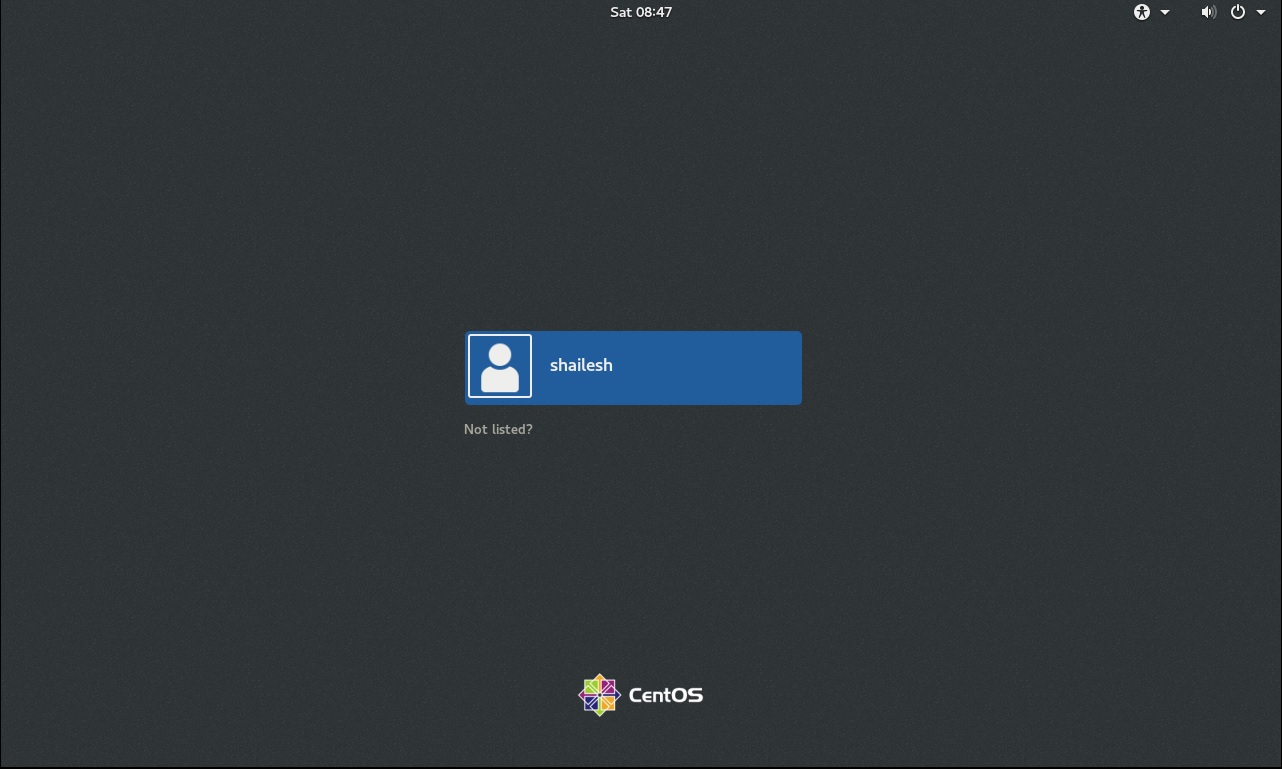
CentOS Installation – Login screen
Enter your password in the resulting screen. Now you will see the CentOS desktop. There are some more settings required. You will see a welcome screen
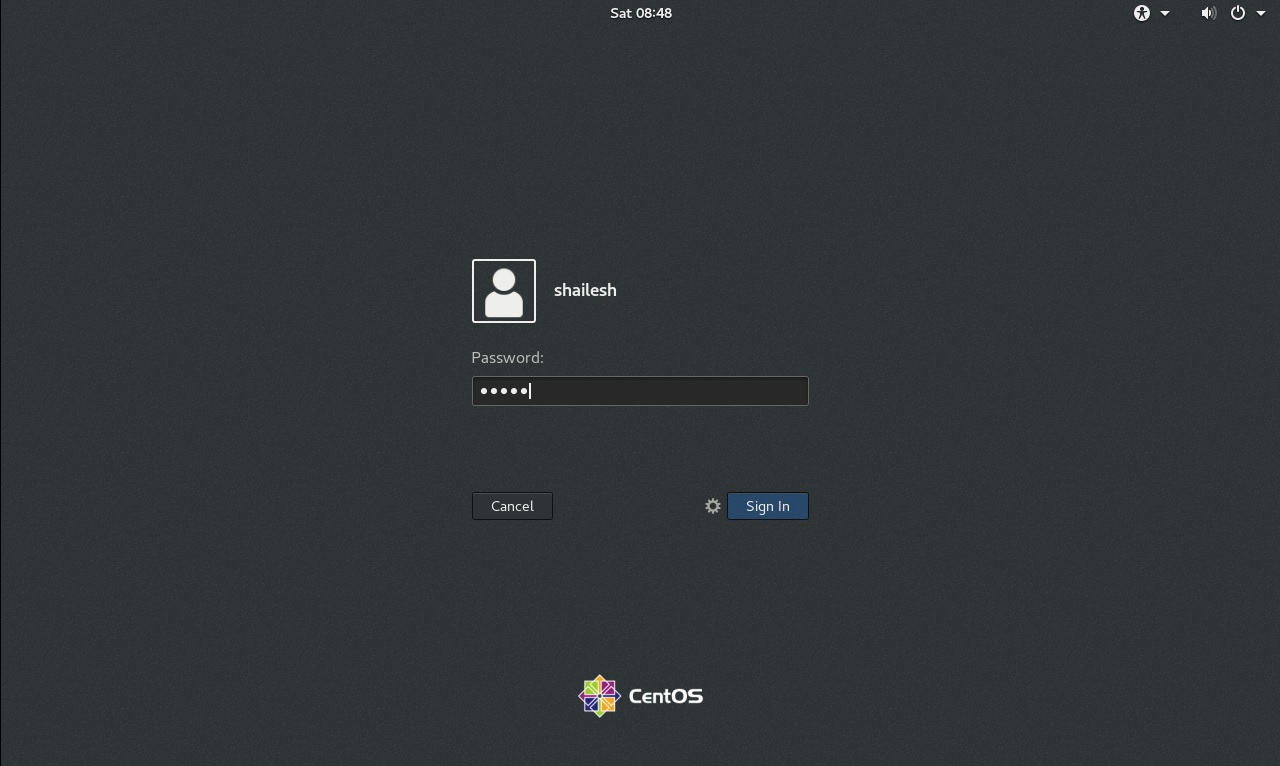
CentOS Installation – User password
Step 13- CentOS – Welcome Screen – language preference
Once you have logged in for the first time, you will asked to select your default language in the welcome screen. Select the language of your choice and click on next.
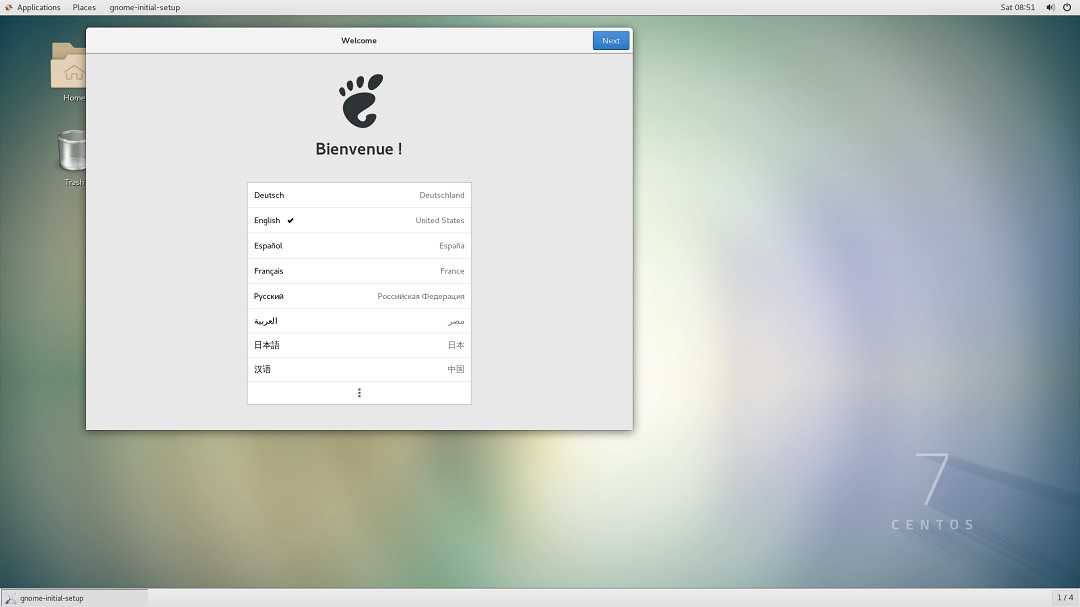
CentoOS Installation – Welcome screen – language preference
Step 14- CentOS – Welcome Screen – Keyboard preference
Now you will be asked to set your keyboard. Select based on the keyboard preference you have.
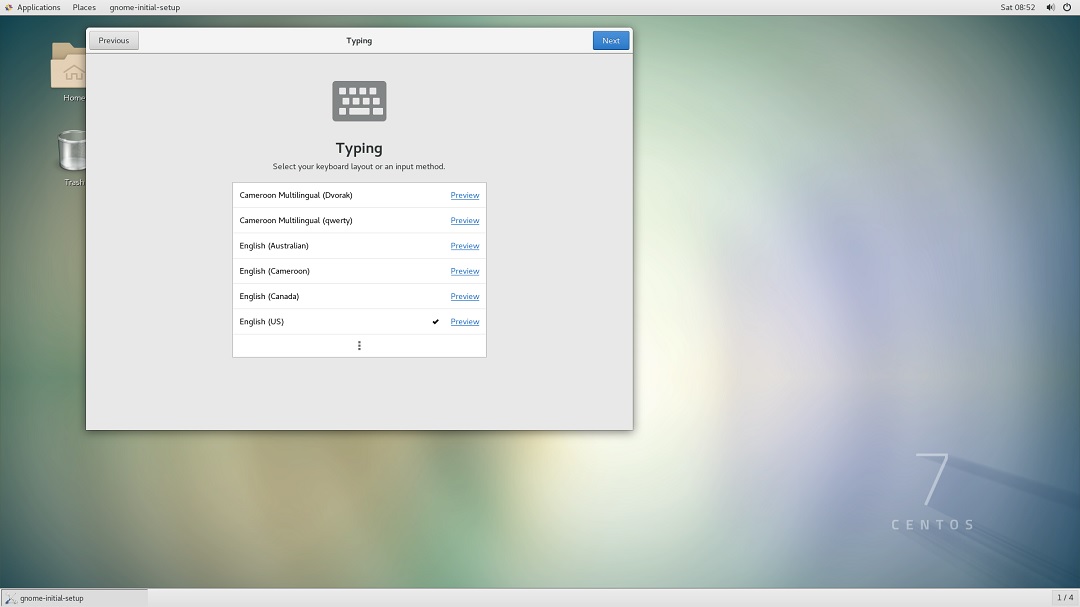
CentOS installation – Welcome Screen – Keyboard preference
Click next to continue.
Step 15- CentOS – Welcome screen – privacy
Now you will be asked to set your privacy which is basically, if you want the application to use the location service. Select yes or no using the slider. Click on next to continue.
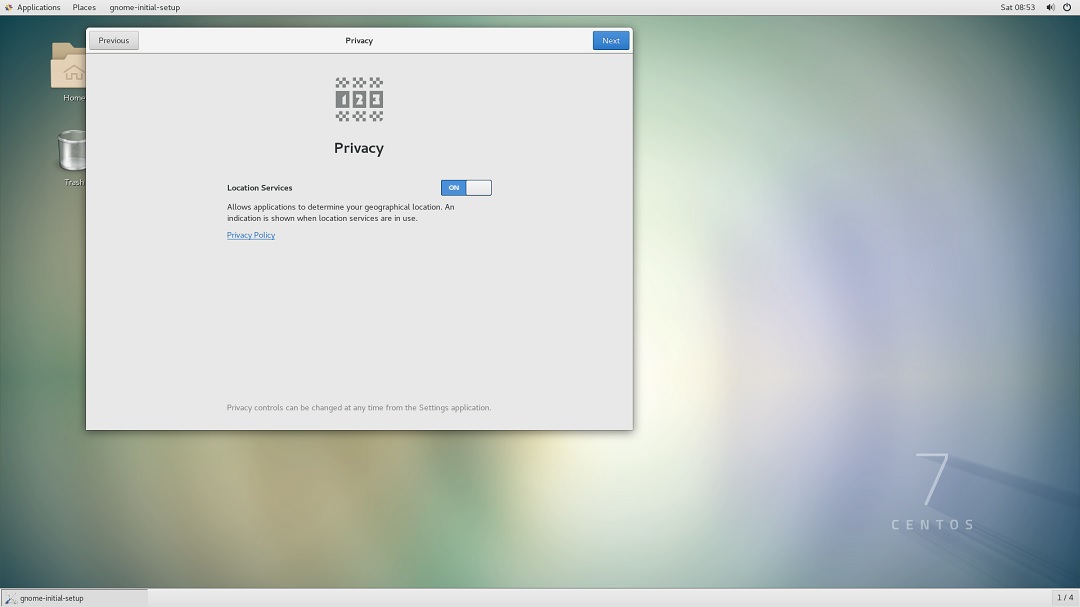
CentOS Setup – Welcome screen – privacy preference
Now you will be asked if you want to give color access to your location. You can accept or deny. I usually accept.
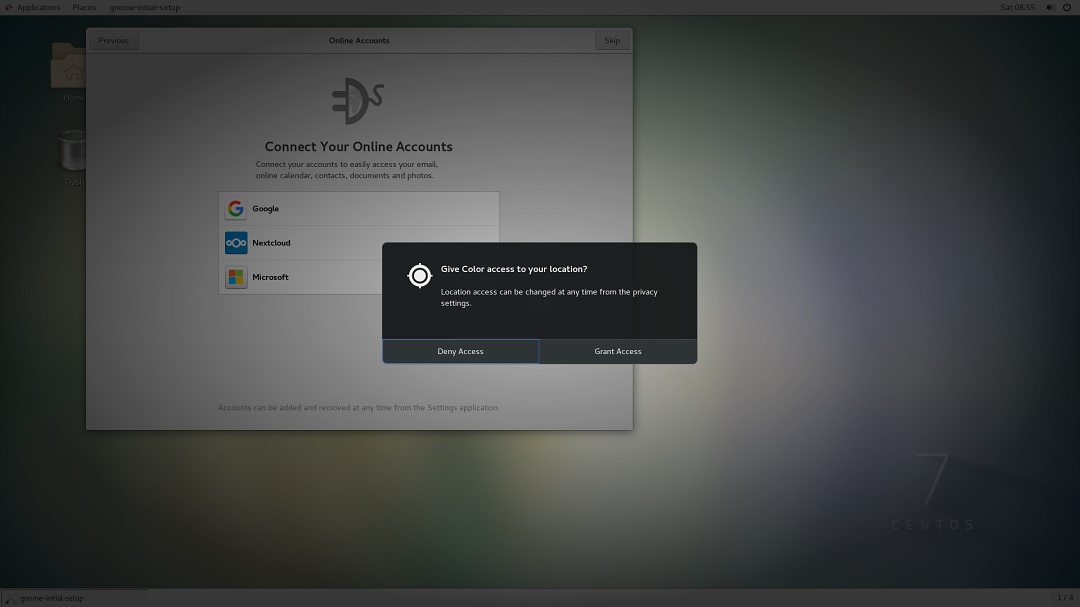
CentOS Setup – Welcome screen – location color access
Step 16- CentOS – Welcome screen – setup online accound
Now you will be asked if you want to setup online account such as gmail etc.. for setting up mail and other services. I generally dont set it up here. If you want to set it, click on the service and you will be redirected to the the service provider authentication system where you will have to enter your user ID and password.
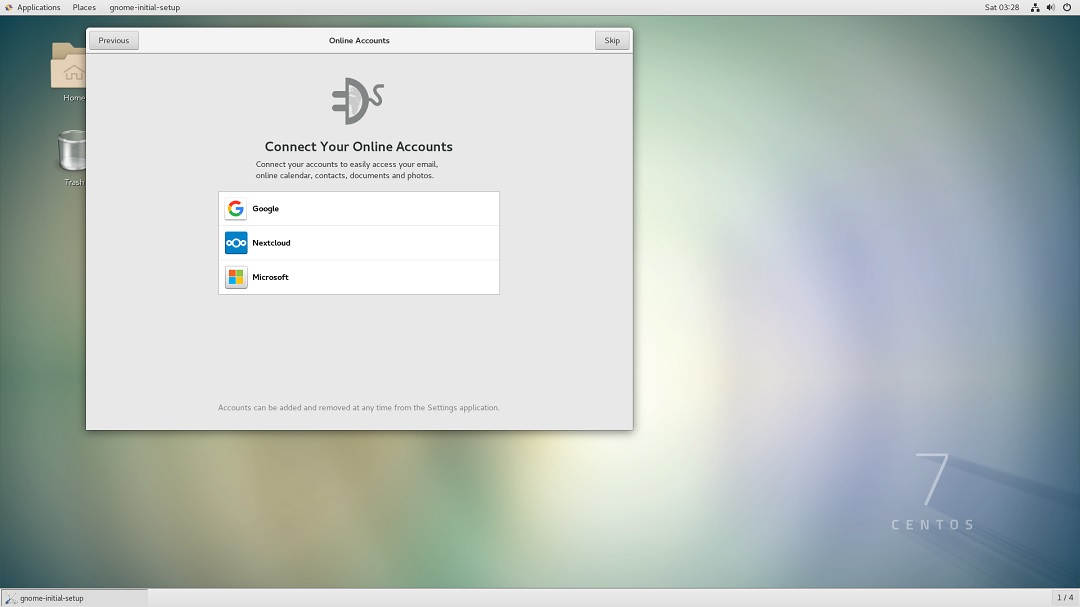
CemtOS installation – welcome screen – connect your online account
Step 17- CentOS – Welcome screen – All done
That it. Click on start using CentOS.
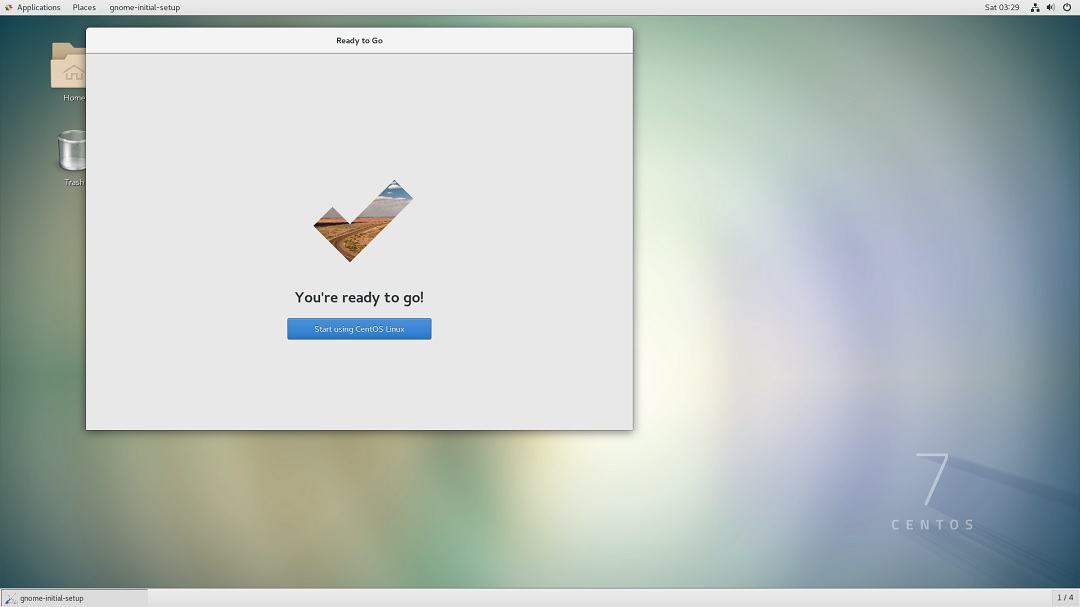
CentOS setup complete
Step 18- CentOS – Network setup
If CentOS is not able to access the internet – Goto Application->Settings->Network