4 Steps to install Anaconda and PyTorch on Windows 10
Hi guys:) Today, I would like to share how to install Anaconda and PyTorch (with/without GPU) in Windows 10 such that you can run different deep learning-based applications. Let’s start!
1. Install Anaconda
The first step is to install Anaconda such that you can create different environments for different applications. Note the different applications may require different libraries. For example, some may require OpenCV 3 and some require OpenCV 4. So, it is better to create different environments for different applications.
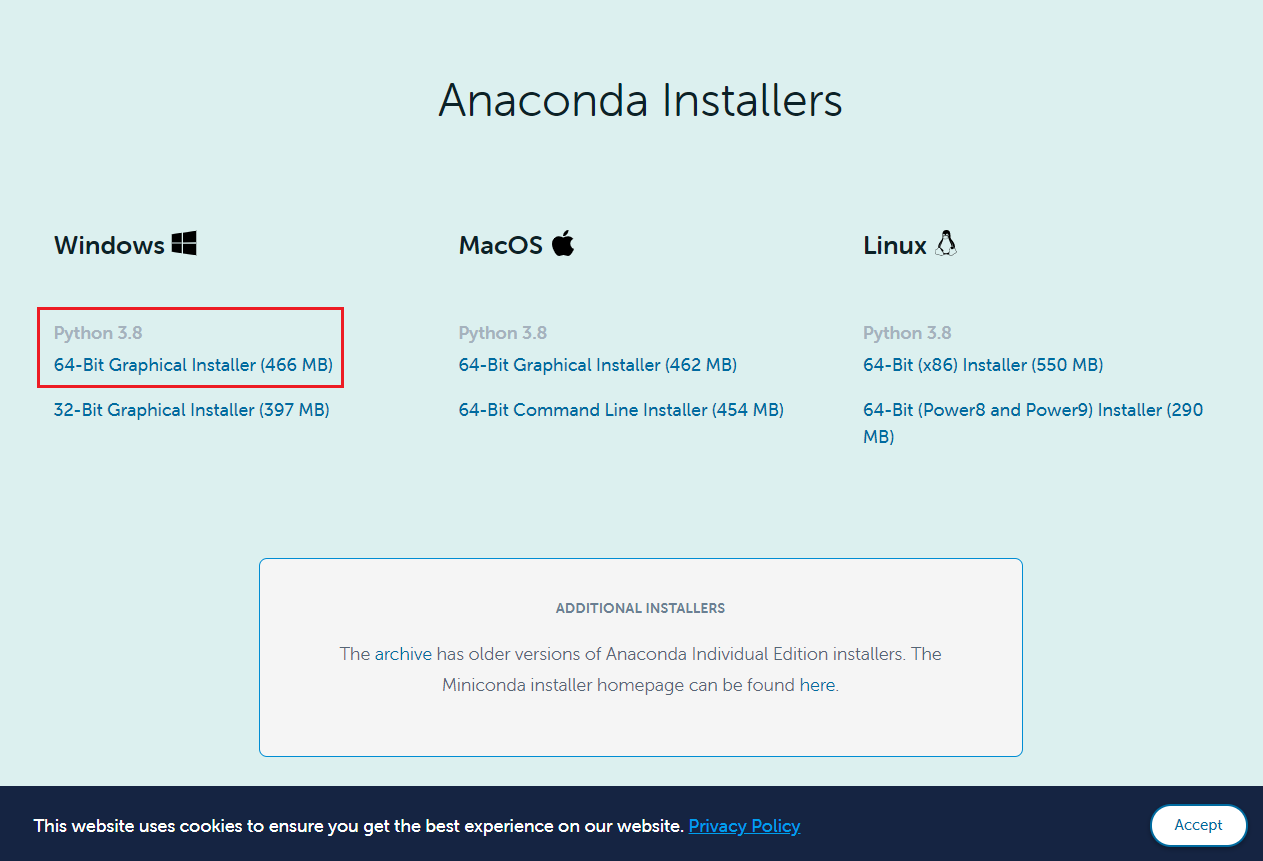
Please click [here] to go to the official website of Anaconda. Then click “Download” as shown below.

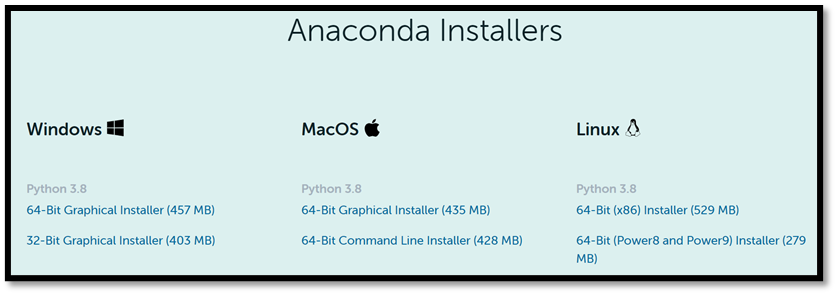
Select the installer based on your OS. Assume that your OS is Windows 10 64-Bit. Figure 2 is an example of selecting the installer.
Start to download the EXE of the installer and then follow the instructions to install Anaconda to your OS. Detailed instructions with screen captures are available at [here].
2. Install CUDA Toolkit (if you have GPU(s))
If you have GPU(s) on your computer and you want to use GPU(s) to speed up your applications, you have to install CUDA Toolkit. Please download CUDA Toolkit [here].
Select your Operating System, Architecture, Version, and Installer Type as shown below.
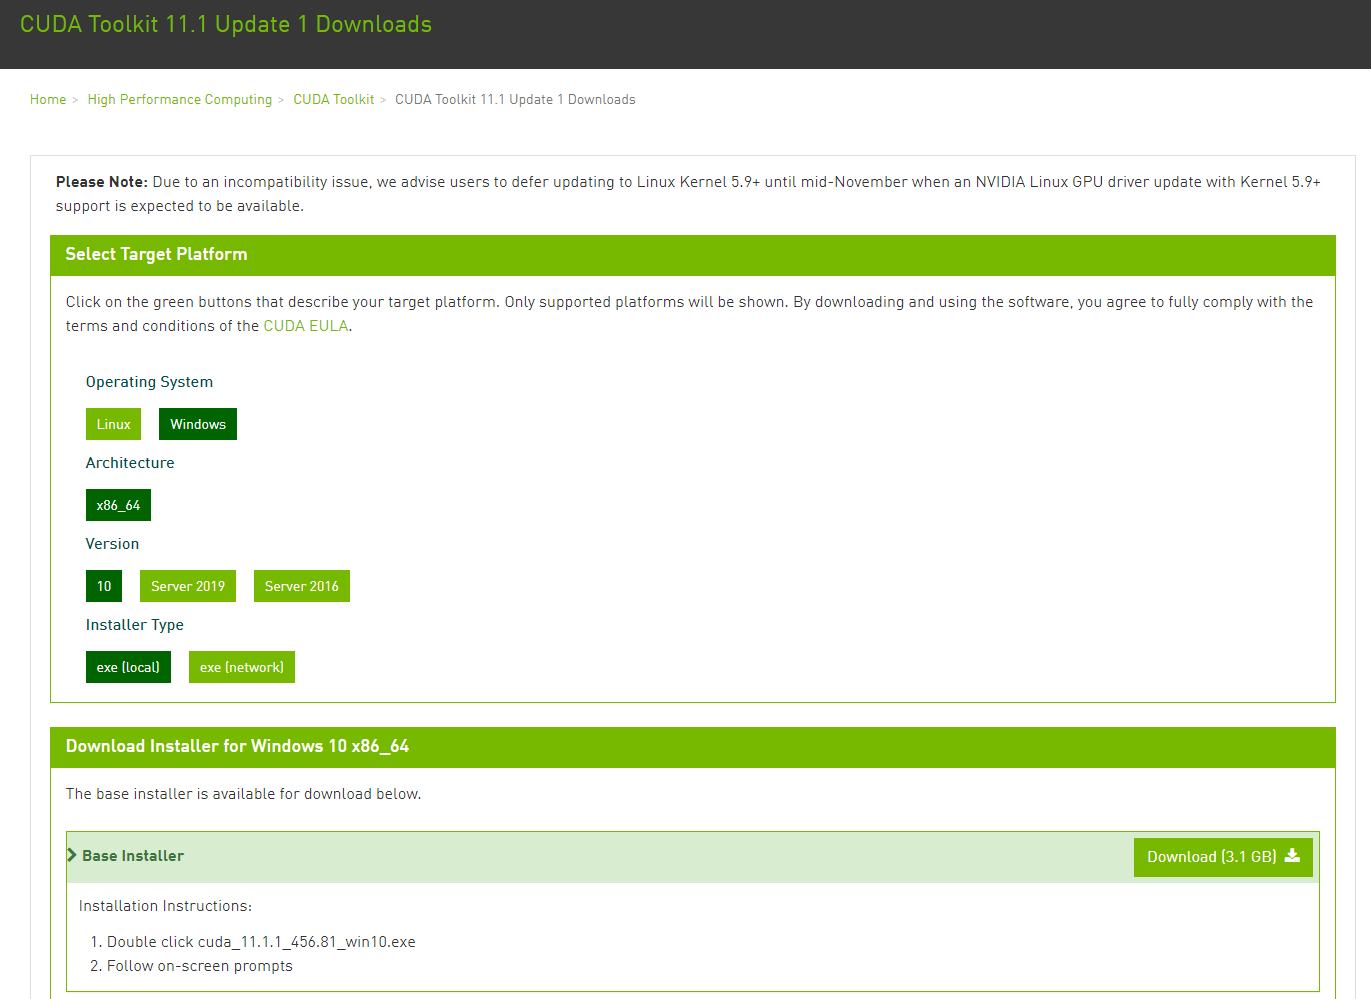
Click the “Download” button as shown in Figure 3 above and then install the CUDA Toolkit. The newest version of CUDA Toolkit is 11.1 at the time of writing this installation guide. Note that you have to check which GPU you are using and which version of CUDA Toolkit is applicable.
3. Create Conda environment for PyTorch
If you have finished Step 1 and 2, you have successfully installed Anaconda and CUDA Toolkit to your OS.
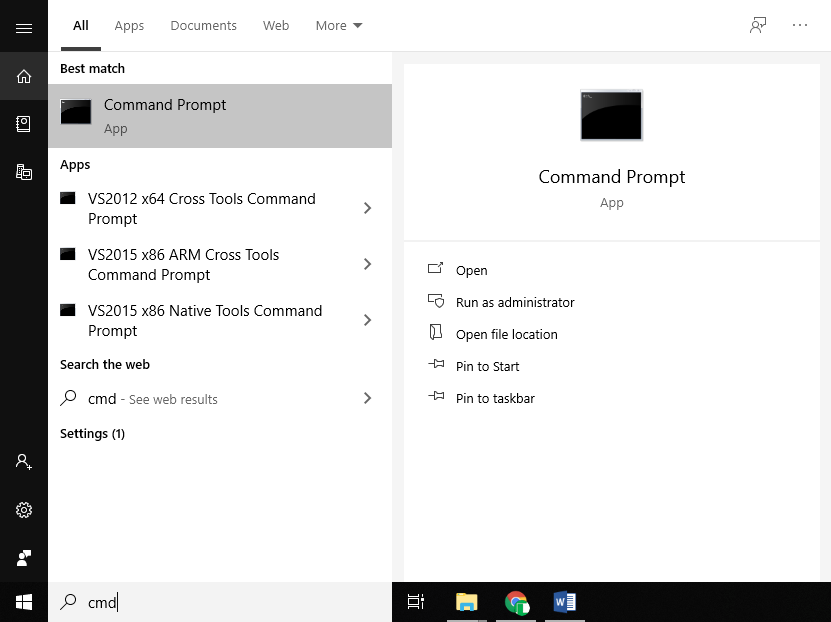
Please open your Command Prompt by searching ‘cmd’ as shown below.
Then, type the following line to your cmd
conda create -n ailab python=3.7
By typing this line, you are creating a Conda environment called ‘ailab’
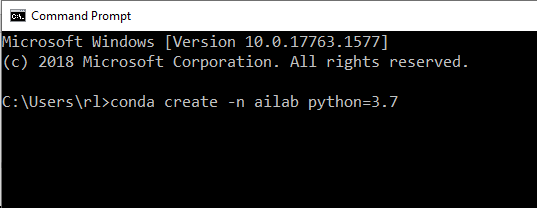
Figure 5 shows an example of typing the above line to the cmd.
You should see the following, please type ‘y’ to continue the creation. Note that you may need to wait for a few minutes.
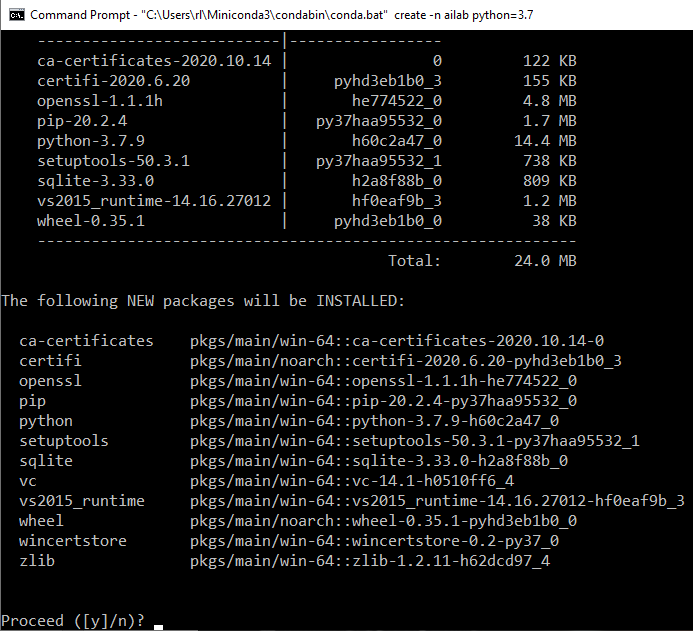
After finishing the creation, type the following line to activate your conda environment ‘ailab’
conda activate ailab
You should see something like the below.
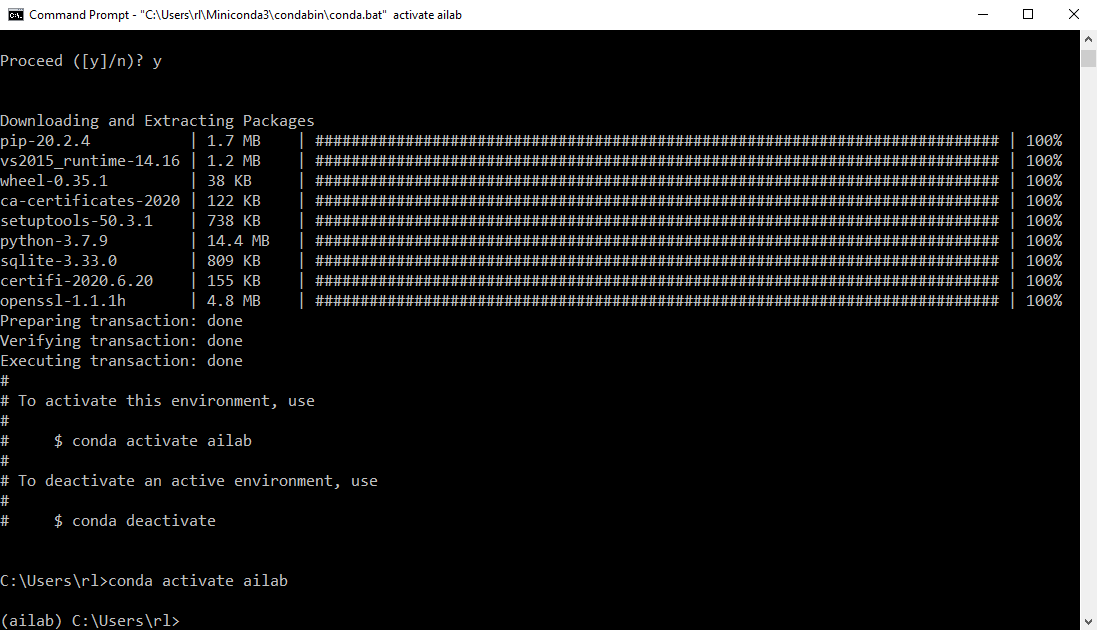
Now, you are inside your Conda environment ‘ailab’. You can install the necessary libraries for deep learning-based applications.
Type the following lines one-by-one (# represents the explanation for the code below),
# install PyTorch and Torchvision libraries with CUDA Toolkit version 11
conda install pytorch torchvision torchaudio cudatoolkit=11.0 -c pytorch
# install Pandas library for handling dataframe, csv data, etc.
pip install pandas
# install matplotlib library for plotting training and testing curves
pip install matplotlib
# install OpenCV library for image pre/post-processing
conda install -c conda-forge opencv
# install Pillow library for reading and writing images
conda install -c anaconda pillow
4. Verify your installation
Here, we are going to verify the installation.
To check the installation of PyTorch with/without GPU(s) available, type the following three lines:
If GPU(s) is/are available for the PyTorch platform, it returns True else False as shown below.

In the above case, we do not have a GPU, hence it returns False.
Congrats
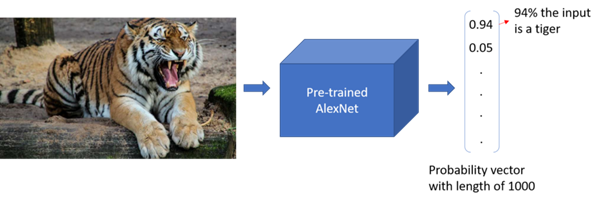
Now, you can try to run different deep learning-based applications on your computer. You may try a simple direct use of a pre-trained AlexNet for Image Classification [here]. Hope you guys find this post useful:)
Thanks for reading my post. If you have any questions, please feel free to send me an email or leave comments here. I am happy to hear from you and any suggestions are welcome. Hope to see you next time! 🙂
Get Started
Select preferences and run the command to install PyTorch locally, or get started quickly with one of the supported cloud platforms.
Start Locally
Select your preferences and run the install command. Stable represents the most currently tested and supported version of PyTorch. This should be suitable for many users. Preview is available if you want the latest, not fully tested and supported, 1.12 builds that are generated nightly. Please ensure that you have met the prerequisites below (e.g., numpy), depending on your package manager. Anaconda is our recommended package manager since it installs all dependencies. You can also install previous versions of PyTorch. Note that LibTorch is only available for C++.
Additional support or warranty for some PyTorch Stable and LTS binaries are available through the PyTorch Enterprise Support Program.
Installing on macOS
PyTorch can be installed and used on macOS. Depending on your system and GPU capabilities, your experience with PyTorch on a Mac may vary in terms of processing time.
Prerequisites
macOS Version
PyTorch is supported on macOS 10.15 (Catalina) or above.
Python
It is recommended that you use Python 3.7 or greater, which can be installed either through the Anaconda package manager (see below), Homebrew, or the Python website.
Package Manager
To install the PyTorch binaries, you will need to use one of two supported package managers: Anaconda or pip. Anaconda is the recommended package manager as it will provide you all of the PyTorch dependencies in one, sandboxed install, including Python.
Anaconda
To install Anaconda, you can download graphical installer or use the command-line installer. If you use the command-line installer, you can right-click on the installer link, select Copy Link Address , or use the following commands on Intel Mac:
or following commands on M1 Mac:
If you installed Python via Homebrew or the Python website, pip was installed with it. If you installed Python 3.x, then you will be using the command pip3 .
Tip: If you want to use just the command pip , instead of pip3 , you can symlink pip to the pip3 binary.
Installation
Anaconda
To install PyTorch via Anaconda, use the following conda command:
To install PyTorch via pip, use one of the following two commands, depending on your Python version:
Verification
To ensure that PyTorch was installed correctly, we can verify the installation by running sample PyTorch code. Here we will construct a randomly initialized tensor.
The output should be something similar to:
Building from source
For the majority of PyTorch users, installing from a pre-built binary via a package manager will provide the best experience. However, there are times when you may want to install the bleeding edge PyTorch code, whether for testing or actual development on the PyTorch core. To install the latest PyTorch code, you will need to build PyTorch from source.
Prerequisites
- [Optional] Install Anaconda
- Follow the steps described here: https://github.com/pytorch/pytorch#from-source
You can verify the installation as described above.
Installing on Linux
PyTorch can be installed and used on various Linux distributions. Depending on your system and compute requirements, your experience with PyTorch on Linux may vary in terms of processing time. It is recommended, but not required, that your Linux system has an NVIDIA GPU in order to harness the full power of PyTorch’s CUDA support..
Prerequisites
Supported Linux Distributions
PyTorch is supported on Linux distributions that use glibc >= v2.17, which include the following:
-
, minimum version 2012-07-15 , minimum version 7.3-1611 , minimum version 8.0 , minimum version 24 , minimum version 14 , minimum version 42.1 , minimum version 2014.7 , minimum version 14.2 , minimum version 13.04
The install instructions here will generally apply to all supported Linux distributions. An example difference is that your distribution may support yum instead of apt . The specific examples shown were run on an Ubuntu 18.04 machine.
Python
Python 3.7 or greater is generally installed by default on any of our supported Linux distributions, which meets our recommendation.
Tip: By default, you will have to use the command python3 to run Python. If you want to use just the command python , instead of python3 , you can symlink python to the python3 binary.
However, if you want to install another version, there are multiple ways:
If you decide to use APT, you can run the following command to install it:
It is recommended that you use Python 3.6, 3.7 or 3.8, which can be installed via any of the mechanisms above .
If you use Anaconda to install PyTorch, it will install a sandboxed version of Python that will be used for running PyTorch applications.
Package Manager
To install the PyTorch binaries, you will need to use one of two supported package managers: Anaconda or pip. Anaconda is the recommended package manager as it will provide you all of the PyTorch dependencies in one, sandboxed install, including Python.
Anaconda
To install Anaconda, you will use the command-line installer. Right-click on the 64-bit installer link, select Copy Link Location , and then use the following commands:
You may have to open a new terminal or re-source your
/.bashrc to get access to the conda command.
While Python 3.x is installed by default on Linux, pip is not installed by default.
Tip: If you want to use just the command pip , instead of pip3 , you can symlink pip to the pip3 binary.
Installation
Anaconda
No CUDA
To install PyTorch via Anaconda, and do not have a CUDA-capable system or do not require CUDA, in the above selector, choose OS: Linux, Package: Conda and CUDA: None. Then, run the command that is presented to you.
With CUDA
To install PyTorch via Anaconda, and you do have a CUDA-capable system, in the above selector, choose OS: Linux, Package: Conda and the CUDA version suited to your machine. Often, the latest CUDA version is better. Then, run the command that is presented to you.
No CUDA
To install PyTorch via pip, and do not have a CUDA-capable system or do not require CUDA, in the above selector, choose OS: Linux, Package: Pip and CUDA: None. Then, run the command that is presented to you.
With CUDA
To install PyTorch via pip, and do have a CUDA-capable system, in the above selector, choose OS: Linux, Package: Pip and the CUDA version suited to your machine. Often, the latest CUDA version is better. Then, run the command that is presented to you.
Verification
To ensure that PyTorch was installed correctly, we can verify the installation by running sample PyTorch code. Here we will construct a randomly initialized tensor.
The output should be something similar to:
Additionally, to check if your GPU driver and CUDA is enabled and accessible by PyTorch, run the following commands to return whether or not the CUDA driver is enabled:
Building from source
For the majority of PyTorch users, installing from a pre-built binary via a package manager will provide the best experience. However, there are times when you may want to install the bleeding edge PyTorch code, whether for testing or actual development on the PyTorch core. To install the latest PyTorch code, you will need to build PyTorch from source.
Prerequisites
- Install Anaconda
- Install CUDA, if your machine has a CUDA-enabled GPU.
- Follow the steps described here: https://github.com/pytorch/pytorch#from-source
You can verify the installation as described above.
Installing on Windows
PyTorch can be installed and used on various Windows distributions. Depending on your system and compute requirements, your experience with PyTorch on Windows may vary in terms of processing time. It is recommended, but not required, that your Windows system has an NVIDIA GPU in order to harness the full power of PyTorch’s CUDA support.
Prerequisites
Supported Windows Distributions
PyTorch is supported on the following Windows distributions:
-
7 and greater; Windows 10 or greater recommended. r2 and greater
The install instructions here will generally apply to all supported Windows distributions. The specific examples shown will be run on a Windows 10 Enterprise machine
Python
Currently, PyTorch on Windows only supports Python 3.7-3.9; Python 2.x is not supported.
As it is not installed by default on Windows, there are multiple ways to install Python:
If you use Anaconda to install PyTorch, it will install a sandboxed version of Python that will be used for running PyTorch applications.
If you decide to use Chocolatey, and haven’t installed Chocolatey yet, ensure that you are running your command prompt as an administrator.
For a Chocolatey-based install, run the following command in an administrative command prompt:
Package Manager
To install the PyTorch binaries, you will need to use at least one of two supported package managers: Anaconda and pip. Anaconda is the recommended package manager as it will provide you all of the PyTorch dependencies in one, sandboxed install, including Python and pip.
Anaconda
To install Anaconda, you will use the 64-bit graphical installer for PyTorch 3.x. Click on the installer link and select Run . Anaconda will download and the installer prompt will be presented to you. The default options are generally sane.
If you installed Python by any of the recommended ways above, pip will have already been installed for you.
Installation
Anaconda
To install PyTorch with Anaconda, you will need to open an Anaconda prompt via Start | Anaconda3 | Anaconda Prompt .
No CUDA
To install PyTorch via Anaconda, and do not have a CUDA-capable system or do not require CUDA, in the above selector, choose OS: Windows, Package: Conda and CUDA: None. Then, run the command that is presented to you.
With CUDA
To install PyTorch via Anaconda, and you do have a CUDA-capable system, in the above selector, choose OS: Windows, Package: Conda and the CUDA version suited to your machine. Often, the latest CUDA version is better. Then, run the command that is presented to you.
No CUDA
To install PyTorch via pip, and do not have a CUDA-capable system or do not require CUDA, in the above selector, choose OS: Windows, Package: Pip and CUDA: None. Then, run the command that is presented to you.
With CUDA
To install PyTorch via pip, and do have a CUDA-capable system, in the above selector, choose OS: Windows, Package: Pip and the CUDA version suited to your machine. Often, the latest CUDA version is better. Then, run the command that is presented to you.
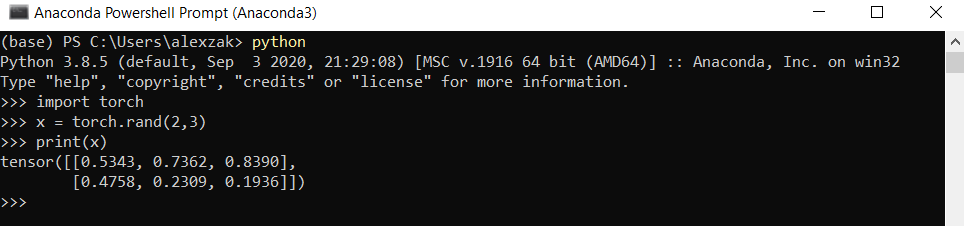
Verification
To ensure that PyTorch was installed correctly, we can verify the installation by running sample PyTorch code. Here we will construct a randomly initialized tensor.
From the command line, type:
then enter the following code:
The output should be something similar to:
Additionally, to check if your GPU driver and CUDA is enabled and accessible by PyTorch, run the following commands to return whether or not the CUDA driver is enabled:
Building from source
For the majority of PyTorch users, installing from a pre-built binary via a package manager will provide the best experience. However, there are times when you may want to install the bleeding edge PyTorch code, whether for testing or actual development on the PyTorch core. To install the latest PyTorch code, you will need to build PyTorch from source.
Установка и настройка PyTorch на компьютере
На предыдущем этапе работы с этим учебником мы обсуждали основы PyTorch и предварительные требования, которые нужно выполнить, чтобы иметь возможность использовать эту библиотеку при создании модели машинного обучения. Выполняя действия этой статьи, мы установим ее на вашем компьютере.
Получение PyTorch
Во-первых, необходимо настроить среду Python.
Мы рекомендуем настроить виртуальную среду Python в Windows, используя в качестве диспетчера пакетов платформу Anaconda. Далее в командах установки предполагается, что вы используете среду Anaconda.
-
. Выберите Anaconda 64-bit installer for Windows Python 3.8 .
Не забудьте установить Python 3.x. В настоящее время PyTorch в Windows поддерживает только Python 3.x; Python 2.x не поддерживается.
После завершения установки проверьте версии Anaconda и Python.
- Откройте диспетчер Anaconda, перейдя к разделу «Start (Запуск) — Anaconda3 — Anaconda PowerShell Prompt», и протестируйте свои версии:
Проверить версию Python можно с помощью следующей команды: python –-version
Проверить версию Anaconda можно с помощью следующей команды: conda –-version
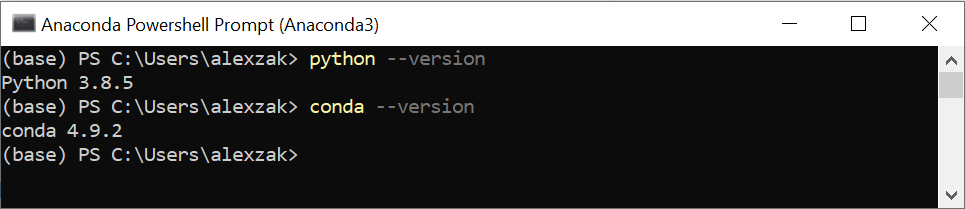
Теперь вы можете установить пакет PyTorch из двоичных файлов с помощью Conda.
- Перейдите к https://pytorch.org/.
Выберите соответствующие сведения об установке PyTorch:
- Сборка PyTorch — стабильная.
- Ваша ОС — Windows
- Пакет — Conda
- Язык — Python
- Платформа вычислений — ЦП или выберите свою версию Cuda. Выполняя действия в этом учебнике, вы будете обучать и выводить модель на ЦП, но вы также можете использовать графический процессор Nvidia.
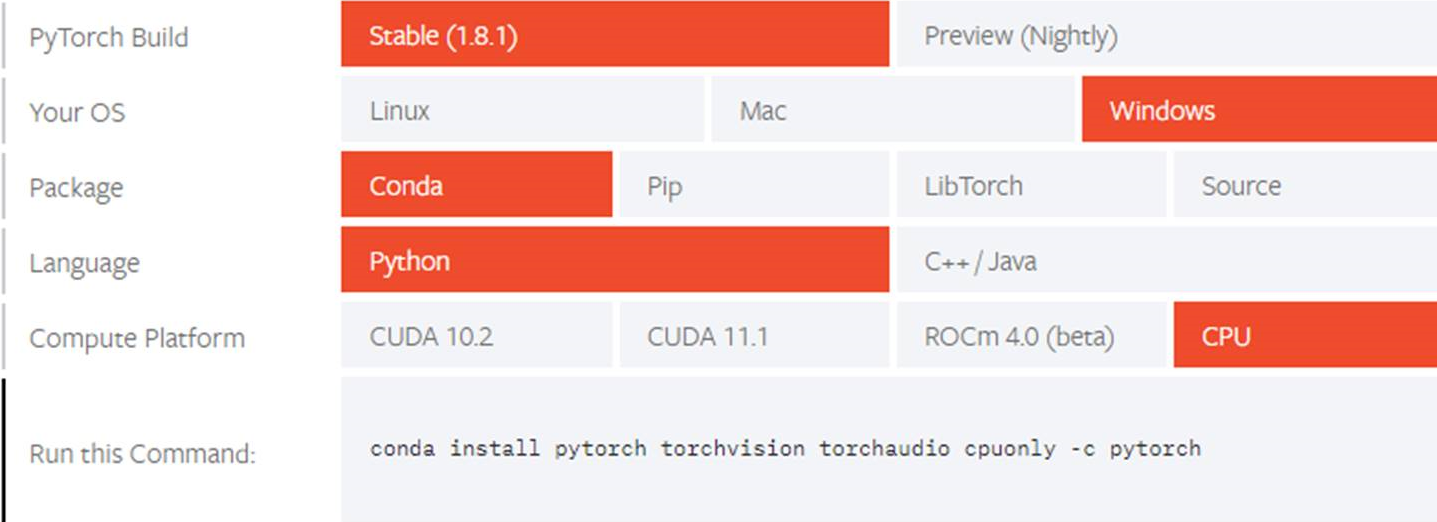
- Откройте диспетчер Anaconda и выполните команду, как указано в инструкциях по установке.
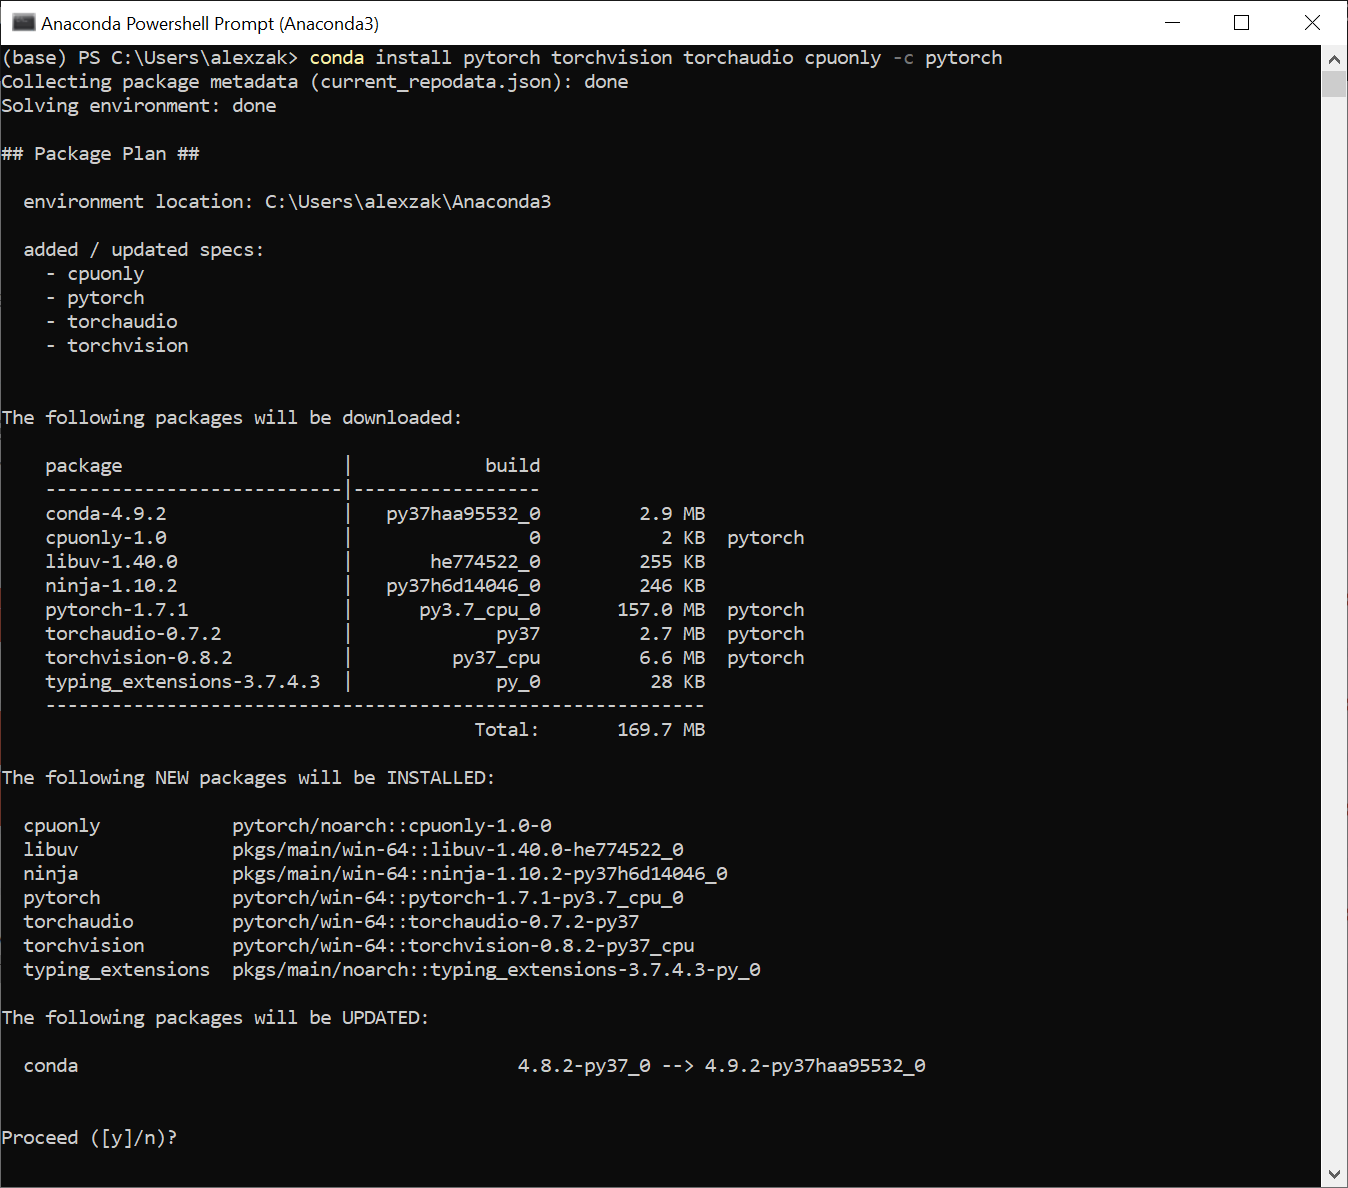
- Подтвердите и завершите извлечение необходимых пакетов.
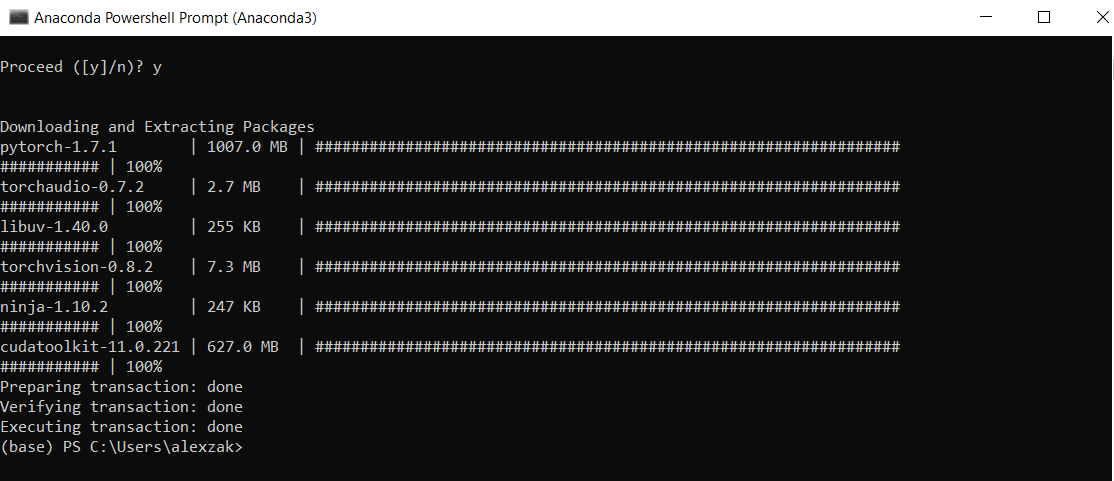
Давайте проверим установку PyTorch, выполнив пример кода PyTorch для создания случайно инициализированного тензора.
- Откройте Anaconda PowerShell Prompt и выполните следующую команду.
Затем введите следующий код:
В качестве вывода должен отображатся случайный тензор 5×3. Числа будут отличаться, однако результат должен выглядеть примерно так, как показано ниже.
Next Steps
Теперь, установив PyTorch, мы можем перейти к настройке данных для нашей модели.