Настройка проекта C++ в Eclipse на примере приложения SFML
Eclipse CDT — интегрированная среда разработки С и C++ на базе платформы Eclipse.
MinGW — компилятор, нативный программный порт GNU Compiler Collection (GCC) под Microsoft Windows, вместе с набором свободно распространяемых библиотек импорта и заголовочных файлов для Windows API. MinGW позволяет разработчикам создавать нативные приложения Microsoft Windows.
SFML — свободная кроссплатформенная мультимедийная библиотека, написана на C++.
Установка Eclipse и MinGW
Для работы Eclipse требуется Java.
Скачиваем Eclipse CDT с официального сайта и распаковываем в любое удобное место, например C:\eclipse . Запускаем eclipse.exe , если все заработало, прекрасно.
Далее качаем установщик MinGW. Запускаем его. Видим окно с описанием, нажимаем Install . Если нужно меняем место установки и нажимаем Continue .
Отмечаем для установки mingw-32-base и mingw-gcc-g++.

После этого нажимаем Installation -> Apply Changes. На открывшемся окне жмем Apply и ждем пока загрузятся и установятся компоненты. Когда установка закончена, качаем msys. Думаю при установке сложностей не возникнет. Теперь нужно добавить в системную переменную Path путь к папке bin MinGW, и к папке bin msys.
У меня получилось так: d:\MinGW\bin\;d:\msys\1.0\bin\
Качаем SFML MinGW, и распаковываем куда угодно.
На этом подготовка окончена.
Создание и настройка проекта C++
Запускаем Eclipse, нажимаем File -> New -> C++ Project. Создаем проект Hello World и выбираем MinGW как на картинке.
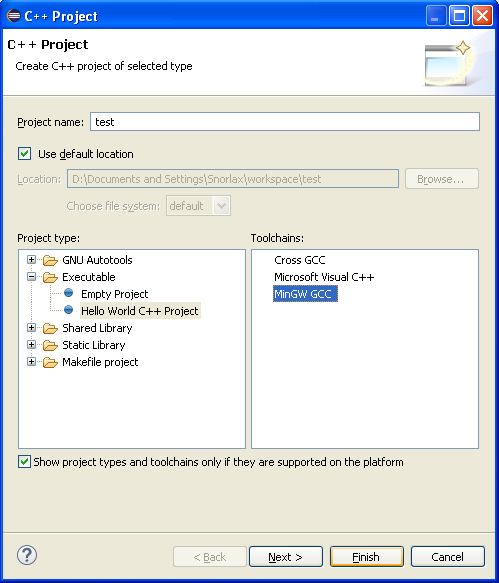
Далее ПКМ на созданном проекте -> Properties, открываем C/C++ Build -> Settings -> Tool Setting -> GCC C++ Compiler -> Includes.
1. Нажимаем Add.
2. Выбираем папку includes из директории, куда мы распаковали SFML.

После этого переходим на пункт Preprocessor и в Defined Symbols добавляем SFML_DYNAMIC.
Вот мы подошли к моменту где я получил первую ошибку. Если подключить библиотеку с расширением .a через MinGW C++ Linker -> Libraries, ничего работать не будет. Эти библиотеки нужно подключать через MinGW C++ Linker -> Miscellaneous как Other Object. Указываем путь к библиотекам SFML, нужно подключить libsfml-graphics.a, libsfml-window.a, libsfml-main.a

Построение проекта
Заменяем весь код в автоматически созданном .cpp на этот:
Нажимаем Build 
Все соберется успешно но работать не будет, так как отсутствуют dll. Копируем все из папки bin в директории SFML в папку Debug нашего проекта.
Теперь жмем ПКМ на .exe файле, который расположен в папке Debug нашего проекта, выбираем Run As -> Run Configurations, жмем C/C++ Application и нажимаем New launch configuration, после этого нажимаем Run ничего не меняя.

После этого запускать проект можно с помощью Ctrl + F11 или соответствующей иконкой на тулбаре.
How to compile and run C++ with MinGW using Eclipse and CDT?
I would like to do some C++ development on Windows using Eclipse and the CDT plugin. I use Eclipse Helios SR1 and have installed the CDT plugin. I have also installed MinGW and now I wrote a simple «Hello World» in Eclipse.
In Eclipse using the CDT plugin and the MinGW compiler. How can I compile my program? And how can I test run the program from within Eclipse?
5 Answers 5

After browsing many threads and articles I’ve found a solution. Solution tested on Windows 10 x64 on Eclipse Neon.3 Release (4.6.3) with C/C++ Development Tools 9.2.1.201704050430 and MinGW
System configuration
- Download MinGW. Any distro might work. I used the distro recommended on http://isocpp.org/
- Extract archive into C:\MinGW (actually to C:\ , because archive contains folder MinGW )
- RMB on This PC -> Properties -> Additional system settings -> Tab Advanced -> Button Environment variables
- On second table System variables click New . Name variable MINGW_HOME and set path to MinGW install folder C:\MinGW and then OK
- Find variable Path in table and choose Edit
- In new window click New and type %MINGW_HOME%\bin\
- Confirm actions by clickig OK in opened windows
- You can check availability of new tools by typing in command line g++ —version You should see something like
g++ (GCC) 6.3.0 Copyright (C) 2016 Free Software Foundation, Inc. This is free software; see the source for copying conditions. There is NO warranty; not even for MERCHANTABILITY or FITNESS FOR A PARTICULAR PURPOSE.
Eclipse CDT configuration
- Install Eclipse with CDT or just add CDT to existing Eclipse installation
- Go to the folder with installed MinGW ( C:\MinGW\bin\ ). Make a copy of file gcc.exe (DO NOT RENAME original file!)
- Rename copied filed to mingw32-gcc.exe (You should have both files gcc.exe and mingw32-gcc.exe in \MinGW\bin\ )
- Open Eclipse and select C\C++ perspective
- Go to Window -> Preferences -> C\C++ -> Build -> Environment
- Click Add and type PATH as name and click on Variables and select Path . Confirm with Ok .
- Select new variable PATH by clicking Select and then Ok .
- Restart Eclipse
Now you should be able to compile Hello World program. Just select New -> C++ Project . Here you should see available MinGW as Toolchain
Configuration
Currently, I’m updated my configuration, so I’m able to write about a second working tool chain.
Eclipse-3.2, CDT-3.1 & MinGW-3.1.0-1.exe
First and the older version:
- OS: WinXP Professional SP2
- MingW: MinGW-3.1.0-1.exe (
Eclipse-3.3.2, CDT-4.0.3 & MinGW-5.1.3
And this is the newest version:
- OS: WinXP Professional SP2
- MingW: MinGW-5.1.3.exe (
Install MinGW
MinGW-3.1.0-1.exe
For installing MinGW-3.1.0-1.exe double click on this file. I installed it on «C:\MinGW\bin». Now you should put the path into the path environment variable. I hope you know how to do this under winXP! Be sure, it’s the only compiler in your path. So if you have installed cygwin and or msys remove these entries from your path. To see if everything is ok, enter at the command prompt: mingw32-make —version. Something like in the next box should appear.
So now everything is okay.
MinGW-5.1.3.exe
Do the same like under MinGW-3.1.0-1.exe. Only if you enter «mingw32-make —version», another version should be prompted.
So now everything is okay.
Install wxWidgets-2.8.x
Installation
This part is more interesting as the section about MinGW. First, if you haven’t done it already, download wxWidgets-2.8.x.tar.bz2. I unpacked it and moved the unpacked directory to «C:\wxWidgets-2.8.x». Now let’s open the command prompt and go to «c:\wxWidgets-2.8.x\build\msw». To compile wxWidgets with MSW you have to enter:
Note: This might take quite a while (circa 10-30 minutes).
As of January 30, 2008 this does not quite work. makefile.gcc makes directories and deletes files and than errors on «/usr/bin/sh -c». To do a build with MinGW follow the instructions here: Compiling wxWidgets with MSYS-MinGW. However, TDM’s MinGW Installer (tested with version 1.902.0) plays very nicely with wxWidgets-2.8.9 and compilation works till the end (tried March 3, 2009).
At this point, wxWidgets should be compiled and the libraries will be at «C:\wxWidgets-2.8.x\lib\gcc_lib\mswud». The last directory name shows you that it is compiled with UNICODE and DEBUG options. To compile RELEASE libraries you have to enter the same like above but change the BUILD-option.
While compilation, following libraries are created inside the «C:\wxWidgets-2.8.x\lib\gcc_lib» directory:
- libwxbase28ud.a
- libwxbase28ud_net.a
- libwxbase28ud_odbc.a
- libwxbase28ud_xml.a
- libwextpatd.a
- libwxjpegd.a
- libwxmsw28ud_adv.a
- libwxmsw28ud_aui.a
- libwxmsw28ud_core.a
- libwxmsw28ud_dbgrid.a
- libwxmsw28ud_html.a
- libwxmsw28ud_media.a
- libwxmsw28ud_richtext.a
- libwxmsw28ud_xrc.a
- libwxpngd.a
- libwxtiffd.a
- libwxzlibd.a
BUILD=release
- libwxbase28u.a
- libwxbase28u_net.a
- libwxbase28u_odbc.a
- libwxbase28u_xml.a
- libwextpat.a
- libwxjpeg.a
- libwxmsw28u_adv.a
- libwxmsw28u_aui.a
- libwxmsw28u_core.a
- libwxmsw28u_dbgrid.a
- libwxmsw28u_html.a
- libwxmsw28u_media.a
- libwxmsw28u_richtext.a
- libwxmsw28u_xrc.a
- libwxpng.a
- libwxtiff.a
- libwxzlib.a
Two more directories are created, one named «mswud» and the other one named «mswu»
For testing, go to a sample directory e.g. (in my case) «c:\wxWidgets-2.8.x\samples\minimal» and compile it with the same options as you compiled the wxWidgets.
If you don’t do that, the libraries won’t be found!
Download, install & config Eclipse/CDT
Let’s download, install and config Eclipse and CDT.
Because I’m using now the newer version of Eclipse and this is quite changed at some positions compared to version 3.2.x. Following numbers will help to differ between this versions:
- Eclipse-3.2.x: 3.2
- Eclipse-3.3.x: 3.3
The entry point for the CDT-Project on the eclipse homepage is CDT — Eclipse .
Download
3.2 Download Eclipse version 3.2.x (about 120MB for Windows) or
3.3 Download Eclipse/CDT version 3.3.x (about 60MB for Windows and only C/C++ developers)
Installation
The downloaded file should be a *.zip file, so installation must be done without windows installer. But in the case of eclipse, this is really very easy. Unzip the file. Make a copy of the new directory which has the same name like before but without zip ending. I put it to c:\Programme\ and renamed it to eclipse only. So the complete path is c:\Programme\eclipse. Inside this directory an eclipse.exe exists, which is the application we will configure. Make a shortcut on your desktop or in your quick launch bar.
To install CDT I hope you have minimal experience with eclipse. Go to Help — Software Updates — Find & Install. . Now choose Search for new features to install. Than click on New Remote Site. and enter «http://download.eclipse.org/tools/cdt/releases/callisto». So this will install CDT in your eclipse installation. I installed CDT-3.1.1, please do the same to be as sure as possible that the same configuration will work.
Configure Eclipse
To configure eclipse we must — of course — start eclipse first. During startup the workspace launcher will appear on the screen. Define whatever you want. When the startup of eclipse is finished we need to change to the c++ perspective. So click in eclipse on Window/Open Perspective/Other. . Chose c++ and click on ok. The appearance will change to the c++ perspective.
Now let’s create a new project. Click on File/New/Managed Make C++ Project. A New Project dialog should be now on the screen. Enter the project name, in this example minimal to see if we can compile the minimal sample of the wxWidgets source. Now you can change the workspace location for this project if you like. In my case I changed the location to «U:\Daten\programming\wxWidgets\minimalWidget». Click Next. Project Type should be «Executable (Gnu on Windows)» and in the configurations section chose (if isn’t already done) both, means Debug and Release. Click again on Next. Now you can click without any change on Finish.
Debug configuration
Now we will check which configuration is currently active. For this, click on «Project/Active Build Configuration/». Please be sure the debug configuration is active. If you have done this part click on the created project to mark the name minimal. Than a right-click with the mouse and chose «Properties». Now the «Properties for minimal» dialog will open on the screen.
Please click on C/C++ Build. In the Active configuration Debug should be visible, if not change it to Debug. For the next step, go to the Environment tab and under Environment variables the Configuration tab should be activated. Click on New to create a new User Variables. Enter PATH. Now your complete system path should appear in the Value field. Delete everything excepting the path to your MinGW installation e.g. «C:\MinGW\bin». Delimiter should be ; and in the field Operation chose Replace. Click on OK.
Now go to the Tool Settings tab. In the GCC C++ Compiler section click on Preprocessor (attention: in CDT 3.1.2 you will find the symbols under the seperate option Symbols, directly under Preprocessor). Add to Defined symbols (-D) __WXMSW__ (attention, please make 2 underscores before AND after WXMSW), __WXDEBUG__ and _UNICODE (only one underscore and of course only if you have compiles the libraries with unicode support). Than you can change to Directories. Add to Include paths (-I) «C:\wxWidgets-2.8.0\lib\gcc_lib\mswud» (in my case. ), «C:\wxWidgets-2.8.0\include» and «C:\wxWidgets-2.8.0\contrib\include». Now you can change to Miscellaneous and enter in the field Other flags -c -Wundef -Wno-ctor-dtor-privacy -fno-strict-aliasing.
Now make a jump to the «GCC C++ Linker» section. Click on «Libraries». Enter the libraries in the following order:
- wxmsw28ud_xrc
- wxmsw28ud_richtext
- wxbase28ud_net
- wxmsw28ud_dbgrid
- wxbase28ud_odbc
- wxmsw28ud_media
- wxmsw28ud_aui
- wxmsw28ud_html
- wxmsw28ud_adv
- wxbase28ud_xml
- wxmsw28ud_core
- wxbase28ud
- wxtiffd
- wxjpegd
- wxpngd
- wxzlibd
- wxregexud
- wxexpatd
- kernel32
- user32
- gdi32
- comdlg32
- winspool
- winmm
- shell32
- comctl32
- ole32
- oleaut32
- uuid
- rpcrt4
- advapi32
- wsock32
- odbc32
Add to «Library search path (-L)» (again in my case. ) «C:/wxWidgets-2.8.0/lib/gcc_lib» and «C:/wxWidgets-2.8.0/lib». Now the last change, click on «Miscellaneous» and enter in the field «Linker flags» -Wl,—subsystem,windows -mwindows. Click on Apply.
And last but not least, go to «Build Settings» tab, uncheck «Use default command», and enter new build command as «mingw32-make -f makefile». This will have Eclipse use mingw32-make rather than make command. That’s it, click on Apply and then on OK.
That’s all. Let’s go and enjoy!
Test the debug configuration
To test this configuration, I copied the minimal.cpp, minimal.rc, sample.ico into my project workspace. Press F5 will update the screen (maybe you have to press F5 several times, eclipse isn’t very fast!!) and the files should be visible under the minimal directory. Mark minimal again and click on «Project/Build Project». BTW, I deactivated the build automatically. Now you should be able to compile and run the debug binary.
Release configuration
Do the same like under Debug configuration. The library names shouldn’t have a d at the end. In the «Preprocessor» section, you don’t have to define __WXDEBUG__. That’s it.
Known problems
If I compile the minimal sample and run the executable in the top left corner, I can’t see the icon. If someone knows how I can change this, please write it to this page. Thanks a lot.