Как установить mongodb на windows 10
Для установки MongoDB загрузим один распространяемых пакетов с официального сайта https://www.mongodb.com/try/download/community.
Официальный сайт предоставляет пакеты дистрибутивов для различных платформ: Windows, Linux, MacOS, Solaris. И каждой платформы доступно несколько дистрибутивов. Причем есть два вида серверов — Community и Enterprise. В данном случае надо установить версию Community. Хотя Enterprise-версия обладает несколько большими возможностями, но она доступна только в триальном режиме или по подписке.
На момент написания данного материала последней версией платформы была версия 5.0 , которая увидела свет в июле 2021 года и для которой постоянно выходят подверсии. Использование конкретной версии может несколько отличаться от применения иных версий платформы MongoDB.
Для загрузки всех необходимых файлов выберем нужную операционную систему и подходящий тип пакета. Рассмотрим на примере установки на ОС Windows.
MongoDB можно загрузить в ряде вариантов. Так, для Windows доступна загрузка установщика msi и также доступна загрузка zip-пакета. В реальности нам достаточно загрузить zip-архив и распаковать в нужной нам папке. Поэтому выберем этот вариант загрузки:
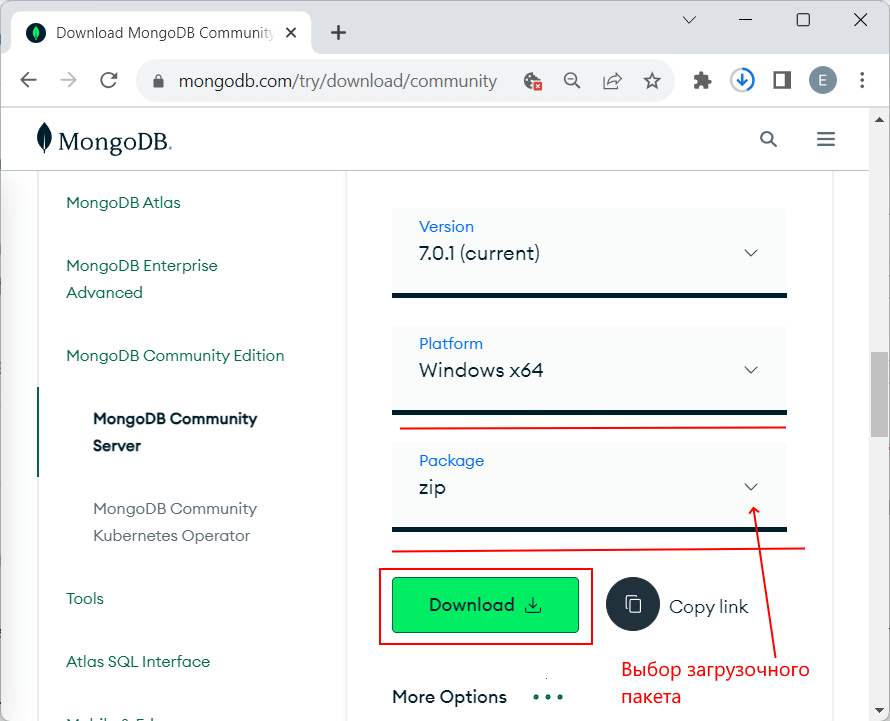
Если до установки уже была установлена более ранняя версия MongoDB, то ее необходимо удалить.
(В случае если на стороне сайта mongodb.com есть ограничения по региональному признаку, можно использовать VPN для входя на сайт или загрузить все необходимые файлы по прямой ссылке, например, ссылка для пакета mongodb 5.0.9 для Windows: https://fastdl.mongodb.org/windows/mongodb-windows-x86_64-5.0.9.zip )
После загрузки архивного пакета распакуем его в папку C:\mongodb .
Содержимое пакета MongoDB
Если после установки мы откроем папку bin в распакованном архиве ( C:\mongodb\bin ), то сможем найти там кучу приложений, которые выполняют определенную роль. Вкратце рассмотрим их.
mongo : представляет консольный интерфейс для взаимодействия с базами данных, своего рода консольный клиент
mongod : сервер баз данных MongoDB. Он обрабатывает запросы, управляет форматом данных и выполняет различные операции в фоновом режиме по управлению базами данных
mongos : служба маршрутизации MongoDB, которая помогает обрабатывать запросы и определять местоположение данных в кластере MongoDB
Создание каталога для БД и запуск MongoDB
После установки надо создать на жестком диске каталог, в котором будут находиться базы данных MongoDB.
В ОС Windows по умолчанию MongoDB хранит базы данных по пути C:\data\db , поэтому, если вы используете Windows, вам надо создать соответствующий каталог.
Если же возникла необходимость использовать какой-то другой путь к файлам, то его можно передать при запуске MongoDB во флаге —dbpath .
Итак, после создания каталога для хранения БД можно запустить сервер MongoDB. Сервер представляет приложение mongod , которое находится в папке bin. Для этого запустим терминал/командную строку и там введем соответствующие команды. Для ОС Windows это будет выглядеть так:
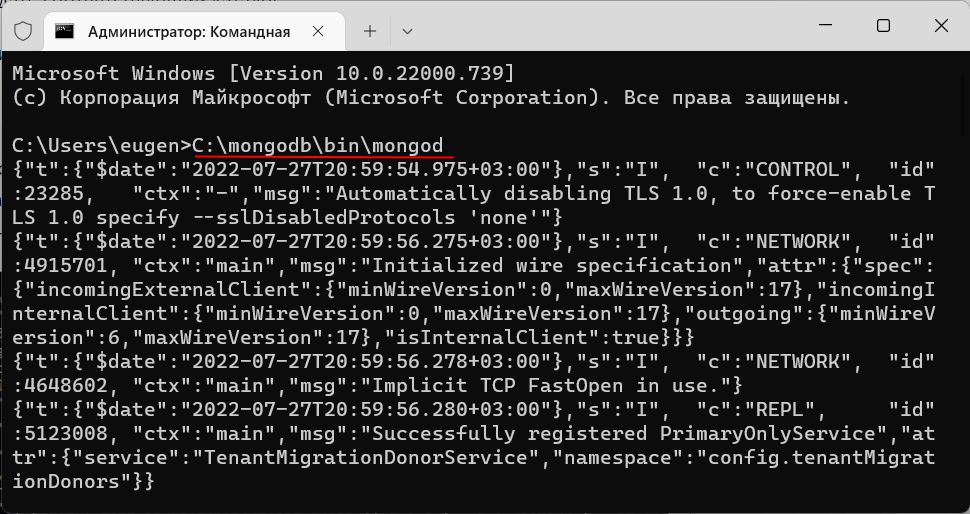
Командная строка отобразит нам ряд служебной информации, например, что сервер запускается на localhost на порту 27017.
И после удачного запуска сервера мы сможем производить операции с бд через оболочку mongo . Эта оболочка представляет файл mongo.exe , который располагается в выше рассмотренной папке установки. Запустим этот файл:
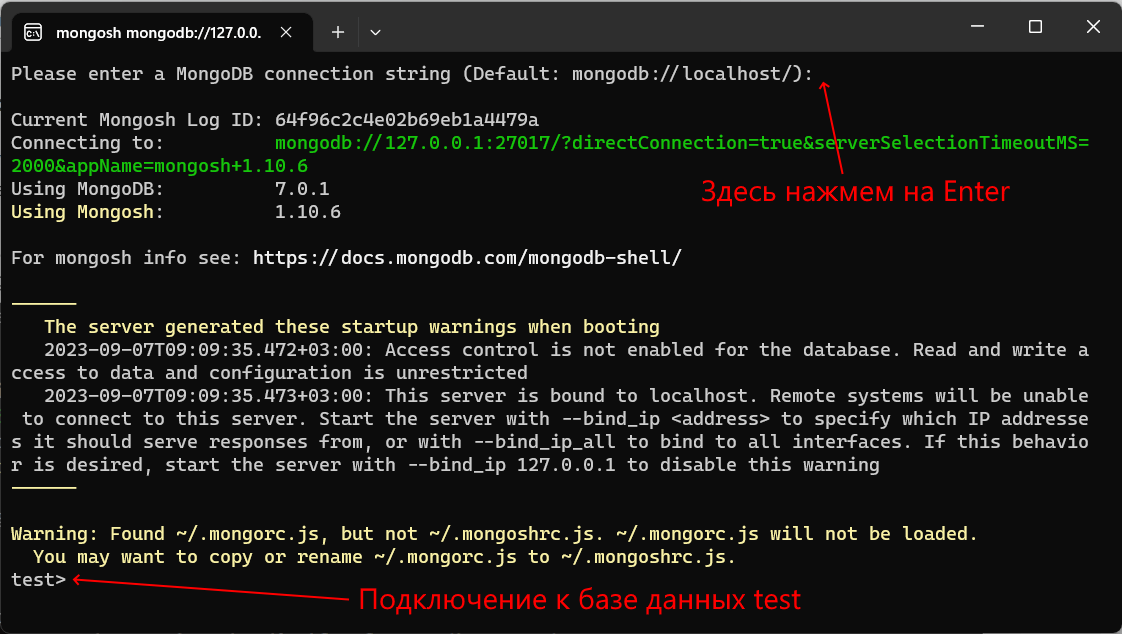
Это консольная оболочка для взаимодействия с сервером, через которую можно управлять данными. Второй строкой эта оболочка говорит о подключении к серверу mongod.
Теперь поизведем какие-либо простейшие действия. Введем в mongo последовательно следующие команды и после каждой команды нажмем на Enter:
Первая команда use test устанавливает в качестве используемой базу данных test. Даже если такой бд нет, то она создается автоматически. И далее db будет представлять текущую базу данных — то есть базу данных test. После db идет users — это коллекция, в которую затем мы добавляем новый объект. Если в SQL нам надо создавать таблицы заранее, то коллекции MongoDB создает самостоятельно при их отсутствии.
С помощью метода db.users.insertOne() в коллекцию users базы данных test добавляется объект < name: "Tom" >. Описание добавляемого объекта определяется в формате, с которым вы возможно знакомы, если имели дело с форматом JSON. То есть в данном случае у объекта определен один ключ «name», которому сопоставляется значение «Tom». То есть мы добавляем пользователя с именем Tom.
Если объект был успешно добавлен, то консоль выведет результат операции, в частности, идентификатор добавленного объекта.
А третья команда db.users.find() выводит на экран все объекты из бд test.
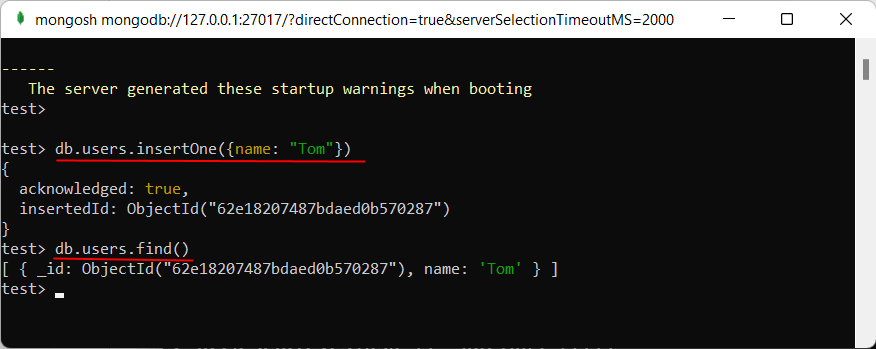
Из вывода вы можете увидеть, что к начальным значениям объекта было добавлено какое-то непонятно поле ObjectId . Как вы помните, MongoDB в качестве уникальных идентификаторов документа использует поле _id . И в данном случае ObjectId как раз и представляет значение для идентификатора _id.
Установка драйверов MongoDB
В дальнейшем в рамках данного руководства мы будет рассматривать взаимодействие с сервером MongoDB преимущественно через выше использованную оболочку mongo . Однако, мы также можем взаимодействовать с mongodb в наших приложениях, написанных на PHP, C++, C# и других языках программирования. И для этой цели необходим специальный драйвер.
На офсайте на странице https://docs.mongodb.com/ecosystem/drivers/ можно найти список драйверов для всех поддерживаемых языков программирования, в частности, для PHP, C, C++, C#, Java, Go, Python, Rust, Ruby, Scala, Swift, а также для Node.js.
Работа с драйверами на конкретных языках программирования будет рассмотрена в соответствующих разделах, посвященных этим языкам..
Как установить и запустить MongoDB на Windows 10

Установка и запуск MongoDB на Windows 10.
В первую очередь необходимо скачать MongoDB с официального сайта.
После перехода по ссылке на официальный сайт перед вами будет представлена форма, в которой необходимо указать требуемую версию системы управления базами данных, вашу версию операционной системы, тип устанавливаемого пакета и нажать кнопку «Download» для скачивания.

После того как файл будет скачан, приступаем к установке:
Начиная с версии 4.0, MongoDB можно настроить и запустить как службу Windows в процессе установки.
Сама служба MongoDB будет запущена после успешной установки.
Для запуска MongoDB как службы в процессе установки необходимо отметить checkbox с пунктом: «Install MongoD as service».
Так-же вы можете установить MongoDB со своими параметрами или оставить все по умолчанию.
Setting up a local MongoDB database
This page explains how to install and configure a MongoDB database server and the default mongo shell. This guide will cover how to install and set up these components on your computer for local access.
This guide will cover the following platforms:
Navigate to the sections that match the platforms you will be working with.
Prisma's MongoDB connector has recently been promoted to general availability! With this change, you can use the Prisma Client to manage production MongoDB databases with confidence.
Join us in celebrating this milestone on April 25-29 with our virtual MongoDB Launch week. There will be exclusive workshops, opportunities for Atlas credits, great swag, and much more!
Prisma is an open-source database toolkit for Typescript and Node.js that aims to make app developers more productive and confident when working with databases.
Setting up MongoDB on Windows
MongoDB provides a native Windows installer to install and configure your databases.
Visit the download page for the MongoDB Community Server and select the latest msi package available for Windows. Click Download to get the installer:

Once the download is complete, double click on the file to run the installer (you may have to confirm that you wish to allow the program to make changes to your computer):
Once the download completes, double click on the file to run the installer (you may have to confirm that you wish to allow the program to make changes to your computer):

Click Next on the initial page to continue.
On the next page, read and review the end-user license agreement and check the box confirming that you agree to the terms

Click Next to continue.
The next page allows you to choose which components you wish to install:

Choose the Complete installation to install all of the MongoDB components.
The next screen allows you to customize the installation location and other configuration items:

The default values should work well for most scenarios. Click Next when you are satisfied with your selections.
Next, choose whether you want to install MongoDB Compass, a graphical interface that you can use to connect to and manage MongoDB servers. This component is optional:

Click Next after making your decision.
The next screen indicates that the pre-installation configuration is complete and that MongoDB is ready to install:

Click Install to begin installing all of the MongoDB components on your computer.
Once the installation is complete, MongoDB Compass may open automatically. If so, you can ignore it for now.
Now that MongoDB is installed, we can run the server and connect to it using the included MongoDB shell. Both of these components are run from the command line.
In your start menu, type cmd and click on the Windows Command Prompt to launch a terminal session.
Before you run the server, you need to create the default directory where MongoDB stores its data: \data\db . You can create that directory by typing:

Afterwards, you can start up the MongoDB server by typing in the absolute path to the mongod.exe executable file. Part of the path contains the MongoDB version number that you installed, so your installation path may be slightly different than the one used below:

If everything is functioning correctly, the server will start up and output diagnostic information to the console. To verify that the startup was successful, look for a message that indicates that it is now accepting connections from clients:

To connect to your running MongoDB server, open another Command Prompt window. Similar to before, we need to type in the absolute path to the executable file.
In this case, we are trying to run the mongo.exe executable so, taking into account the differences in version numbers, the command should look something like this:

Once the shell connects to the server, it will print information about the connection and drop you into a MongoDB prompt:

To verify that the server is responding to commands, run the show dbs command:

If you installed the MongoDB Compass component, you can also connect to and manage your MongoDB server from a graphical interface.
Open up MongoDB Compass to begin.
The initial screen will give you the opportunity to connect to a running MongoDB server by providing a connection string:

If you click Connect without entering any information, Compass will automatically attempt to connect to a local MongoDB server running with the default configuration.
Click Connect to connect to the MongoDB server you are running.
Once Compass connects to your local server, it will display information about the databases within and allow you to manage your data using a friendly graphical interface:

When you are finished working with your MongoDB server, you can stop each of the components.
In MongoDB Compass, click the Connect menu and select Disconnect to drop the connection to your MongoDB server. Afterwards, you can safely close the MongoDB Compass application.
In the MongoDB shell, you can type exit to end your session.
To stop the MongoDB server, type CTRL — c to begin the shutdown process for the server component.
If you are looking to get started working with MongoDB and Prisma, checkout our getting started from scratch guide or how to add to an existing project.
Prisma is an open-source database toolkit for Typescript and Node.js that aims to make app developers more productive and confident when working with databases.
Setting up MongoDB on macOS
MongoDB provides a native macOS installer to install and configure your database.
Visit the download page for the MongoDB Community Server and select the latest .tgz file available for macOS. Click Download to get the installer:

Once the download completes, open a new terminal window and navigate to the location where you downloaded the MongoDB .tgz file.
Extract the contents of the .tgz file by typing:

Change into the extracted directory and then copy the executables to your /usr/local/bin directory so that they are a part of PATH that the operating system uses to search for executables:

Before you can start the MongoDB server, you need to create some of the directories that it will need.
First, create the MongoDB server data directory by typing:

Next, create a directory that MongoDB can use to store its logs:

Next, give your current user ownership over the new directories so that MongoDB can write to them when you run the server with your user:

Now that the directories that the MongoDB server needs are in order, you can run start the MongoDB server with the paths we created by typing:

Depending on your version of macOS, it's possible you will see a prompt stating that the execution of the MongoDB server has been blocked:

This is a security policy that is activated whenever an application is run that Apple does not recognize. You can allow an exception for your MongoDB server by going in to your System Preferences, clicking Security and Privacy and then clicking Allow Anyway next to the MongoDB server entry:

When you run the command again, another prompt will likely appear. However, this time, you have the option to allow the program to execute by clicking Open:

Now that the MongoDB server is running, you can start up the MongoDB shell to connect to and manage your server. To run the MongoDB shell, type:

Depending on your version of macOS, you may receive a notice that the execution was blocked again. If that's the case, go through the same procedure as before to allow an exception and confirm that you want to run the MongoDB shell.
When all goes well, the MongoDB shell will connect to your local MongoDB server and provide you with a MongoDB prompt:

To verify that the server is responding to commands, run the show dbs command:

You can also optionally install a graphical MongoDB manager called MongoDB compass. To install Compass, use the install_compass command that's been included in the MongoDB installation:

Occasionally, the installer will run into an error, as shown above, but usually it does not affect the actual installation.
The initial screen will give you the opportunity to connect to a running MongoDB server by providing a connection string:

If you click Connect without entering any information, Compass will automatically attempt to connect to a local MongoDB server running with the default configuration.
Click Connect to connect to the MongoDB server you are running.
Once Compass connects to your local server, it will display information about the databases within and allow you to manage your data using a friendly graphical interface:

When you are finished working with your MongoDB server, you can stop each of the components.
In MongoDB Compass, click the Connect menu and select Disconnect to drop the connection to your MongoDB server. Afterwards, you can safely close the MongoDB Compass application.
In the MongoDB shell, you can type exit to end your session.
To stop the MongoDB server, you can find and kill the MongoDB server process by typing:
Setting up MongoDB on Linux
Installation methods differ depending on the Linux distribution you are using. Follow the section below that matches your Linux distribution.
Debian and Ubuntu
The best way to install MongoDB on Ubuntu or Debian is to configure your system to use the repositories that MongoDB maintains.
First, download the MongoDB GPG key to your collection of trusted apt signing keys by typing:
Next, find and record the latest version of MongoDB available for your operating system by typing:
Afterwards, configure the apt repository appropriate for your operating system.
If you are running Ubuntu, type:
If you are running Debian, type this instead:
With the MongoDB apt repository configured, update the local package index and install MongoDB by typing:
Once the software is installed, you can start the MongoDB server by typing:
Optionally, you can also automatically start MongoDB on boot with the enable command:
Now that the MongoDB server is running, you can start up the MongoDB shell to connect to and manage your server. To run the MongoDB shell, type:
When all goes well, the MongoDB shell will connect to your local MongoDB server and provide you with a MongoDB prompt. To verify that the server is responding to commands, run the show dbs command:
When you are finished working with your MongoDB server, you can stop each of the components.
In the MongoDB shell, you can type exit to end your session.
To stop the MongoDB server, type:
The best way to download and install MongoDB on CentOS is to use the repositories maintained by the MongoDB.
First, find and record the latest version of MongoDB available for your operating system by typing:
Next, write the repository definition file using the version info you just queried. You can type the following command to write the repository file to the filesystem:
With the repository definition file in place, you can install the MongoDB server package by typing:
Once the software is installed, you can start the MongoDB server by typing:
Optionally, you can also automatically start MongoDB on boot with the enable command:
Now that the MongoDB server is running, you can start up the MongoDB shell to connect to and manage your server. To run the MongoDB shell, type:
When all goes well, the MongoDB shell will connect to your local MongoDB server and provide you with a MongoDB prompt. To verify that the server is responding to commands, run the show dbs command:
When you are finished working with your MongoDB server, you can stop each of the components.
In the MongoDB shell, you can type exit to end your session.
To stop the MongoDB server, type:
Prisma's MongoDB connector has recently been promoted to general availability! With this change, you can use the Prisma Client to manage production MongoDB databases with confidence.
Join us in celebrating this milestone on April 25-29 with our virtual MongoDB Launch week. There will be exclusive workshops, opportunities for Atlas credits, great swag, and much more!