Библиотека инструментов wxWidgets. Сборка
В продолжение поста (новости) wxWidgets. Мелочь, но приятно, ловите печеньку. 
Картинка взята с ресурса: ru.wikipedia.org, автор: Bryan Petty.
Выдержка из Wiki: wxWidgets — это кросс-платформенная библиотека инструментов с открытым исходным кодом для разработки кроссплатформенных на уровне исходного кода приложений, в частности для построения графического интерфейса пользователя (GUI).
Библиотека имеет набор классов для работы с графическими изображениями, HTML, XML документами, архивами, файловыми системами, процессами, подсистемами печати, мультимедиа, сетями, классы для организации многопоточности, отладки, отправки дампов и множество других инструментов.
Внимание! Под катом трафик!
Тройку лет назад заинтересовался кросс-платформенным программированием с использованием выше озаглавленной библиотеки. Каждый раз при сборке этой библиотеки возникало куча проблем. Проблемы не были связанны с тем, что библиотека имела какие-то существенные баги, а были связаны с тем, что при использовании подобных инструментов требующих компиляции (сборки), необходимо внимательно относится к сопровождающей литературе.
Если говорить понятным языком, то необходимо внимательно читать мануалы, readme-файлы , FAQ и т.д…
Хотя статей по сборке и использованию wxWidgets достаточно в сети, все равно считаю нужным поделится своим опытом, постараюсь объяснить шаги, которые приводят к положительному результату, и описать что к чему, чтобы разработчики только начинающие использовать wxWidgets в своих проектах, меньше наступали на грабли, и сразу перешли к использованию всех функциональных возможностей этой библиотеки.
И так, поехали.
Сборку библиотеки будем производить в операционной системе Windows 7 Professional x32 SP1 . Что касается других OS , то могу смело заявить, что сборка wxWidgets под Ubuntu Desktop 12.04 , не вызывает особых сложностей, все прекрасно собирается. Для сборки под GNU/Linux, можно воспользоваться этим мануалом.
В качестве IDE (редактора кода и автоматизации сборки), будем использовать Code::Blocks. Думаю многие уже о нем слышали, поэтому не будем вдаваться в подробности. Упомяну лишь, что C::B – достаточно мощный инструмент для написания больших приложений, и напрямую «заточен» под использование библиотеки инструментов wxWidgets , т.к. сам собран с использованием этой библиотеки.
1) Установка компилятора, средств отладки и предварительная настройка:
Средства отладки ( дебагер ), обычно устанавливаются по умолчанию вместе с компилятором, в случае компиляторов GCC и некоторых других, — это файл со скромным названием GDB .
Стоить отметить, что при установке MinGW , библиотека может собраться, но с очень малой вероятностью, скорее всего в конце сборки, после многоминутного ожидания, вы получите сообщение об ошибке вроде этой:
if not exist ..\..\lib\gcc_lib\mswud mkdir ..\..\lib\gcc_lib\mswud
g++ -c -o gcc_mswud\monolib_treectrl.o -g -O0 -mthreads -DHAVE_W32API_H -D__WXMSW__ -D_UNICODE -I..\..\lib\gcc_lib\mswud -I..\..\include -W -Wall -DWXBUILDING -I..\..\src\tiff\libtiff -I..\..\src\jpeg -I..\..\src\png -I..\..\src\zlib -I..\..\src\regex -I..\..\src\expat\lib -I..\..\src\stc\scintilla\include -I..\..\src\stc\scintilla\lexlib -I..\..\src\stc\scintilla\src -D__WX__ -DSCI_LEXER -DLINK_LEXERS -DwxUSE_BASE=1 -Wno-ctor-dtor-privacy -MTgcc_mswud\monolib_treectrl.o -MFgcc_mswud\monolib_treectrl.o.d -MD -MP ../../src/msw/treectrl.cpp
makefile.gcc:9395: recipe for target ‘gcc_mswud\monolib_treectrl.o’ failed
Переходим на официальный сайт компилятора TDM-GCC в раздел загрузки, скачиваем и устанавливаем последнюю стабильною версию соответствующую разрядности нашей операционной системы ( x32 или x64 ). В нашем случае это: tdm-gcc-4.8.1-3.exe .
Далее стандартная процедура: запускаем мастер установки, и устанавливаем компилятор с опциями по умолчанию.
Настройка компилятора заключается в том, что необходимо добавить в системную переменную окружения Path, путь к бинарным сборкам компилятора, если этого не сделал мастер установки по умолчанию. Обычно это: C:\TDM-GCC-32\bin (если директорией установки (распаковки) был выбран корневой каталог диска C:\ ); 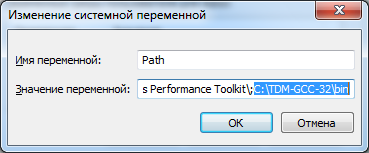
Проверка: Проверка работоспособности будет заключаться в следующих действиях: запускаем командную строку ( CMD ), и просто выполняем команду: mingw32-make -v соответственно видим версию сборки make — компоновщика. Должно появится чтото вроде этого:

2) Загрузка, распаковка и сборка библиотеки wxWidgets :
Переходим на официальный сайт библиотеки wxWidgets в раздел загрузки, скачиваем и распаковываем последнюю стабильною версию библиотеки для OS Windows . В нашем случае это: wxMSW-Setup-3.0.0.exe ( Windows Installer ).
Далее стандартная процедура: запускаем мастер распаковки, и распаковываем библиотеку с опциями по умолчанию.
Предварительная настройка компилятора заключается в том, что необходимо добавить системную переменную окружения WXWIN , которая будет содержать путь к корневому каталогу библиотеки. Обычно это: C:\wxWidgets-3.0.0 (если директорией установки (распаковки) был выбран корневой каталог диска C:\ ); 
Собственно приступаем к сборке. Запускаем командную строку ( CMD ), и выполняем по порядку следующие команды (дожидаясь завершение выполнения каждой):
Процесс сборки будет похож на этот скриншот: 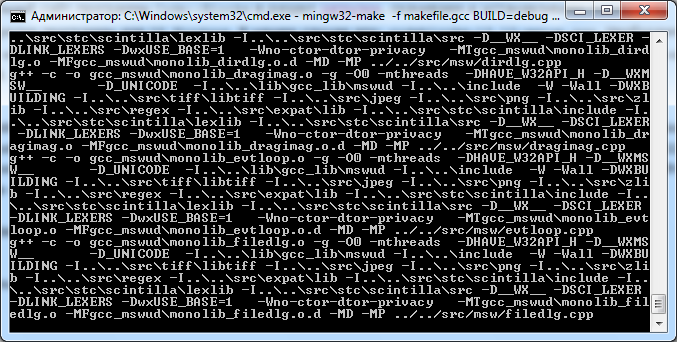
3) Загрузка, установка и настройка IDE Code::Blocks :
Переходим на официальный сайт программы Code::Blocks в раздел загрузки, скачиваем и устанавливаем последний стабильный бинарный релиз программы для OS Windows . В нашем случае это: codeblocks-13.12-setup.exe . Необходимо загружать версию без компилятора, т.к. компилятор мы установили ранее, и скорее всего он «свежее» компилятора который идет в поставке с C::B .
FAQ, Note: The codeblocks-13.12mingw-setup.exe file includes the GCC compiler and GDB debugger from TDM-GCC (version 4.7.1, 32 bit). The codeblocks-13.12mingw-setup-TDM-GCC-481.exe file includes the TDM-GCC compiler, version 4.8.1, 32 bit. While v4.7.1 is rock-solid (we use it to compile C::B), v4.8.1 is provided for convenience, there are some known bugs with this version related to the compilation of Code::Blocks itself.
IF UNSURE, USE «codeblocks-13.12mingw-setup.exe»!
Далее стандартная процедура, запускаем мастер установки, и устанавливаем программу с опциями по умолчанию.
Настройки среды разработки сводятся к настройке компилятора по умолчанию. Обычно при первом запуске C::B сам выдаст диалог для выбора основного компилятора из всех найденных (выбираем TDM-GCC ), но иногда этот диалог может не появлятся. Тогда запускаем C::B и переходим по пунктам главного меню к настройкам компилятора: Settings—>Compiler Вкладка: Toolchain executables и по анологии со скриншотом настраиваем C::B . 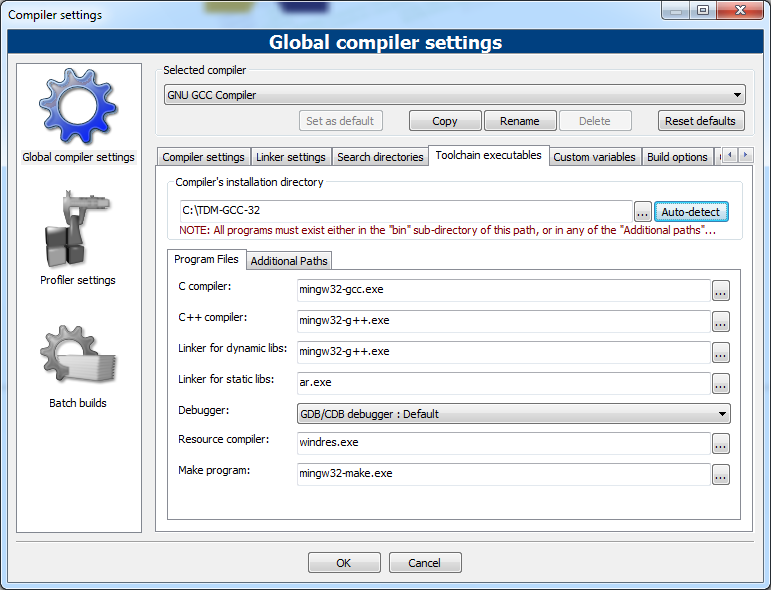
Проверка: Для проверки работоспособности среды разработки и проверки правильной настройки компиляторов, необходимо в C::B создать тестовый консольный проект, следующим образом:
1) Запускаем C::B (если он не запушен ранее);
2) Переходим по пунктам меню: File—>New—>Project в открывшимся диалоге ( Project ) выбираем Console application и нажимаем кнопку [ Go ];
3) Следуем подсказкам диалога предварительной настройки проекта, задаем параметры проекта (имя, расположение и т.д), нажимаем кнопку [ Next ] затем [ Finish ];
Открылся редактор кода проекта. Если нет то Выбираем пункты главного меню: View—>Manager , View—>Toolbars—>Compiler . Открываем исходный код в дереве менеджера main.cpp ,
должен быть такой код: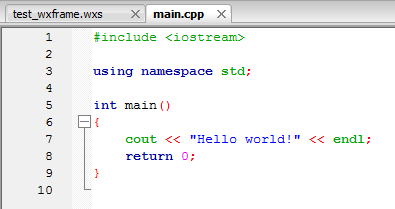
если необходимо редактируем.
4) Выбираем пункт главного меню: Build—>Build and Run , и наблюдаем наше скомпилированное приложение: 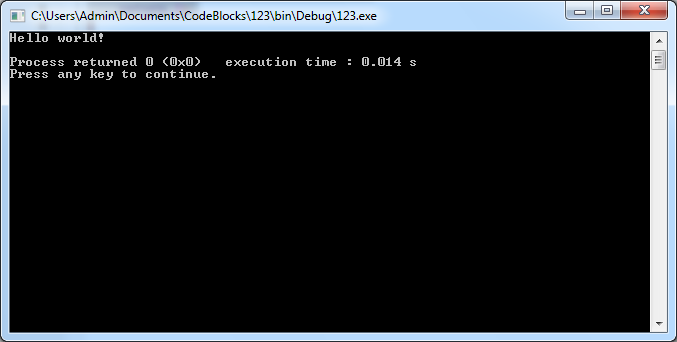
4) Создание тестового проекта с использованием wxWidgets :
Запускаем C::B если он не был запущен, и переходим по пунктам главного меню: File—>New—>Projects из всех типов создаваемого проекта, выбираем wxWidgets project , нажимаем кнопку [ Go ]. 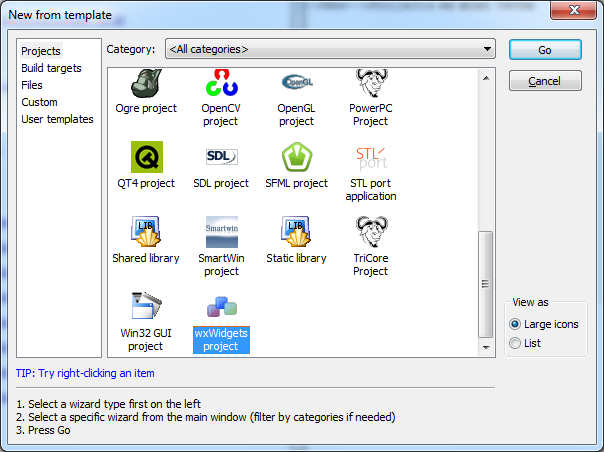
В появившимся окне предварительной настройки проекта, следуем подсказкам, а именно:
1) Нажимаем кнопку [ Next ];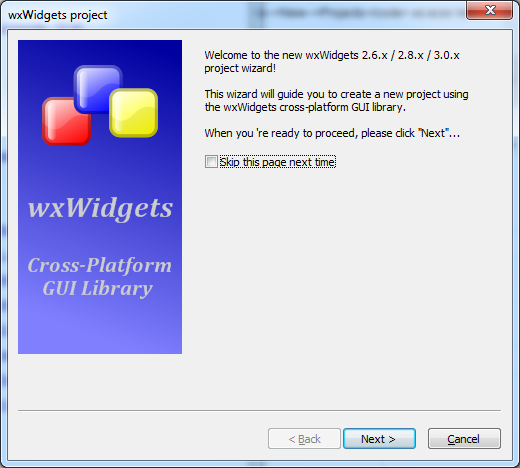
2) Выбираем тип используемой библиотеки wxWidgets 3.0.x , нажимаем кнопку [ Next ];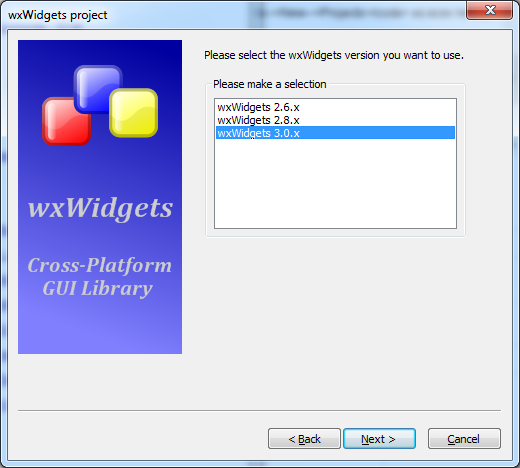
3) Задаем параметры проекта имя, путь к исходникам и т.д., нажимаем кнопку [ Next ];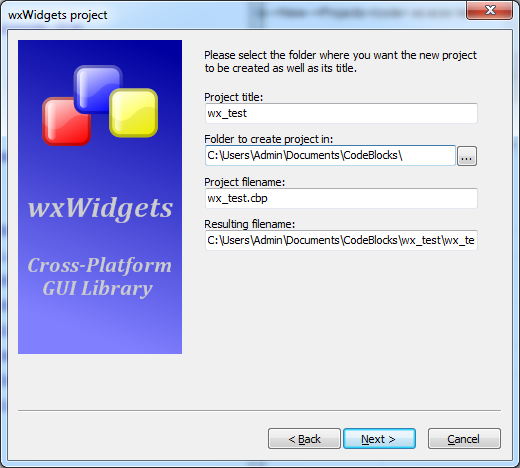
4) Задаем авторов проекта (это можно пропустить), нажимаем кнопку [ Next ];
5) Выбираем дизайнер форм wxSmith (т.к. wxFormBuilder — у нас предварительно не установлен), также выбираем тип создаваемого приложения Frame Based , нажимаем кнопку [ Next ];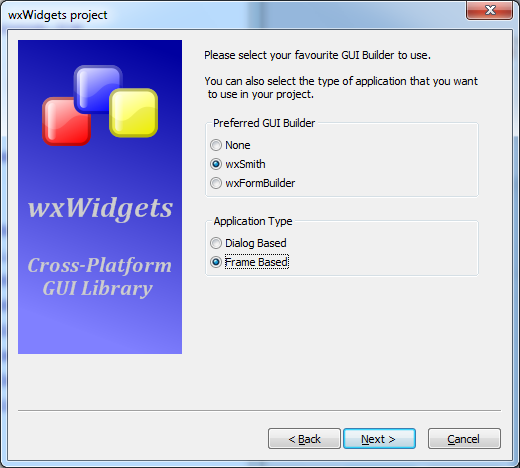
6) Очень внимательно отнесемся к локальной переменной, и вместо $(wx) зададим $(WXWIN) , нажимаем кнопку [ Next ];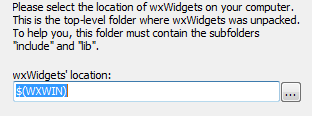
7) выбираем компилятор (обычно по умолчанию) нажимаем кнопку [ Next ];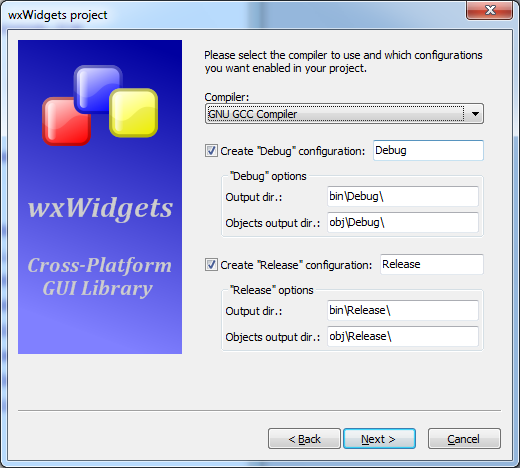
8) в случае нашей сборки (статической-не монолитной), параметры следующего окна должны быть такими: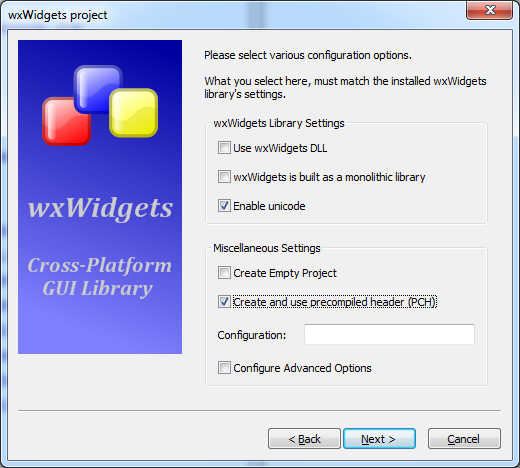
нажимаем кнопку [ Next ] и соглашаемся с диалогами.
9) Выбираем необходимые нам классы с которыми мы хотим работать.
В зависимости от способа сборки, статическая-динамическая, монолитная и ли нет следующего окна может не быть.
нажимаем кнопку [ Finish ];
Глобальные переменные проекта должны быть настроены следующим образом ( Settings—>Global variables ): 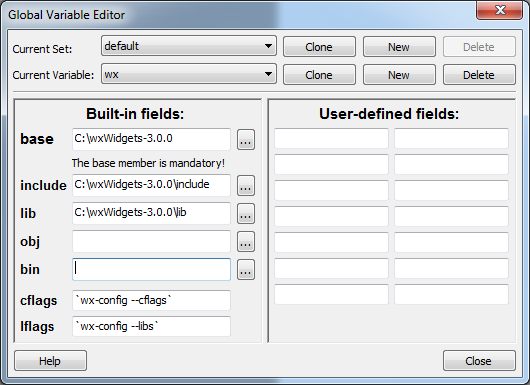
Настройки проекта должны выглядеть примерно так ( Project—>Build options ):
Окно Project build options ( wx_test ) [Вкладка Compiler settings — Other options ]:
Окно Project build options ( wx_test ) [Вкладка Linker settings ]: 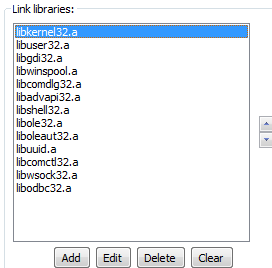
Окно Project build options ( wx_test ) [Вкладки Search directories — Compiler и Resource compiler ]:
Окно Project build options ( Debug ) [Вкладка Linker settings ]: 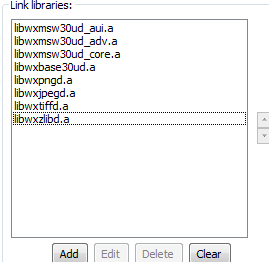
Окно Project build options ( Debug ) [Вкладки Search directories — Compiler и Resource compiler ]:
Окно Project build options ( Debug ) [Вкладки Search directories — Linker ]:
Окно Project build options ( Release ) [Вкладка Linker settings ]: 
Окно Project build options ( Release ) [Вкладки Search directories — Compiler и Resource compiler ]:
Окно Project build options ( Release ) [Вкладки Search directories — Linker ]:
Далее сохраняем настройки путем нажатия кнопки [ Ок ] в форме настройки сборки проекта Project build options .
Скомпилируем (собирем) наше приложение ( Build —> Build and run ): 
Вопрос/Проблема:
Global Variable Edition
Settings -> Compiler and Debugger -> Compiler Settings tab -> Compiler Options
Ответ/Решение:
base: C:\wxWidgets-2.9.4
include: C:\wxWidgets-2.9.4\include
lib: C:\wxWidgets-2.9.4\lib
cflags: `wx-config —cflags`
lflags: `wx-config —libs`
Other options:
`wx-config —cxxflags`
`wx-config —cflags`
`wx-config —libs`
что касается путей. вообще, если ты создашь wxWidgets проект в Code::Blocks, ты увидишь, что в настройках он вместо перечисления хедеров и библиотек указывает команды:
`wx-config —cflags` — в настройках компилятора
`wx-config —libs` — в настройках линкера
так вот: wx-config — это скрипт. если ты наберёшь эти команды в обычной консоли, то увидишь, что они генерируют целую последовательность флагов и файлов. у wx-config есть хэлп: wx-config —help. там описаны все вариации вызова этого скрипта. обрати внимание на опцию static.
Бывают и неприятности. Например линовка может выдавать следующую ошибку:
rem gcc_mswudll\monodll_xh_combo.o: file not recognized: Memory exhausted
rem collect2.exe: error: ld returned 1 exit status
rem mingw32-make.exe: *** [..\..\lib\gcc_dll\wxmsw28u_gcc.dll] Error 1
Проявляется на некоторых 32 битных платформах при компоновке монолитной динамической библиотеки из-за нехватки памяти. Из-за того, что линковщик собранный для x86 архитектуры, не может использовать адреса выше 2Гб, даже на x86_64 архитектуре. Поэтому смена компилятора обычно не помогает, перепробованы MinGW4.4.1TDM, всё семейство MinGW4.6.x, а также MinGW4.7.0, хотя в сети есть информация, что собирается под TDM-GCC 4.5.2 sjlj.
Для компиляции в этом случае необходимо указать опцию компилятора -fno-keep-inline-dllexport:
mingw32-make -f makefile.gcc CXXFLAGS=»-fno-keep-inline-dllexport» BUILD=release SHARED=1 MONOLITHIC=1 UNICODE=1
Ещё можно использовать опцию —large-address-aware для линковщика(можно и для компилятора), но при этом надо настраивать ОС.
Также обойти проблему можно не используя монолитную сборку, или отказавшись от создания динамических библиотек для монолитной сборки, статические собираются без этой ошибки.
Upd:
Ошибки рода: This file requires compiler and library support for the ISO C++
2011 standart. This support is currently experimental, and the —std=c++11 or -std=gnu++11 compiler options.
This file requires compiler and library support for the…
Решаются явным указанием стандарта при сборке библиотеки (добавление опции):
CXXFLAGS=»-std=gnu++11″
Upd1: вероятно в последних релизах MinGW баги пофиксили, теперь можно смело собирать при помощи указанного компилятора, соблюдая те же (описанные) правила.
p/s.
Пост ориентирован прежде всего на начинающую аудиторию программистов, и не в коем случае не претендует на истину в последней инстанции.
В следующих постах опишу как «правильно» собрать библиотеку компьютерного зрения OpenCV.
PBfordev/wxpbguide
This Microsoft Windows specific guide hopes to assist the readers with decisions regarding which wxWidgets version and configuration to use and show how to build wxWidgets using MinGW with various parameters affecting the resulting build. It also describes in detail setting-up a wxWidgets project in popular IDE Code::Blocks.
This guide is not a reference manual, it is a tutorial for new users of wxWidgets, MinGW, and Code::Blocks; supposed to be followed step by step.
Current Guide Version
4.0, released April 20, 2022
Versions of Software Used in Guide
MinGW: MSYS2 mingw-w64-x86_64-toolchain (GCC 11.2 at the time of writing)
This guide does not cover actual wxWidgets programming nor using Code::Blocks (besides the steps necessary to set up a wxWidgets project).
I suggest viewing this guide in a proper PDF viewer (such as Adobe Acrobat Reader), since GitHub’s PDF viewer seems not to support displaying navigable table of contents or clicking on internal cross-references.
About
PB’s Guide to Starting with wxWidgets on Microsoft Windows with MinGW and Code::Blocks
WxWindowsQuickRef
When downloading an official Code::Blocks release, you have the option of downloading a bundle package that includes a full MinGW/GCC toolchain.
- Path properly defined — Ensure that the folder containing the compiler executables (typically C:\Program Files\CodeBlocks\bin, or C:\MinGW32\bin) is in your Windows PATH environment variable.
Contents
Download wxWidgets Source Code
wxWidgets is distributed in source code format, and you need to compile it into a library before you can use it in your own programs.
The current recommended version of wxWidgets to use is 2.8.12. Click here to download the wxWidgets 2.8.12 sources for Windows (wxMSW-2.8.12-Setup.exe; 12.2 MB). You can check the wxWidgets download page to see if a newer stable version is available. It is highly recommended that you install the sources to a path without spaces. You should choose a volume with at least 300 MB of free space.
wxPack is no longer recommended for use, as it is built with a much older version of GCC.
Build wxWidgets
- Open up a command prompt for building. If you are using MinGW/GCC, simply use the standard Windows command shell (open the Start menu, click «Run. «, enter «cmd» and hit OK). If you are using MSVC, you should use the special command shell which sets up the correct environment variables for you. If you use a version of MSVC which required you to download the Platform SDK separately, ensure that whichever command environment you use includes the Platform SDK tools and paths as well as the standard compiler tools and paths.
- Change to the wxWidgets build directory (where <wxWidgets> is the path you extracted the sources to; typically C:\wxWidgets-2.8.12):
Note: the /D flag after cd may be omitted from the command; it simply allows command prompt to change drives if necessary.
- Execute the build command. The recommended command to use for MinGW/GCC is:
- The recommended command to use for MSVC is:
- This step will generally take a long time; faster PCs may expect 30-minute build times, and slower PCs can take as much as several hours.
- If using more recent versions of GCC, many warnings will occur during the build. This can slow the build process noticeably; you may want to redirect the warnings to a text file by appending «2>errlog.txt» to the build command, or supress them entirely by appending «2>nul».
- If the build is successful, gcc dlls will be placed at ../lib/gcc_dll/wxmsw<version>_gcc_custom.dll
The «CXXFLAGS=-fno-keep-inline-dllexport» option is necessary with recent versions of GCC (not with MSVC), to prevent problems with memory usage when performing the final link step on the monolithic DLL.
See the section below titled «wxWidgets build options explained» for details on the meaning of the BUILD, SHARED, MONOLITHIC, and UNICODE options. These options are critically important, because they define the basic wxWidgets development environment you will be using. You must duplicate them exactly when running Code::Blocks’ wxWidgets project wizard.
Create a wxWidgets project in Code::Blocks
- On the Code::Blocks Start Page, select «Create a new project»; alternatively, open the File menu, highlight «New» and select «Project. «
- Select «wxWidgets project»
- The first page is an introduction, which you can choose to skip in the future.
- Select which version of wxWidgets you will be using. If you followed the instructions above, you should select «wxWidgets 2.8.x».
- Set your project title and location.
- Enter author details if you wish (not required).
- At this point wiki member WardXmodem’s gives a «select your GUI options» — can someone detail their meanings?
- Select options for automatic code and file generation.
- Select wxWidgets’ location. It’s highly recommended that you use a global variable for this: enter «$(#wx)» (without quotes). If you haven’t already defined this global variable, the global variables dialog will appear; for the base path, select your wxWidgets installation location. You don’t need to fill in the other paths.
- Select debug and/or release configurations for your project. The debug configuration at least is recommended.
- Choose your wxWidgets build options. These must match the options used when you built wxWidgets! If you followed the directions above, select all three of the options under «wxWidgets Library Settings». The other settings on this page are not related to the wxWidgets build options; you may use them or not as you prefer. In order to avoid using a debug wxWidgets build (as recommended), you must select «Configure Advanced options» and then leave «Use __WXDEBUG__ and Debug wxWidgets lib» unchecked on the next page.
- Select additional libraries if required. You should not need to select any of these for normal usage.
Build and Run
Select «Build and run» (F9) to, well, build and run. If all goes well, your wxWidgets basic program should appear.
wxWidgets Build Options Explained
What do the BUILD, SHARED, MONOLITHIC, and UNICODE options mean?
BUILD
BUILD controls whether a debug version (BUILD=debug) or release version (BUILD=release) of wxWidgets itself is built. In the vast majority of cases you will only need a release version of wxWidgets, since you won’t be interesting in debugging wxWidgets itself. You can still create debug builds of your own programs that link to a release build of wxWidgets.
- A debug build of wxWidgets creates libraries with a «d» suffix — for example, «libwxmsw28d.a»/»wxmsw28d_gcc_custom.dll».
- A debug build of wxWidgets creates the folder «mswd» or «mswud» in the wxWidgets library output folder.
- A release build of wxWidgets creates libraries without the «d» suffix — for example, «libwxmsw28.a»/»wxmsw28_gcc_custom.dll».
- A release build of wxWidgets creates the folder «msw» or «mswu» in the wxWidgets library output folder.
SHARED
SHARED controls whether a DLL (SHARED=1) or static (SHARED=0) version of wxWidgets is built. With a DLL build, compile times are faster and the executable size is smaller. The total size of a single executable plus the wxWidgets DLL is greater, but multiple executables can use the same DLL.
- A DLL build of wxWidgets creates import libraries (such as libwxmsw28.a) and DLLs (such as wxmsw28_gcc_custom.dll). You must include the DLL when you distribute your program.
- A static build of wxWidgets creates static libraries only (such as libwxmsw28.a), and you do not need to distribute a wxWidgets DLL.
MONOLITHIC
MONOLITHIC controls whether a single library (MONOLITHIC=1) or multiple component libraries (MONOLITHIC=0) are built. With a monolithic build, project setup and development are much easier, and you only have one DLL to distribute if you’re using a DLL build. With a non-monolithic (multilib) build, several different libraries are built and you can avoid linking with the entire wxWidgets codebase for programs that don’t need it. You do have to ensure that you choose the correct component libraries.
- A monolithic build of wxWidgets creates a single wxWidgets import library (such as libwxmsw28u.a) and a single DLL (such as wxmsw28_gcc_custom.dll).
- A multilib build of wxWidgets creates multiple import libraries (libwxbase28u.a, etc.) and multiple DLLs.
- Additional static libraries are always created with any wxWidgets build (libwxexpat.a, libwxjpeg.a, etc.). These libraries do not normally need to be used with DLL builds of wxWidgets, but they are required when using static builds.
UNICODE
UNICODE controls whether wxWidgets and your program use wide-character strings with Unicode support. Most programs for Windows 2000 and later should do so. Earlier versions of Windows don’t have the necessary Unicode support. You should always use wxWidget’s _(«string») and _T(«string») macros to ensure that your hardcoded strings are the correct type.
- A Unicode (UNICODE=1) build of wxWidgets creates libraries with a «u» suffix — for example, «libwxmsw28u.a»/»wxmsw28u_gcc_custom.dll».
- A Unicode build of wxWidgets creates the folder «mswu» or «mswud» in the wxWidgets library output folder.
- An ANSI (UNICODE=0) build of wxWidgets creates libraries without the «u» suffix — for example, «libwxmsw28.a»/»wxmsw28_gcc_custom.dll».
- An ANSI build of wxWidgets creates the folder «msw» or «mswd» in the wxWidgets library output folder.
Frequently Asked Questions
I get errors like «wx/setup.h: No such file or directory»
You’re missing an important compiler search path in your build options. Make sure you choose the correct wxWidgets build configuration when running the wxWidgets project wizard. If re-running the wizard isn’t an option, then open your project’s build options and add «$(#wx.lib)\gcc_dll\mswu» (assuming a monolithic Unicode DLL build) or «$(#wx.lib)\gcc_lib\mswu» (assuming a multilib Unicode build)to the compiler search paths.
I get errors like «cannot find -lwxmsw28u»
You have an incorrect link library in your build options. Make sure you choose the correct wxWidgets build configuration when running the wxWidgets project wizard. If re-running the wizard isn’t an option, determine which version of the library is built and adjust the library name in your build options accordingly.
I get errors like «undefined reference to _Unwind_*»
wxWidgets was built with a different version of GCC than the one you’re currently using. You need to rebuild wxWidgets with the same version of GCC that you use to compile your program.